We all know that DevOps brings together people, processes, and technology. In the Microsoft DevOps world A large part of the technology piece is utilizing Visual Studio Team Services (VSTS) for continuous deployment of workloads to Azure.
Microsoft launched their Hybrid Cloud on July 10th 2017. Azure Stack is the secret sauce of Microsoft’s the Hybrid Cloud. Microsoft’s offering is the only one true Hybrid Cloud in the market bringing Azure to on-premises data centers.
As Microsoft continues to move their Hybrid Cloud forward the DevOps integration and capabilities we have for Azure extend to Azure Stack. Again I was fortunate to participate in a preview of the VSTS integration with Azure Stack. I was happy to see Microsoft putting a priority on this functionality because DevOps on Azure Stack is a HUGE need. Cloud is often the catalyst to helping organizations adopt a DevOps culture fostering digital transformation. Some organizations not being able to put all workloads in public cloud Azure Stack is a good way for them to get the same cloud capabilities on-premises DevOps integration being one of them. The setup and integration between VSTS and Azure Stack is working nicely. The team at Microsoft has given me permission to share about this topic via my blog.
In this blog post I am going to cover setting up VSTS to work with Azure and setting up a continuous-integration and-continuous deployment (CI/CD) pipeline to Azure Stack. With Microsoft DevOps you can utilize the pieces of VSTS that make sense for you to use leaving the control up to you. Through VSTS you can use many other DevOps tools such as Jenkins, Octopus deploy, GitHub, Bitbucket etc into your pipeline making Azure Stack just as flexible as Azure is. Let’s Jump in!
Steps to prep Azure Stack for Visual Studio Team Services (VSTS)
#1 Ensure you have installed the Azure Stack PowerShell and Azure PowerShell modules.
Details can be found here:
https://docs.microsoft.com/en-us/azure/azure-stack/azure-stack-powershell-install
#2 Add the Azure Stack environment using the following syntax
# Navigate to the downloaded folder and import the **Connect** PowerShell module
Set-ExecutionPolicy RemoteSigned
Import-Module PATH\AzureStack.Connect.psm1
# Register an AzureRM environment that targets your Azure Stack instance
Add-AzureRMEnvironment `
-Name “AzureStackAdmin” `
-ArmEndpoint “https://adminmanagement.local.azurestack.external“
# Set the GraphEndpointResourceId value
Set-AzureRmEnvironment `
-Name “AzureStackAdmin” `
-GraphAudience “https://graph.windows.net/“
# Get the Active Directory tenantId that is used to deploy Azure Stack
$TenantID = Get-AzsDirectoryTenantId `
-AADTenantName “YOURDOMAIN.onmicrosoft.com” `
-EnvironmentName “AzureStackAdmin”
# Sign in to your environment
Login-AzureRmAccount `
-EnvironmentName “AzureStackAdmin” `
-TenantId $TenantID
NOTE: You will need the environment name and the tenant ID for the next script.
#3 Create SPN
Original SPN creation script can be found here:
https://github.com/Microsoft/vsts-rm-documentation/blob/master/Azure/SPNCreation.ps1
Documentation on creating an SPN can be found here:
https://www.visualstudio.com/en-us/docs/build/concepts/library/service-endpoints#sep-azure-rm
Below I will display the script I used. Note that you will need the following parameters for the script:
$subscriptionName
“Enter Azure Stack Subscription name. You need to be Subscription Admin to execute the script”)]
$password
“Provide a password for SPN application that you would create”
$environmentName
“Provide Azure Stack environment name for your subscription”
$AzureStackTenantID
“Provide tenant ID from when Azure Stack enviroment was added”
EXAMPLE:
.\CreateSPN.ps1 -subscriptionName “Default Provider Subscription” -password PASSWORDHERE -environmentName AzureStackAdmin -AzureStackTenantID ID HERE
Here is the script I used that you can run:
param
(
[Parameter(Mandatory=$true, HelpMessage=”Enter Azure Stack Subscription name. You need to be Subscription Admin to execute the script”)]
[string] $subscriptionName,
[Parameter(Mandatory=$true, HelpMessage=”Provide a password for SPN application that you would create”)]
[string] $password,
[Parameter(Mandatory=$false, HelpMessage=”Provide a SPN role assignment”)]
[string] $spnRole = “owner”,
[Parameter(Mandatory=$false, HelpMessage=”Provide Azure Stack environment name for your subscription”)]
[string] $environmentName,
[Parameter(Mandatory=$false, HelpMessage=”Provide tenant ID from when Azure Stack enviroment was added”)]
[string] $AzureStackTenantID
)
#Initialize
$ErrorActionPreference = “Stop”
$VerbosePreference = “SilentlyContinue”
$userName = $env:USERNAME
$newguid = [guid]::NewGuid()
$displayName = [String]::Format(“VSO.{0}.{1}”, $userName, $newguid)
$homePage = “http://” + $displayName
$identifierUri = $homePage
#Initialize subscription
$isAzureModulePresent = Get-Module -Name AzureRM* -ListAvailable
if ([String]::IsNullOrEmpty($isAzureModulePresent) -eq $true)
{
Write-Output “Script requires AzureRM modules to be present. Obtain AzureRM from https://github.com/Azure/azure-powershell/releases. Please refer https://github.com/Microsoft/vsts-tasks/blob/master/Tasks/DeployAzureResourceGroup/README.md for recommended AzureRM versions.” -Verbose
return
}
Import-Module -Name AzureRM.Profile
Write-Output “Provide your credentials to access Azure subscription $subscriptionName” -Verbose
Login-AzureRmAccount -SubscriptionName $subscriptionName -EnvironmentName $environmentName -TenantId $AzureStackTenantID
$azureSubscription = Get-AzureRmSubscription -SubscriptionName $subscriptionName
$connectionName = $azureSubscription.SubscriptionName
$tenantId = $azureSubscription.TenantId
$id = $azureSubscription.SubscriptionId
#Create a new AD Application
Write-Output “Creating a new Application in AAD (App URI – $identifierUri)” -Verbose
$azureAdApplication = New-AzureRmADApplication -DisplayName $displayName -HomePage $homePage -IdentifierUris $identifierUri -Password $password -Verbose
$appId = $azureAdApplication.ApplicationId
Write-Output “Azure AAD Application creation completed successfully (Application Id: $appId)” -Verbose
#Create new SPN
Write-Output “Creating a new SPN” -Verbose
$spn = New-AzureRmADServicePrincipal -ApplicationId $appId
$spnName = $spn.ServicePrincipalName
Write-Output “SPN creation completed successfully (SPN Name: $spnName)” -Verbose
#Assign role to SPN
Write-Output “Waiting for SPN creation to reflect in Directory before Role assignment”
Start-Sleep 20
Write-Output “Assigning role ($spnRole) to SPN App ($appId)” -Verbose
New-AzureRmRoleAssignment -RoleDefinitionName $spnRole -ServicePrincipalName $appId
Write-Output “SPN role assignment completed successfully” -Verbose
#Print the values
Write-Output “`nCopy and Paste below values for Service Connection” -Verbose
Write-Output “***************************************************************************”
Write-Output “Connection Name: $connectionName(SPN)”
Write-Output “Subscription Id: $id”
Write-Output “Subscription Name: $connectionName”
Write-Output “Service Principal Id: $appId”
Write-Output “Service Principal key: <Password that you typed in>”
Write-Output “Tenant Id: $tenantId”
Write-Output “***************************************************************************”
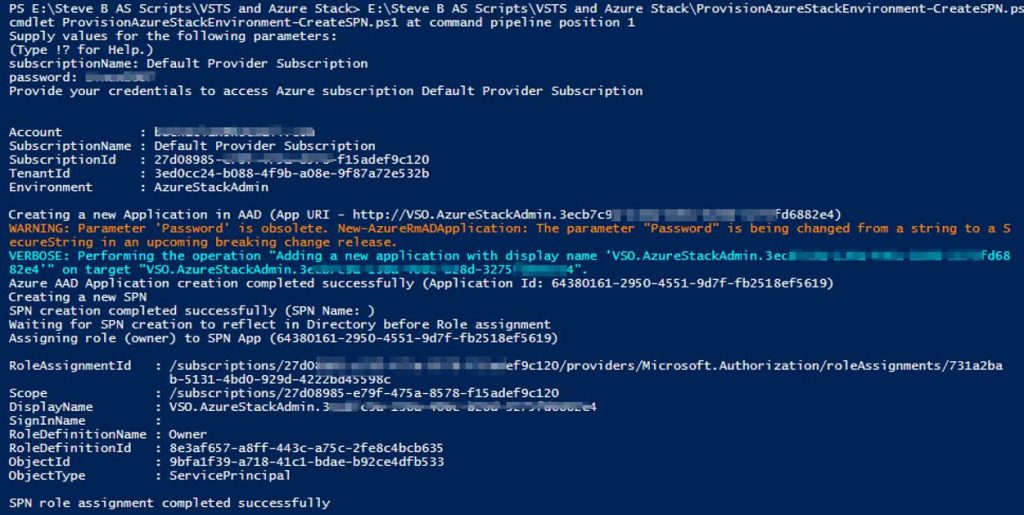
Output should be similar to this:
You will use information from the Service Connection output in the next step.
Steps to configure Azure Stack as a Service Endpoint in VSTS
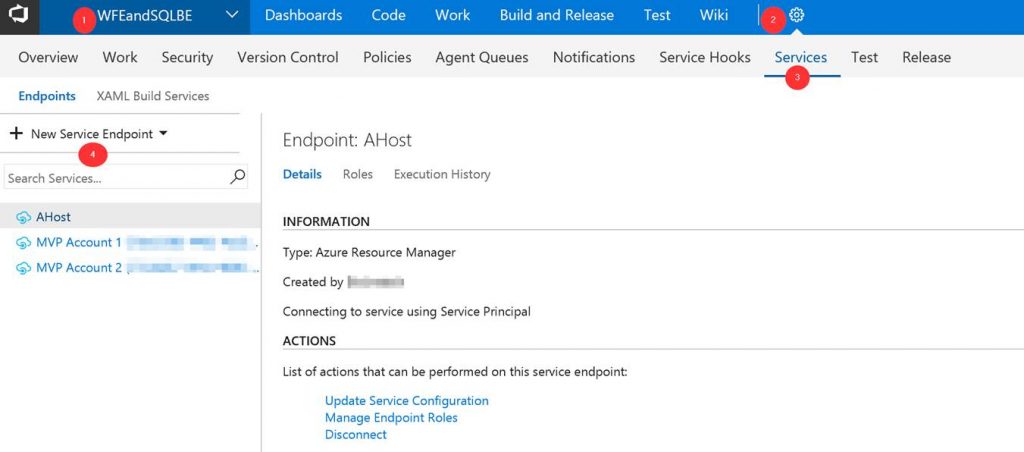
Log into your VSTS account at visalstudio.com
Navigate to one of your projects.
Go into Settings.
Click on Services.
Click on New Service Endpoint
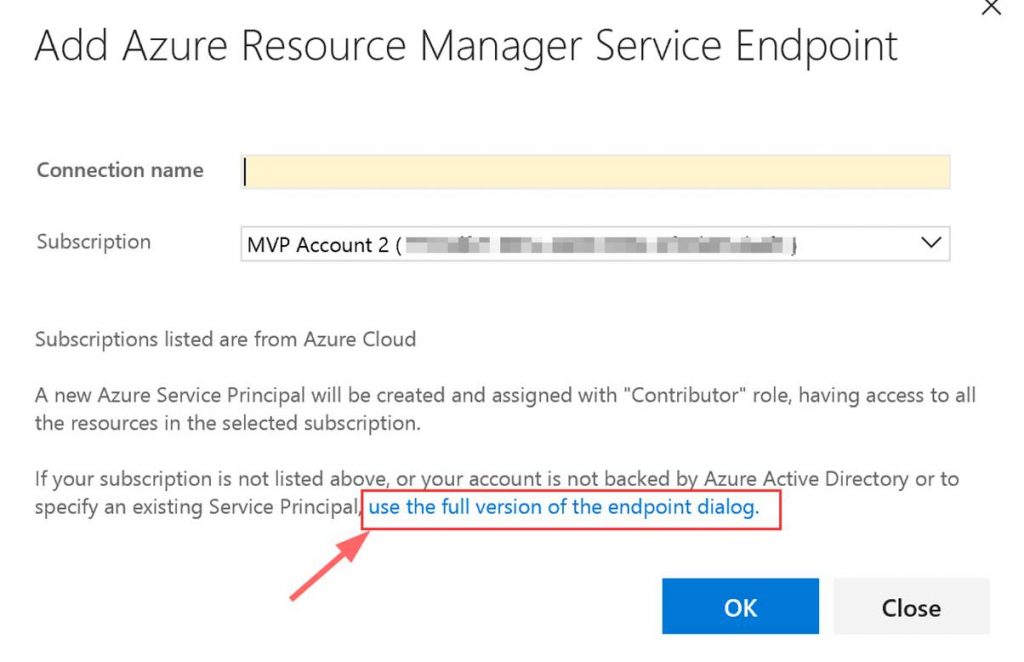
A window will pop up. Click on “use full version of the endpoint dialog.”
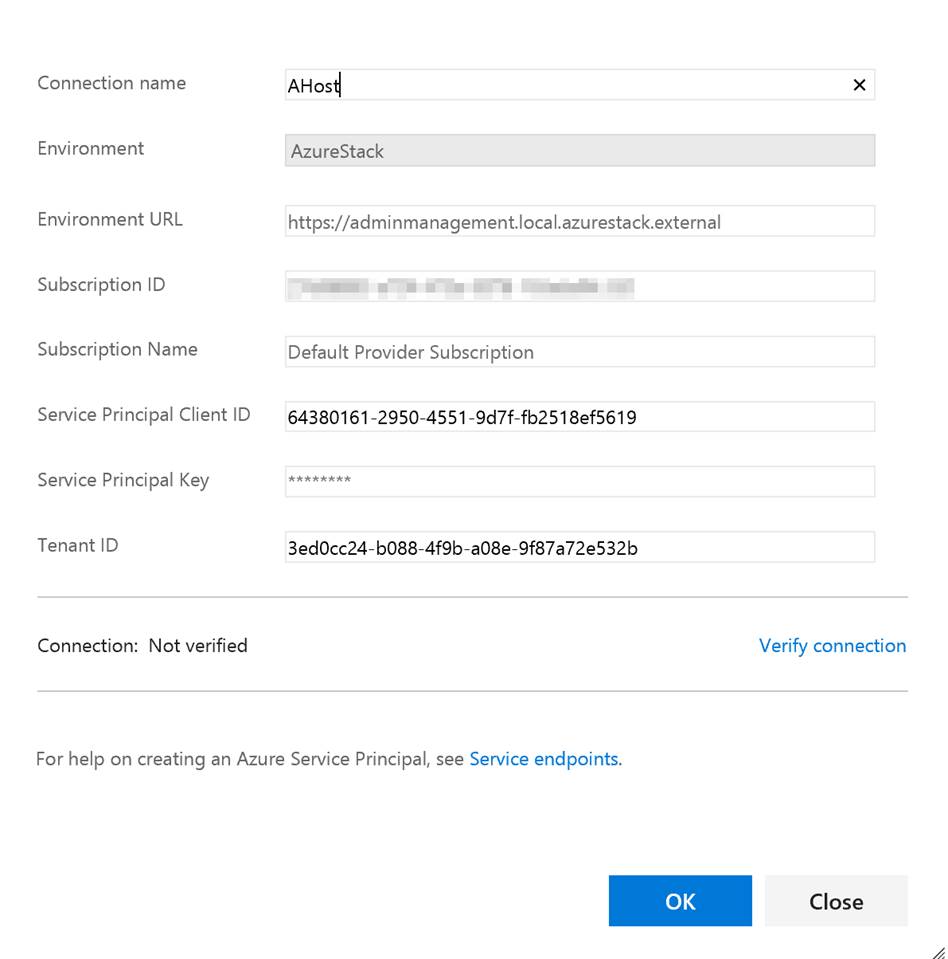
Next input the needed data. This data comes from the Service Connection info that you copied.
You can put whatever you want in the Connection name and the Subscription Name. Note do not verify the connection. It will not succeed as VSTS cannot access your private Azure Stack yet. Click OK when done.
Setup build agent on Azure Stack host
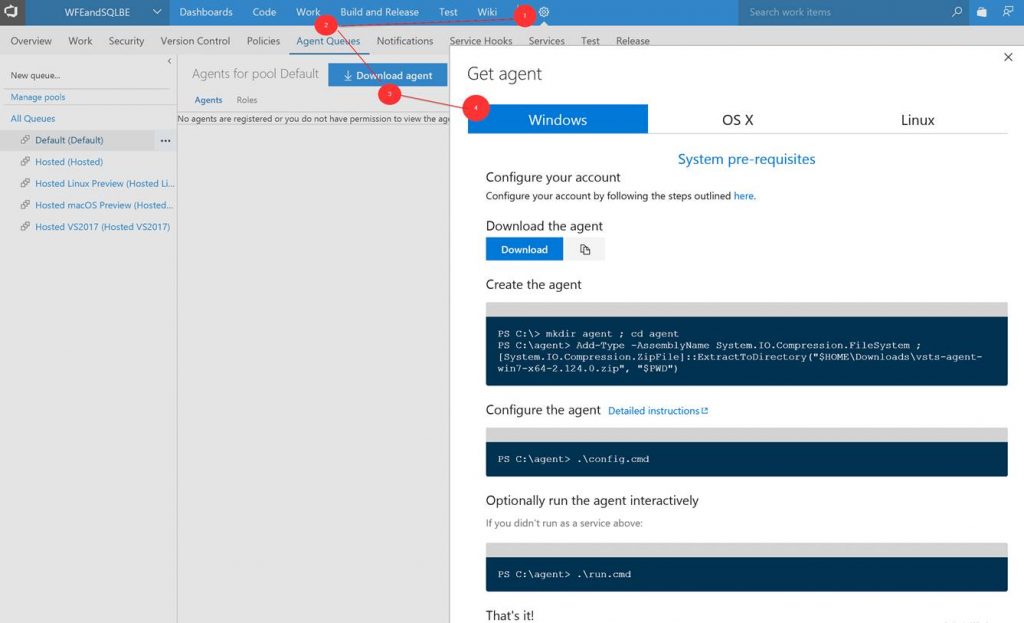
Next you need to setup the build agent on the Azure Stack host. (Note: In this post I am using the ASDK.) From within VSTS download the Windows agent. Extract the download to a local folder.
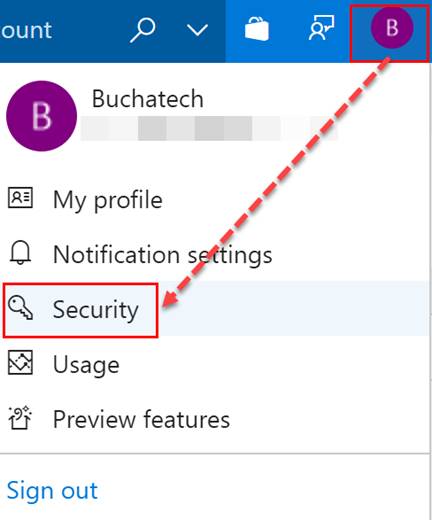
Go to Security under your profile in VSTS.
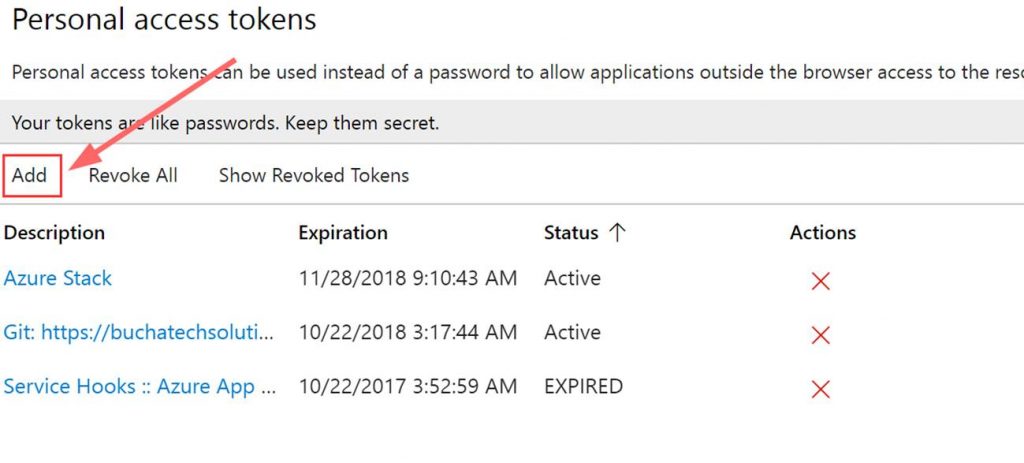
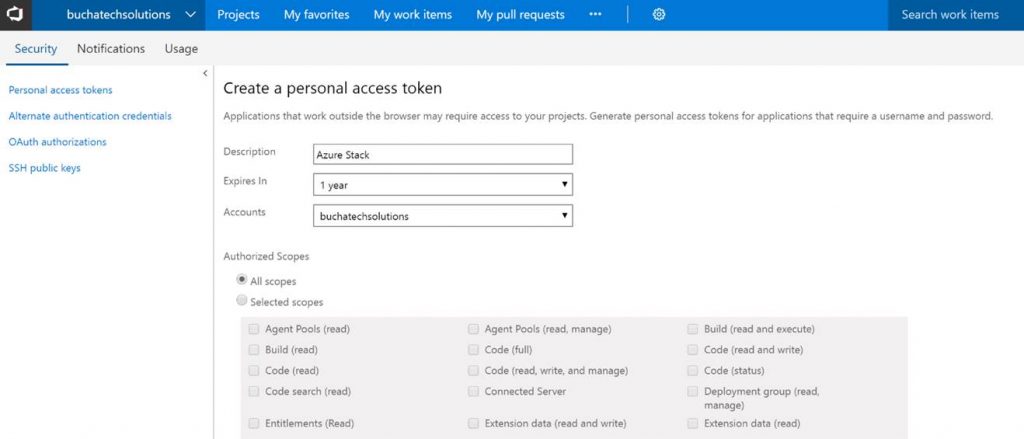
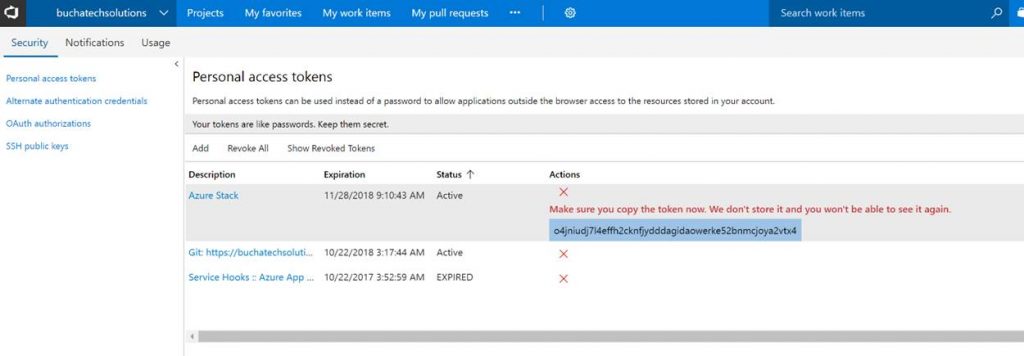
Next add a Personal access token (PAT) for Azure Stack.
Copy the token. Note it will not be shown again ever after you leave this screen.
In the folder with the extracted build agent you will see the following. We need to run the run.cmd file from an elevated command prompt.

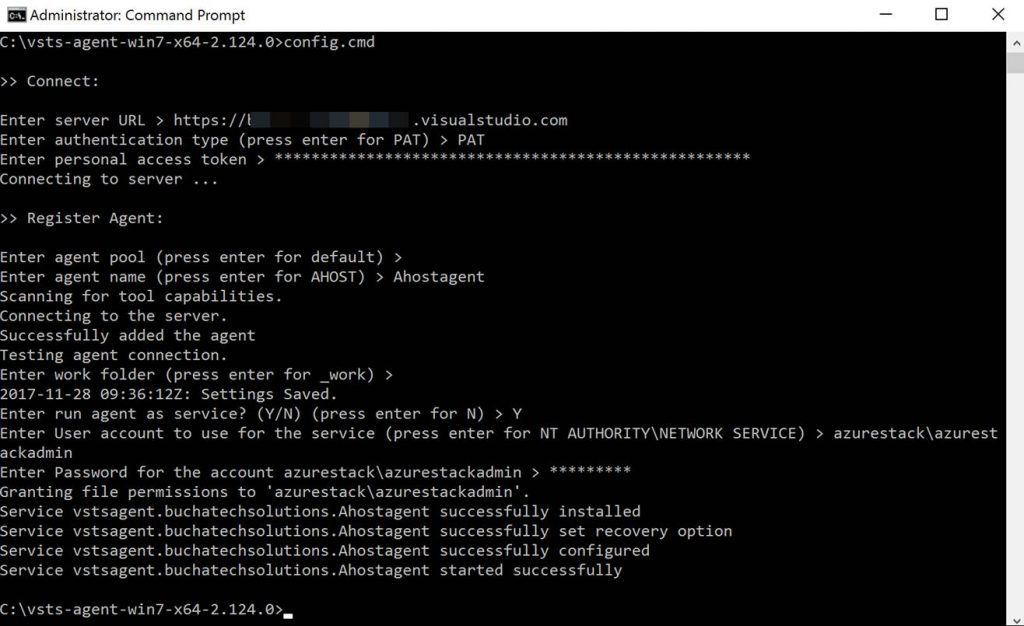
Here is a screenshot of running the run.cmd. I recommend deploying the build agent as a service. You will use your personal access token (PAT) here and the azure stack admin account.
After the run.cmd finished the folder with the extracted contents should look like the following:
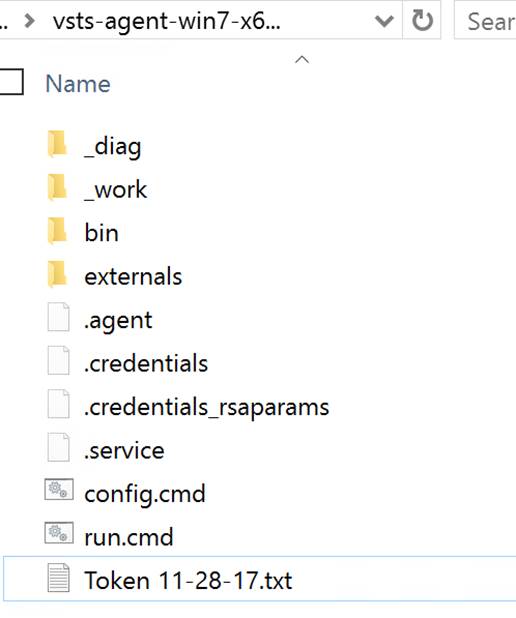
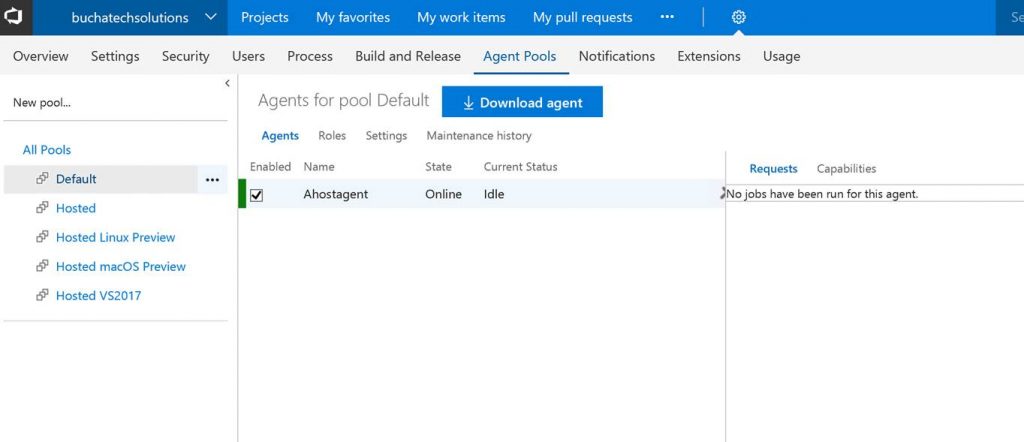
You can now see the agent in VSTS.
That’s it for the setup for connecting VSTS to Azure Stack. Next let’s look at setting up a continuous-integration and-continuous deployment (CI/CD) pipeline for VM-deployment to Azure Stack.
THE BUILD
What I cover here is focused on infrastructure as code (IaC) using ARM templates. If you need to set up CI/CD to Azure Stack for Web Apps, Mobile Apps, Containers, etc the process is the same as it is on Azure with the only difference being that you point to Azure Stack. Also note that in this post I am using the ASDK not multi-node.
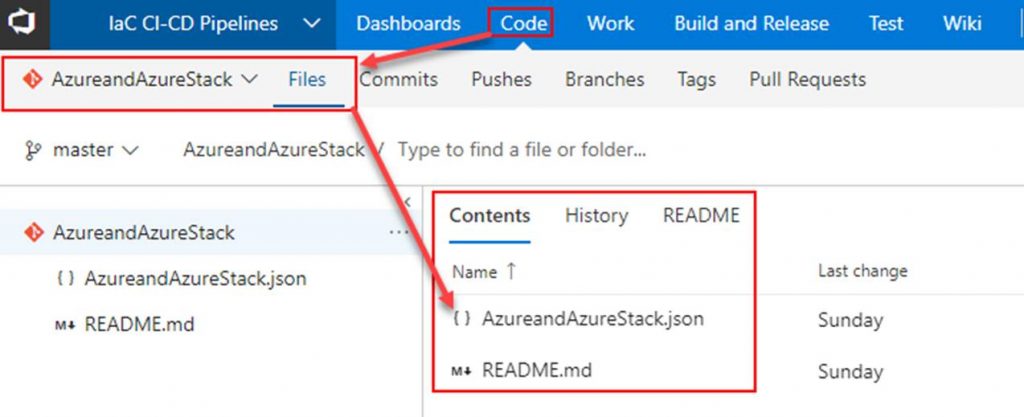
Within VSTS create a new repository and place your ARM template in it.
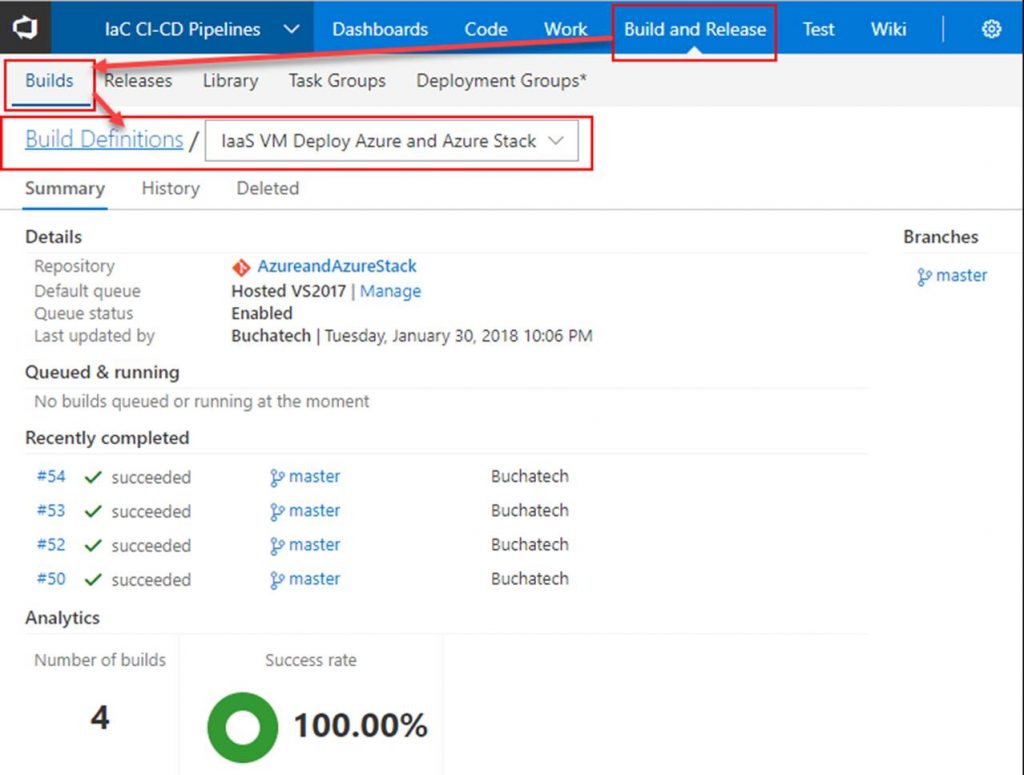
Next click on Build and Release. Create a new Build Definition.
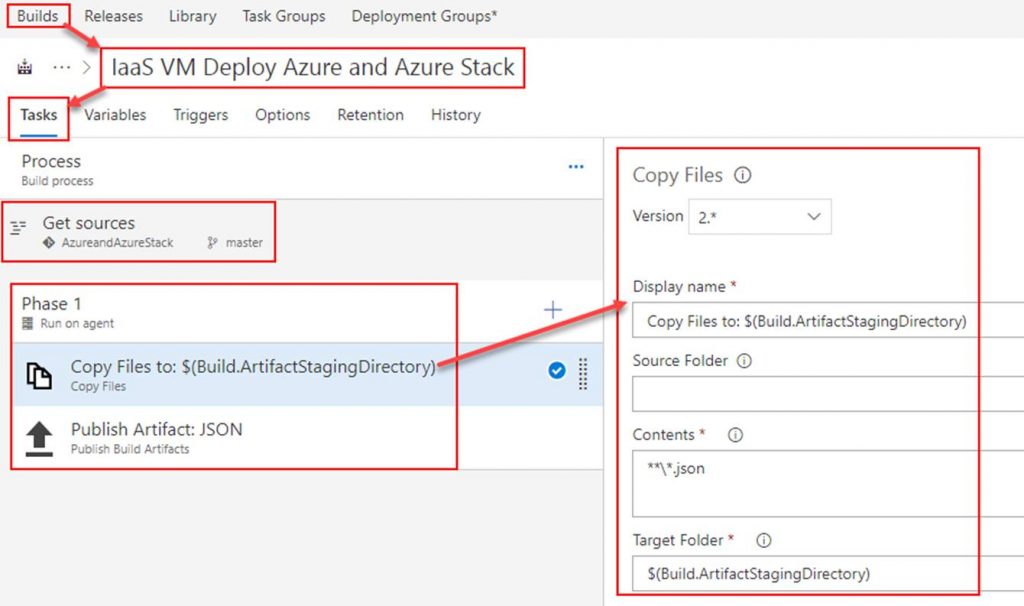
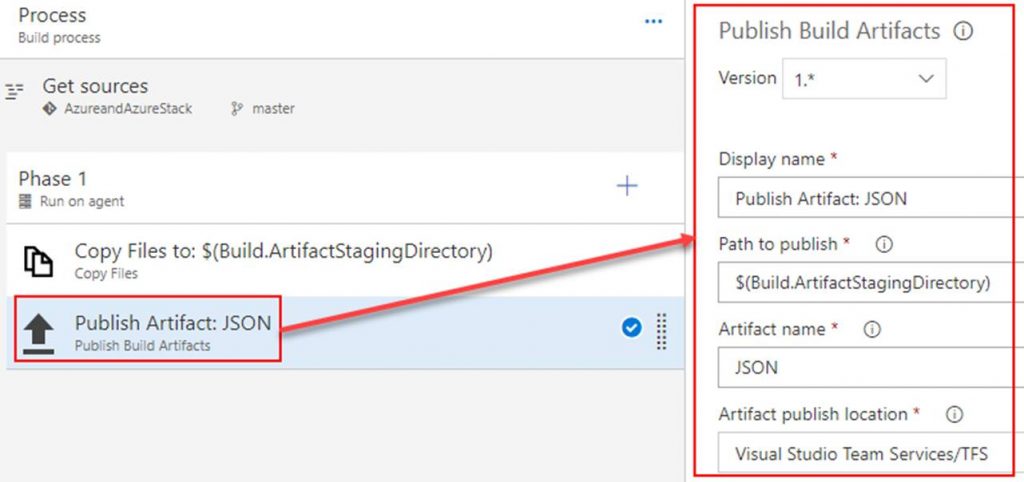
In the build definition. Point the Get sources to the repository you just created. Add 2 tasks under Phase 1. The first task will copy the ARM template to the build staging directory. The second task will publish the ARM template so that a release definition can pick it up. Both tasks are shown in the following screenshots.
Copy Files to task
Publish Artifact task
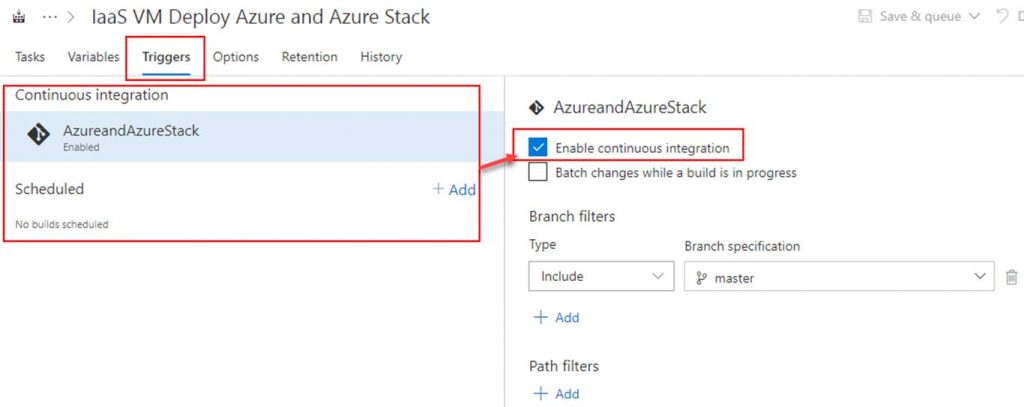
OPTIONAL: To setup continuous integration click on Triggers. Here you can set a schedule to run the builds or you can click on the repository as shown in the screenshot and then check Enable continuous integration. By checking the box next to Enable continuous integration it tells VSTS that anytime content in the repo is changed to run a build.
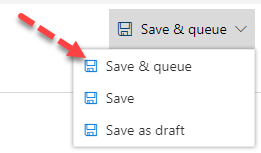
Click on Save & queue. This will start the build.
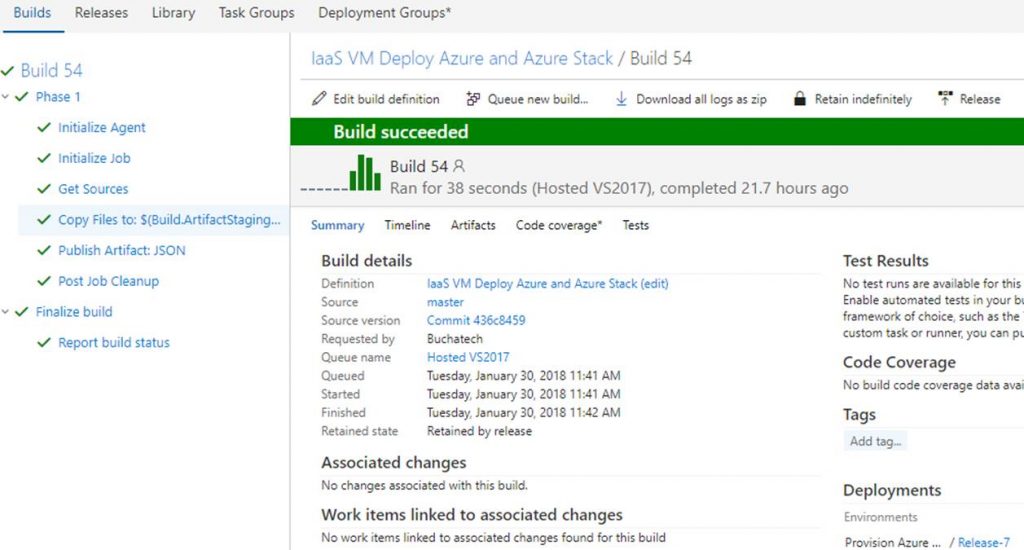
The build will start. As long as everything is setup properly within your build it will succeed as shown in the following Screenshot.
That’s all for our build. Next up we need to create a release definition (RD) pipeline. The RD will take the build artifacts and deploy to an environment/s you specify.

