Speaking at Microsoft Ignite 2020

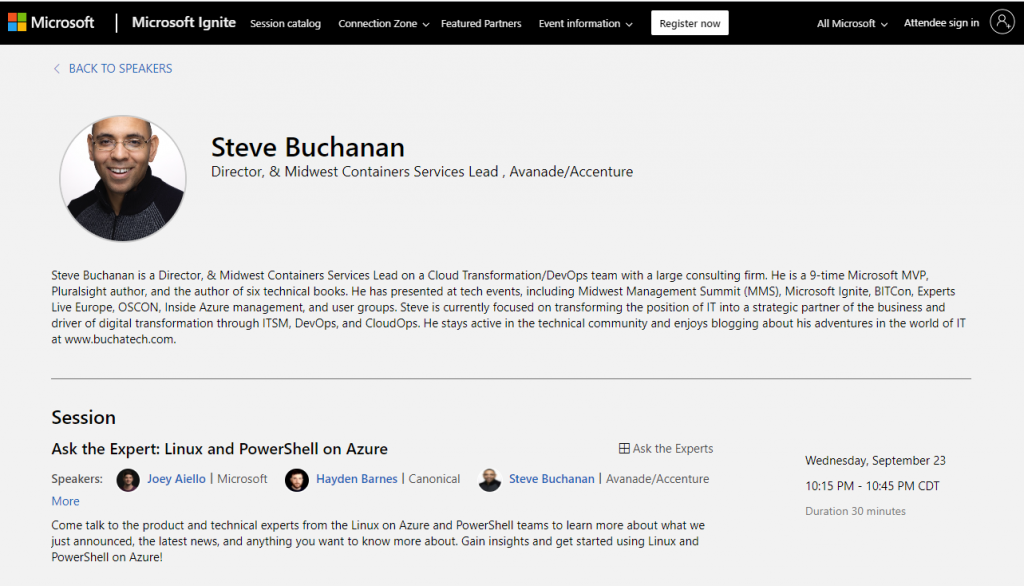
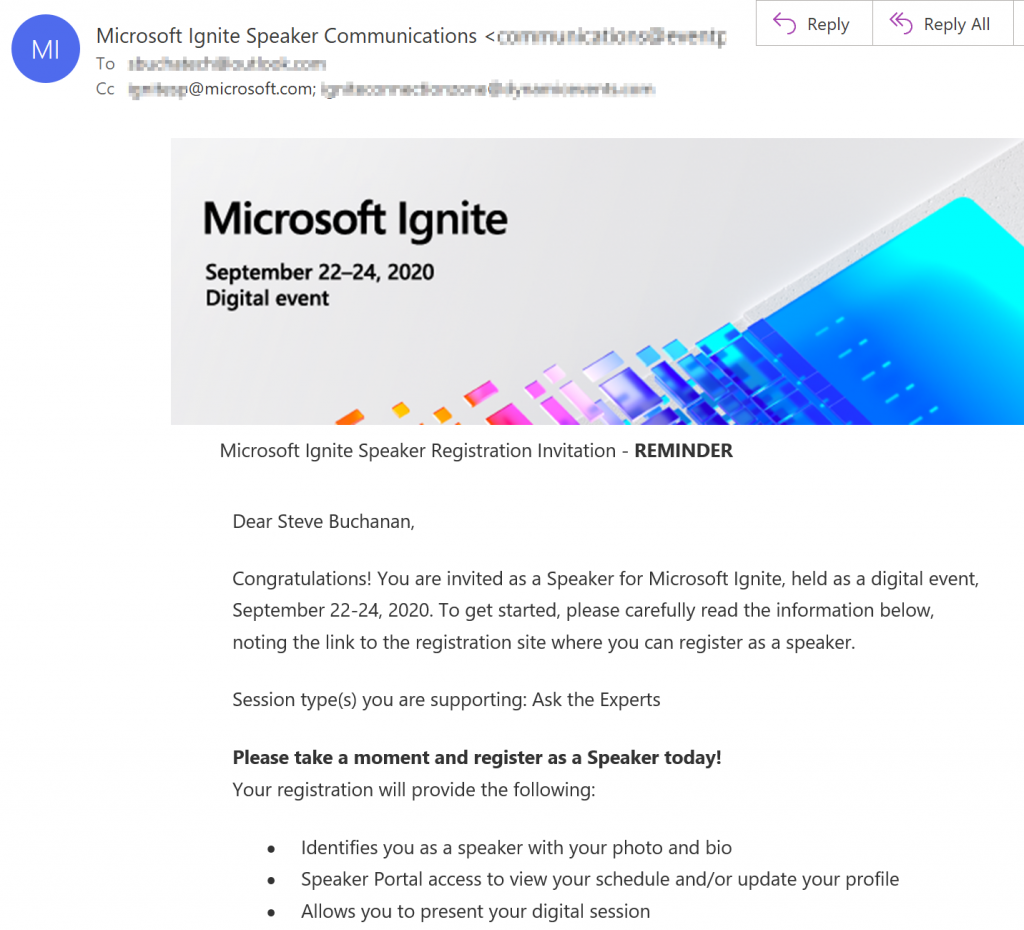
I am excited to announce that I am one of the experts in several Ask the Expert sessions during Microsoft Ignite 2020 this week.

I will be a part of a variety of sessions with topics ranging from Linux and PowerShell on Azure, Kubernetes on Azure, Azure Migration, and Transforming Windows Server workloads in Azure.

My Speaker profile:

https://myignite.microsoft.com/speaker/ce1ea0e0-3f42-4986-90ab-aee809e3735d

The sessions are:

Here is the link to the Ignite home page myignite.microsoft.com. I hope to see you on the digital Ignite event and in one of the Ask the Expert Sessions!

Update 9/30/2020

Being a part of several Ask the Expert sessions was really fun! My most memorable session was the Ask the Expert: Linux and PowerShell on Azure session.

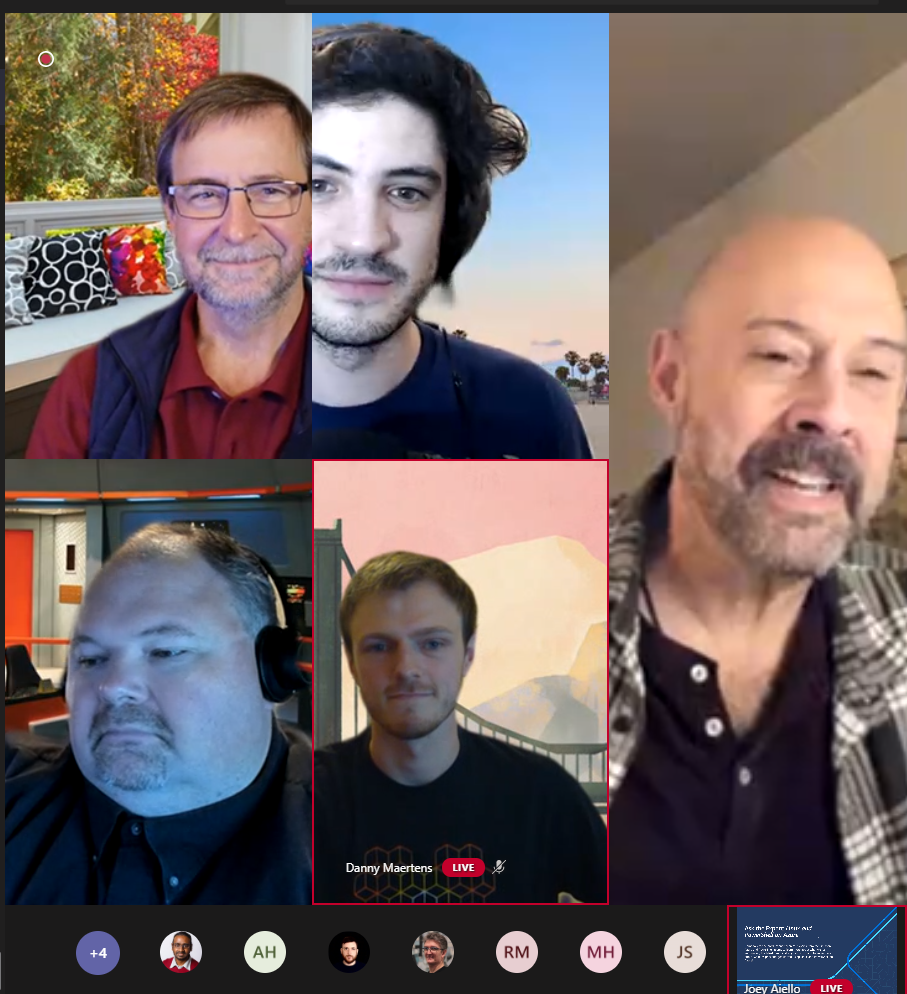
This session was packed full of superstars from Microsoft product groups and fellow MVPs including; Jeffery Snover, Jason Helmick, Janaka Rangama, and Alexander Nikolić. Here is a screenshot from the session:

After the session, I tweeted about the session and shared some wisdom about PowerShell, and both Jeffery Snover and Jason Helmick retweet my tweet!

2020 is not all bad. It’s pretty cool when the inventor of PowerShell and the PowerShell Program Manager retweet you!

Read more

Delete Azure App Registrations Script

When working in my Azure labs I tend to end up with a lot of Azure App Registrations. Recently I had hundreds and hundreds of them in the directory. Its been a while since I cleaned this up. I needed to clean this out and did not want to do this manually through the portal. PowerShell to the rescue.

I pulled together a script that will place your app registrations in a variable. It will then loop through the app registrations to remove them. Note you will be prompted with a confirmation to remove each one.

You can download the script here: https://github.com/Buchatech/Delete-Azure-App-Registrations-

Read more

Azure Policy evaluation on-demand PowerShell Script

Last year I wrote a blog post on how to use the modify effect in Azure Policy to enforce multiple tags. Here is the link to that full walk-through post: https://www.buchatech.com/2019/09/walk-through-use-azure-policy-modify-effect-to-require-tags/

In that blog post, I called out an Azure Policy on-demand evaluation PowerShell script I wrote. This PowerShell script will trigger Azure Policy to run the evaluation right away so you don’t have to wait for the next time Azure Policy will run the evaluation.

This is especially helpful when you are developing Azure Policies and you want to see if they are working properly or not. You can run the on-demand evaluation PowerShell script in Azure Cloud Shell at https://shell.azure.com/.

Well, that brings us to the end of this blog post. I wanted to make a short blog post for this script so that it would be easier to find.

You can get the policy evaluation trigger script on my GitHub here: Az Policy evaluation Trigger v1.ps1

Read more

Azure & Azure Stack Resource Group Cleanup Script

When building things in Azure & Azure Stack I tend to create a lot of temporary resources groups. I like to remove these when I am done. I have been using a PowerShell script for a while to help make this easier. I have decided to upload this script hoping others will find it useful as well. The script is named CleanupResourceGroups.ps1 and can be downloaded here:
https://gallery.technet.microsoft.com/Cleanup-Azure-Resource-d95fc34e

The script can be used two ways:

#1 the script can be run using -Like with an expression like where {$_.ResourceGroupName -like (‘*MySQL*’) in which the script would remove any resource group with MySQL in it. To use this option just un-comment the code in SECTION 1- Uses -Like, change MySQL to whatever you want, comment SECTION 2- Interactive RG selection code, and then run the script.

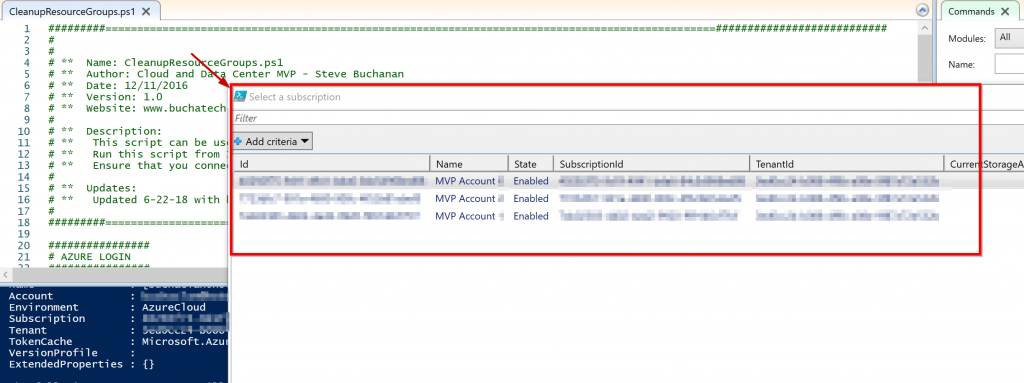
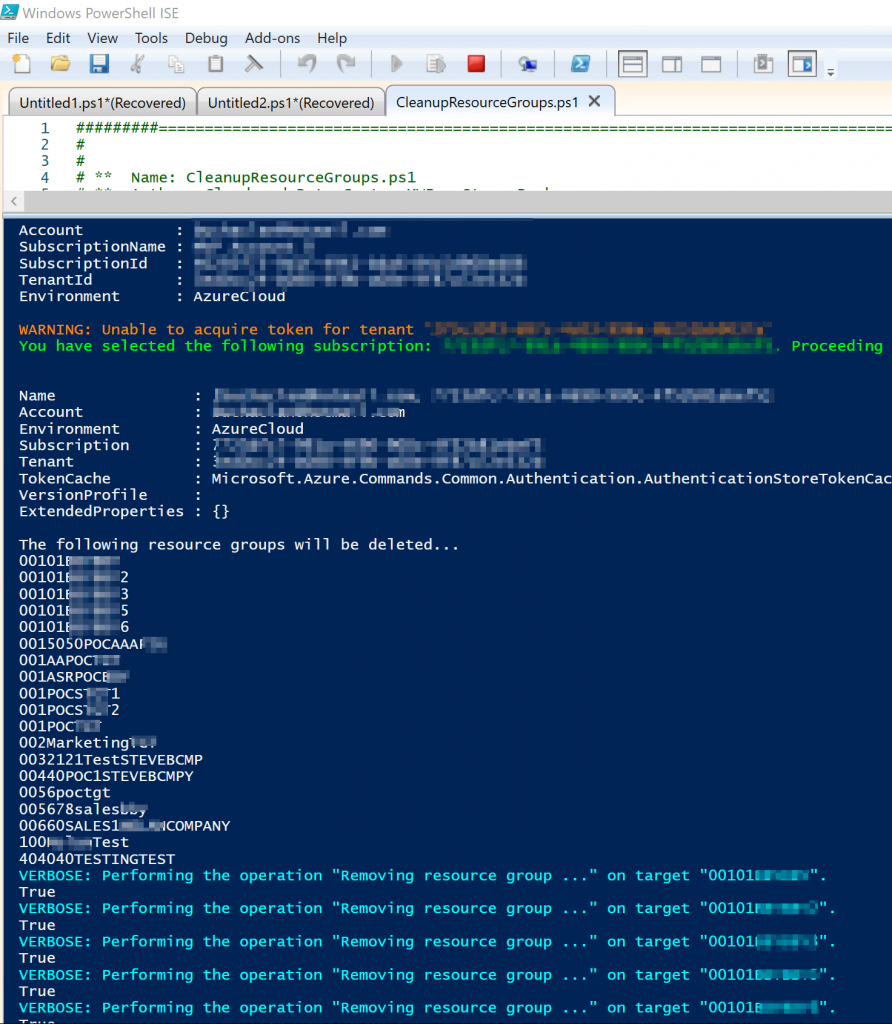
#2 the script can be run interactively allowing you to select multiple resource groups you want to remove. By default the SECTION 2- Interactive RG selection code is un-commented. If you run the script it will run interactively as shown in the following steps/screenshots.

After running the script it will prompt you to select an Azure subscription.

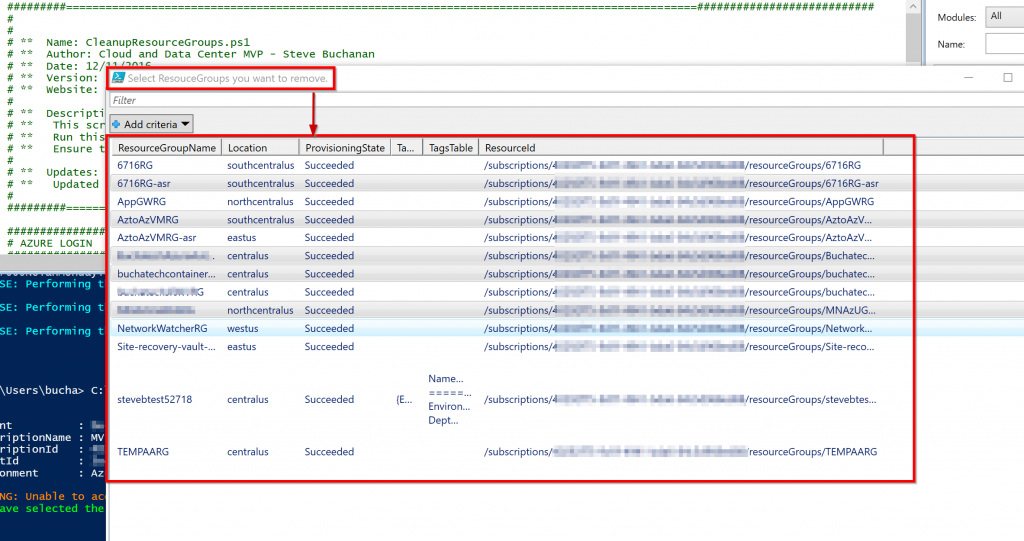
Next the script will give you a list of resource groups in the subscription you selected. Select the resource groups you want to remove and click Ok.

The script will loop through and remove the resource groups you selected. Note that script is using -Force so it will not prompt to ensure you intend to remove the resource groups. Make sure you want to remove the resource groups before running this script.

NOTE: When running this for Azure Stack ensure you are logged into the Azure Stack environment. For info on how to do this visit: https://bit.ly/2LkvddG

That is it. It is a simple script to make removing many resource groups easier. I hope you find this script useful as I have!

Read more

The “argument is null or empty” error in Azure Automation Runbook

I was recently working on an Azure Automation runbook that provisions an empty resource group in Azure. I was running into an issue when the runbook ran that the variable being used with New-AzureRmRoleAssignment was null. The errors I was receiving are:

New-AzureRmRoleAssignment : Cannot validate argument on parameter ‘SignInName’. The argument is null or empty. Provide
an argument that is not null or empty, and then try the command again.
At line:96 char:39
+ New-AzureRmRoleAssignment -SignInName $RequesterSignIn -RoleDefinitio …
+ ~~~~~~~~~~~~~~~~
+ CategoryInfo : InvalidData: (:) [New-AzureRmRoleAssignment], ParameterBindingValidationException
+ FullyQualifiedErrorId :
ParameterArgumentValidationError,Microsoft.Azure.Commands.Resources.NewAzureRoleAssignmentCommand

and

New-AzureRmRoleAssignment : Cannot validate argument on parameter ‘ObjectId’. Specify a parameter of type ‘System.Guid’
and try again.
At line:97 char:37
+ New-AzureRmRoleAssignment -ObjectID $RequesterID -RoleDefinitionName  …
+                                     ~~~~~~~~~~~~
+ CategoryInfo          : InvalidData: (:) [New-AzureRmRoleAssignment], ParameterBindingValidationException
+ FullyQualifiedErrorId :
ParameterArgumentValidationError,Microsoft.Azure.Commands.Resources.NewAzureRoleAssignmentCommand

It turned out to be a permission issue with AzureRM.Resources CMDLETS not being able to talk to AAD specifically Get-AzureRmADUser that I was using for a variable.

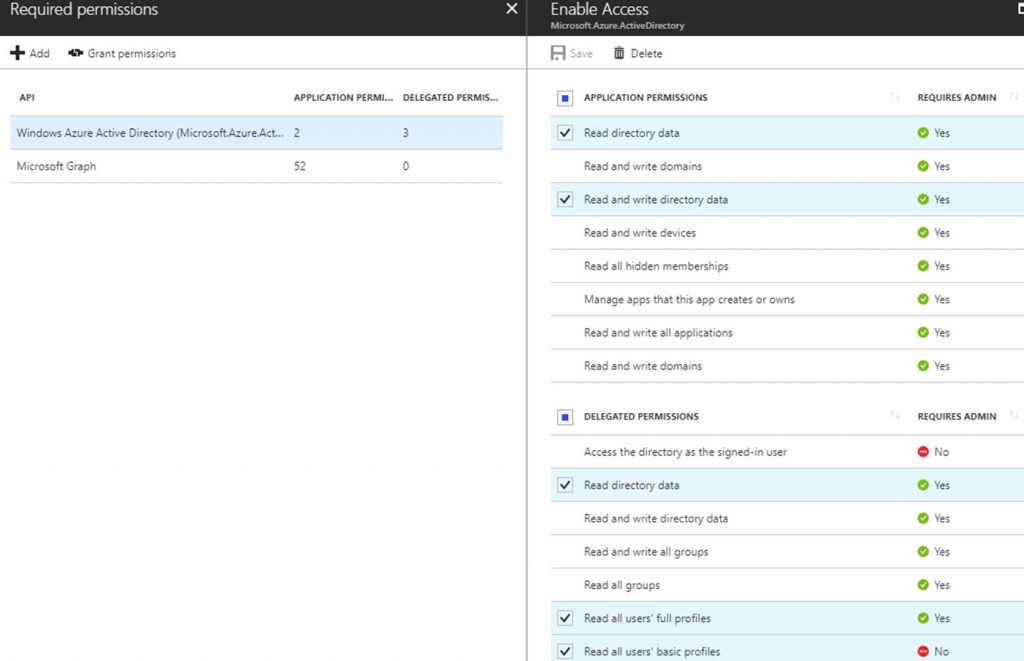
To fix this I had to give the following permissions for the AAD directory to the AzureServicePrincipal Run As Account:

Windows Azure Active Directory (AAD)
Application Permissions

·       Read/Write directory data
·       Read directory data

Delegated Permissions
·       Read directory data
·       Read all users’ full profiles
·       Read all users’ basic profiles

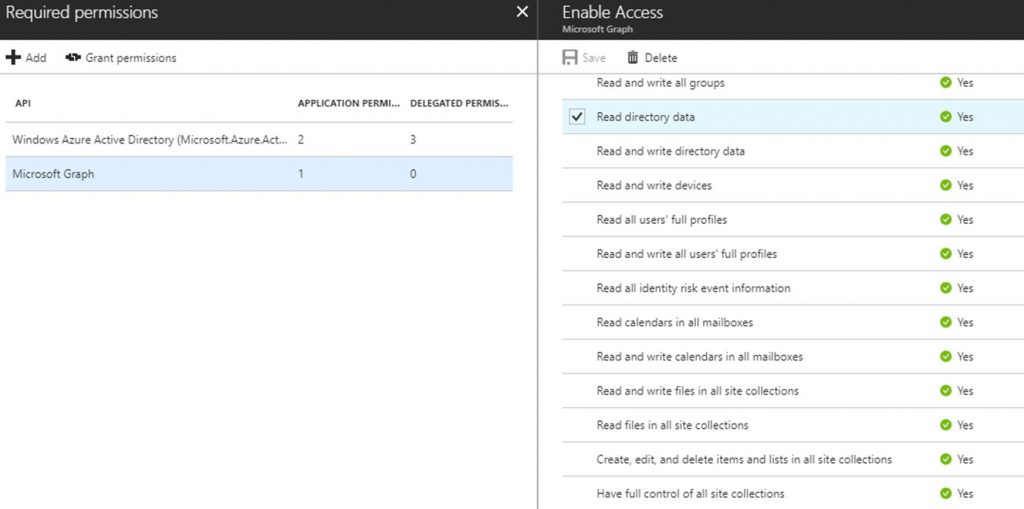
Microsoft Graph
App Permissions
·       Read directory data

In your runbook code you will typically have

# Authenticate to Azure resources
$connectionName = “AzureRunAsConnection”

# Get the connection “AzureRunAsConnection “
$servicePrincipalConnection = Get-AutomationConnection -Name $connectionName
“Logging in to Azure…”
Login-AzureRmAccount `
-ServicePrincipal `
-TenantId $servicePrincipalConnection.TenantId `
-ApplicationId $servicePrincipalConnection.ApplicationId `
-CertificateThumbprint $servicePrincipalConnection.CertificateThumbprint

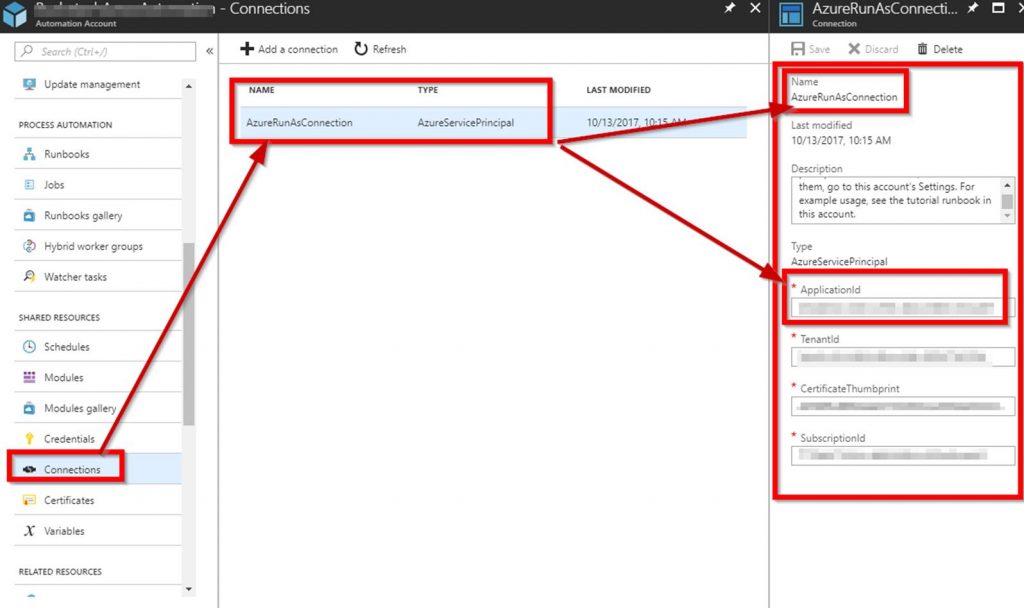
You may have a some differences like the connection variable and the name of the runasconnection. The point here is that the runas connection is what needs to have the proper permissions. You can find this account here to get the name and ApplicationID:

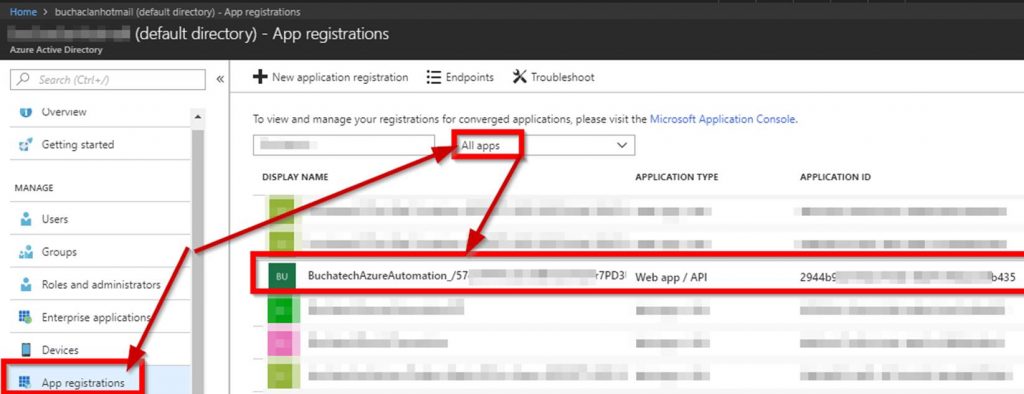
To give the permissions go to Azure Active Directory>the directory you are using in this automation>App registrations>and search based on the ApplicationID. Don’t forget to select All apps in the drop down.

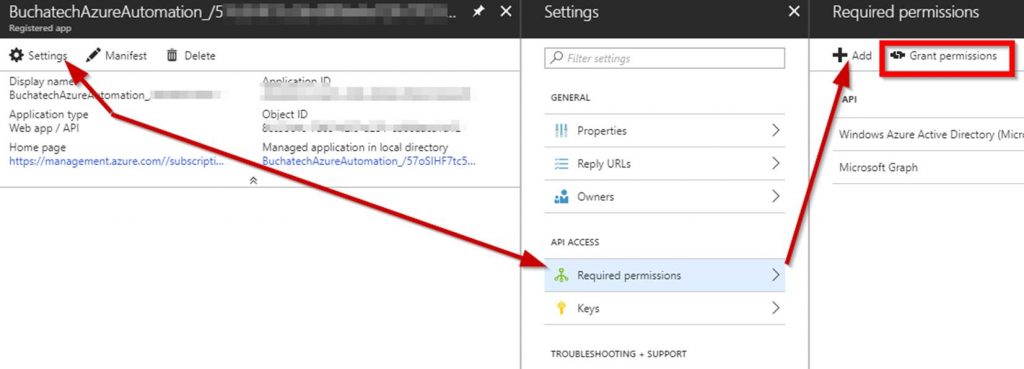
Click on Add first and add the AAD and then Microsoft Graph permissions.

After you add the proper permissions make sure you click on Grant Permissions. The permissions are not actually applied until you do this. Once you click on Grant permissions you will see the prompt shown in the screenshot. Click Yes.

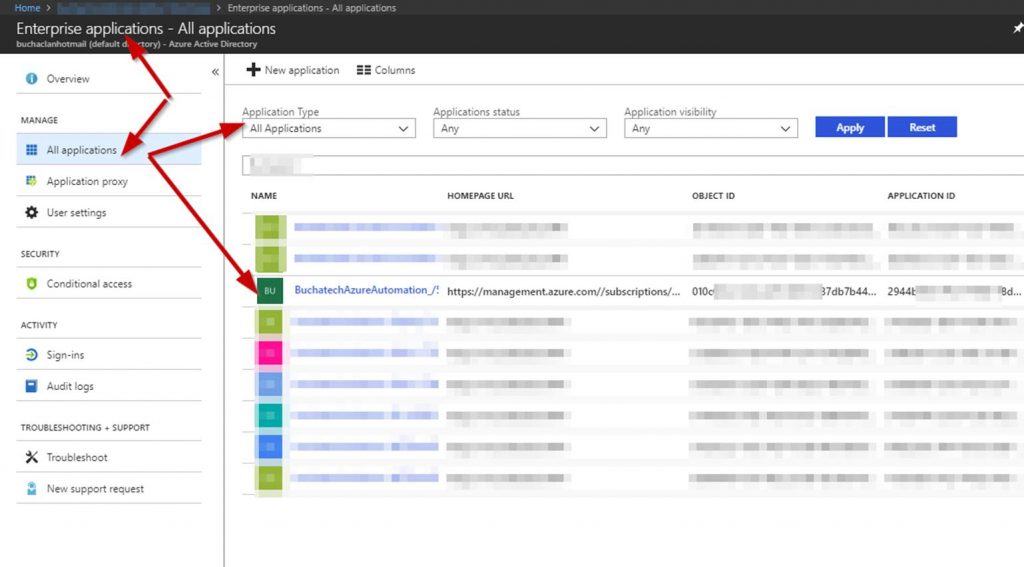
Verify the permissions have been added properly. In AAD go to All applications>select All applications. Find your service principle application.

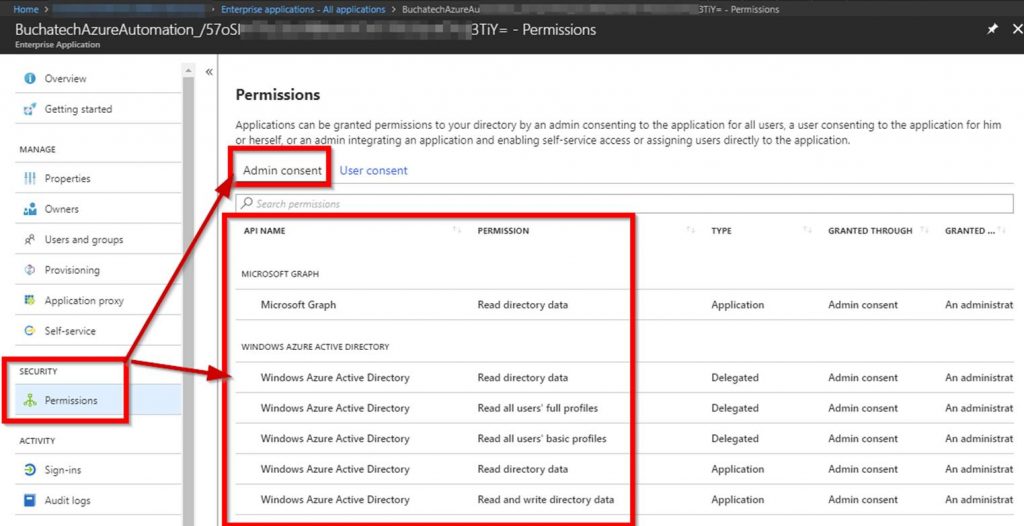
Click on the service principle applications permissions.

Verify the AAD and graph permissions are listed. If the AAD and graph permissions are listed then the runbook should be good to go.

Read more

Setup CI/CD pipeline with VSTS & Azure Stack

We all know that DevOps brings together people, processes, and technology. In the Microsoft DevOps world A large part of the technology piece is utilizing Visual Studio Team Services (VSTS) for continuous deployment of workloads to Azure.

Microsoft launched their Hybrid Cloud on July 10th 2017. Azure Stack is the secret sauce of Microsoft’s the Hybrid Cloud. Microsoft’s offering is the only one true Hybrid Cloud in the market bringing Azure to on-premises data centers.

As Microsoft continues to move their Hybrid Cloud forward the DevOps integration and capabilities we have for Azure extend to Azure Stack. Again I was fortunate to participate in a preview of the VSTS integration with Azure Stack. I was happy to see Microsoft putting a priority on this functionality because DevOps on Azure Stack is a HUGE need. Cloud is often the catalyst to helping organizations adopt a DevOps culture fostering digital transformation. Some organizations not being able to put all workloads in public cloud Azure Stack is a good way for them to get the same cloud capabilities on-premises DevOps integration being one of them. The setup and integration between VSTS and Azure Stack is working nicely. The team at Microsoft has given me permission to share about this topic via my blog.

In this blog post I am going to cover setting up VSTS to work with Azure and setting up a continuous-integration and-continuous deployment (CI/CD) pipeline to Azure Stack. With Microsoft DevOps you can utilize the pieces of VSTS that make sense for you to use leaving the control up to you. Through VSTS you can use many other DevOps tools such as Jenkins, Octopus deploy, GitHub, Bitbucket etc into your pipeline making Azure Stack just as flexible as Azure is. Let’s Jump in!

Steps to prep Azure Stack for Visual Studio Team Services (VSTS)

#1 Ensure you have installed the Azure Stack PowerShell and Azure PowerShell modules.

Details can be found here:

https://docs.microsoft.com/en-us/azure/azure-stack/azure-stack-powershell-install

#2 Add the Azure Stack environment using the following syntax

# Navigate to the downloaded folder and import the **Connect** PowerShell module

Set-ExecutionPolicy RemoteSigned

Import-Module PATH\AzureStack.Connect.psm1

# Register an AzureRM environment that targets your Azure Stack instance

Add-AzureRMEnvironment `

-Name “AzureStackAdmin” `

-ArmEndpoint “https://adminmanagement.local.azurestack.external

# Set the GraphEndpointResourceId value

Set-AzureRmEnvironment `

-Name “AzureStackAdmin” `

-GraphAudience “https://graph.windows.net/

# Get the Active Directory tenantId that is used to deploy Azure Stack

$TenantID = Get-AzsDirectoryTenantId `

-AADTenantName “YOURDOMAIN.onmicrosoft.com” `

-EnvironmentName “AzureStackAdmin”

# Sign in to your environment

Login-AzureRmAccount `

-EnvironmentName “AzureStackAdmin” `

-TenantId $TenantID

NOTE: You will need the environment name and the tenant ID for the next script.

#3 Create SPN

Original SPN creation script can be found here:

https://github.com/Microsoft/vsts-rm-documentation/blob/master/Azure/SPNCreation.ps1

Documentation on creating an SPN can be found here:

https://www.visualstudio.com/en-us/docs/build/concepts/library/service-endpoints#sep-azure-rm

Below I will display the script I used. Note that you will need the following parameters for the script:

$subscriptionName

“Enter Azure Stack Subscription name. You need to be Subscription Admin to execute the script”)]

$password

“Provide a password for SPN application that you would create”

$environmentName

“Provide Azure Stack environment name for your subscription”

$AzureStackTenantID

“Provide tenant ID from when Azure Stack enviroment was added”

EXAMPLE:

.\CreateSPN.ps1 -subscriptionName “Default Provider Subscription” -password PASSWORDHERE -environmentName AzureStackAdmin -AzureStackTenantID ID HERE

Here is the script I used that you can run:

param

(

[Parameter(Mandatory=$true, HelpMessage=”Enter Azure Stack Subscription name. You need to be Subscription Admin to execute the script”)]

[string] $subscriptionName,

[Parameter(Mandatory=$true, HelpMessage=”Provide a password for SPN application that you would create”)]

[string] $password,

[Parameter(Mandatory=$false, HelpMessage=”Provide a SPN role assignment”)]

[string] $spnRole = “owner”,

[Parameter(Mandatory=$false, HelpMessage=”Provide Azure Stack environment name for your subscription”)]

[string] $environmentName,

[Parameter(Mandatory=$false, HelpMessage=”Provide tenant ID from when Azure Stack enviroment was added”)]

[string] $AzureStackTenantID

)

#Initialize

$ErrorActionPreference = “Stop”

$VerbosePreference = “SilentlyContinue”

$userName = $env:USERNAME

$newguid = [guid]::NewGuid()

$displayName = [String]::Format(“VSO.{0}.{1}”, $userName, $newguid)

$homePage = “http://” + $displayName

$identifierUri = $homePage

#Initialize subscription

$isAzureModulePresent = Get-Module -Name AzureRM* -ListAvailable

if ([String]::IsNullOrEmpty($isAzureModulePresent) -eq $true)

{

Write-Output “Script requires AzureRM modules to be present. Obtain AzureRM from https://github.com/Azure/azure-powershell/releases. Please refer https://github.com/Microsoft/vsts-tasks/blob/master/Tasks/DeployAzureResourceGroup/README.md for recommended AzureRM versions.” -Verbose

return

}

Import-Module -Name AzureRM.Profile

Write-Output “Provide your credentials to access Azure subscription $subscriptionName” -Verbose

Login-AzureRmAccount -SubscriptionName $subscriptionName -EnvironmentName $environmentName -TenantId $AzureStackTenantID

$azureSubscription = Get-AzureRmSubscription -SubscriptionName $subscriptionName

$connectionName = $azureSubscription.SubscriptionName

$tenantId = $azureSubscription.TenantId

$id = $azureSubscription.SubscriptionId

#Create a new AD Application

Write-Output “Creating a new Application in AAD (App URI – $identifierUri)” -Verbose

$azureAdApplication = New-AzureRmADApplication -DisplayName $displayName -HomePage $homePage -IdentifierUris $identifierUri -Password $password -Verbose

$appId = $azureAdApplication.ApplicationId

Write-Output “Azure AAD Application creation completed successfully (Application Id: $appId)” -Verbose

#Create new SPN

Write-Output “Creating a new SPN” -Verbose

$spn = New-AzureRmADServicePrincipal -ApplicationId $appId

$spnName = $spn.ServicePrincipalName

Write-Output “SPN creation completed successfully (SPN Name: $spnName)” -Verbose

#Assign role to SPN

Write-Output “Waiting for SPN creation to reflect in Directory before Role assignment”

Start-Sleep 20

Write-Output “Assigning role ($spnRole) to SPN App ($appId)” -Verbose

New-AzureRmRoleAssignment -RoleDefinitionName $spnRole -ServicePrincipalName $appId

Write-Output “SPN role assignment completed successfully” -Verbose

#Print the values

Write-Output “`nCopy and Paste below values for Service Connection” -Verbose

Write-Output “***************************************************************************”

Write-Output “Connection Name: $connectionName(SPN)”

Write-Output “Subscription Id: $id”

Write-Output “Subscription Name: $connectionName”

Write-Output “Service Principal Id: $appId”

Write-Output “Service Principal key: <Password that you typed in>”

Write-Output “Tenant Id: $tenantId”

Write-Output “***************************************************************************”

Output should be similar to this:
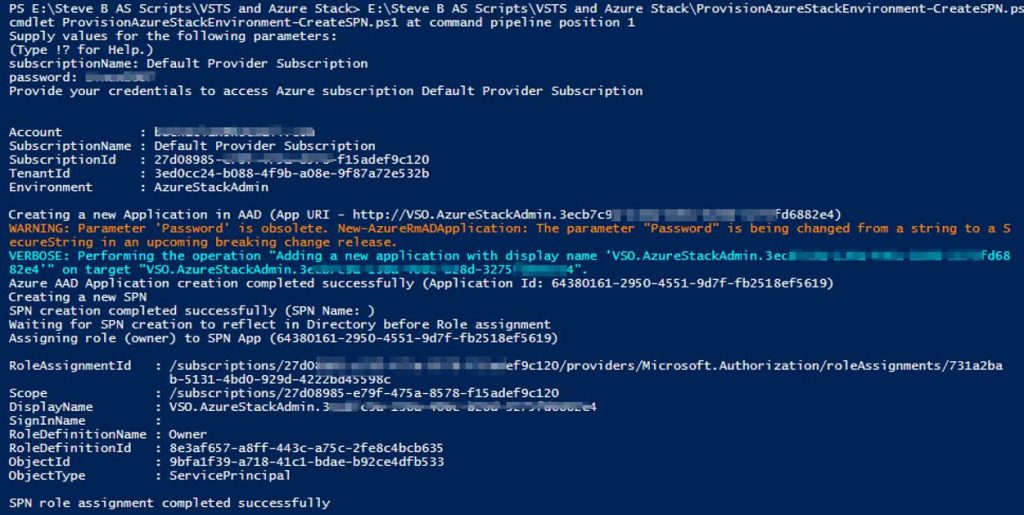
You will use information from the Service Connection output in the next step.

Steps to configure Azure Stack as a Service Endpoint in VSTS

Log into your VSTS account at visalstudio.com

Navigate to one of your projects.

Go into Settings.

Click on Services.

Click on New Service Endpoint
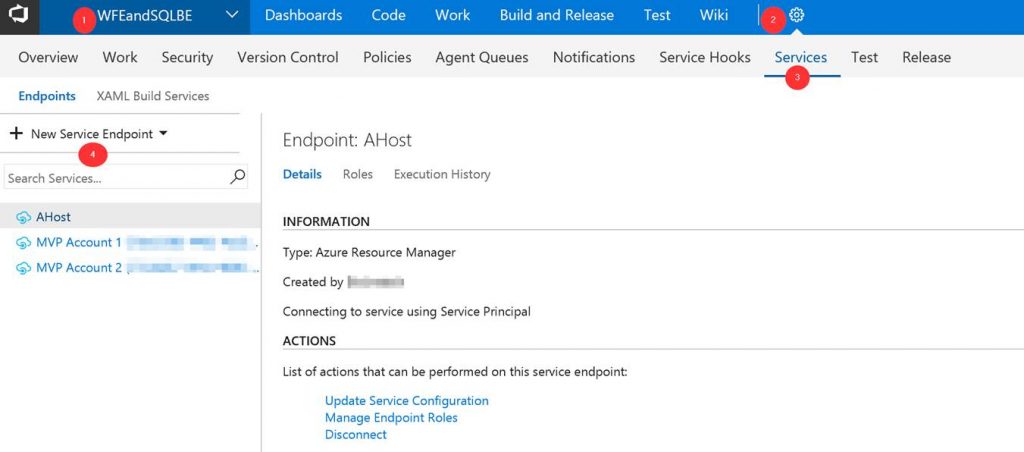
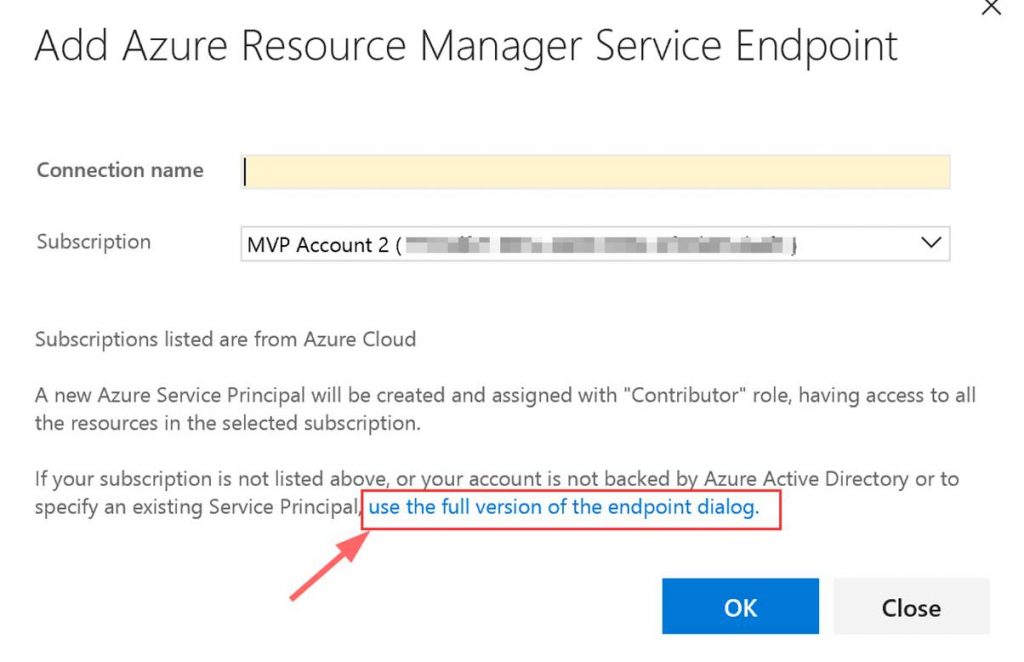
A window will pop up. Click on “use full version of the endpoint dialog.”
Next input the needed data. This data comes from the Service Connection info that you copied.
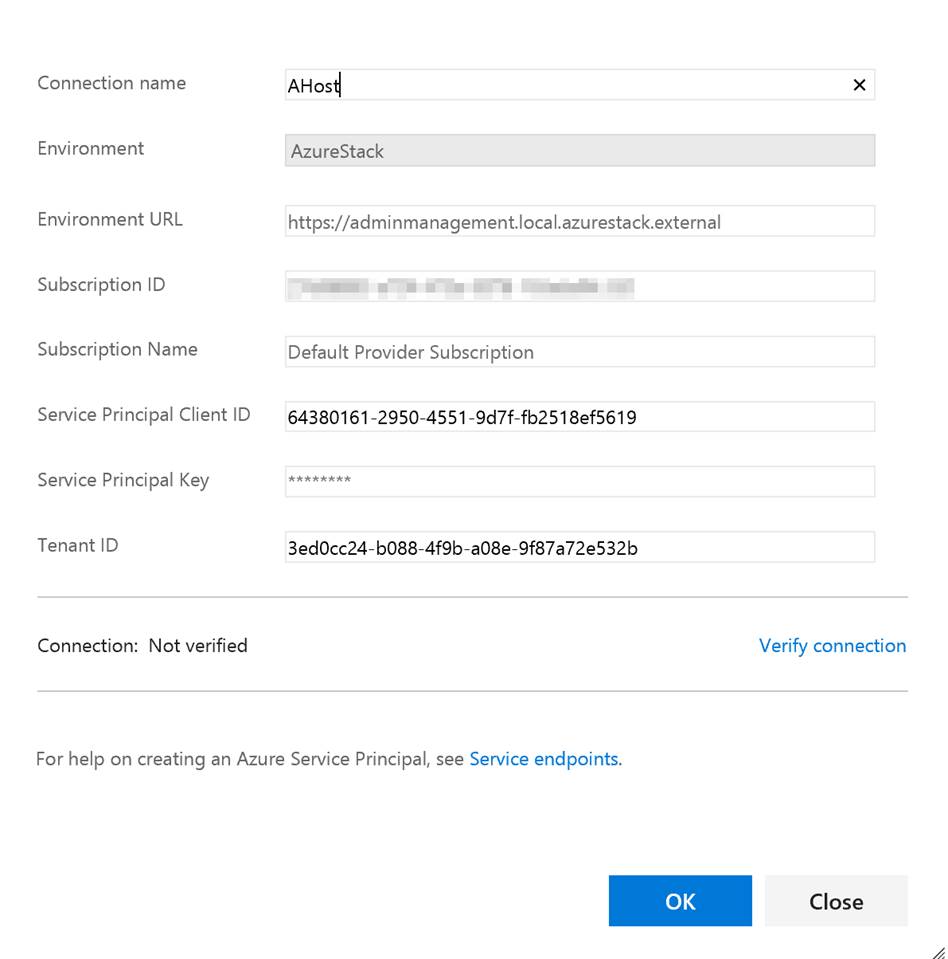
You can put whatever you want in the Connection name and the Subscription Name. Note do not verify the connection. It will not succeed as VSTS cannot access your private Azure Stack yet. Click OK when done.

Setup build agent on Azure Stack host

Next you need to setup the build agent on the Azure Stack host. (Note: In this post I am using the ASDK.) From within VSTS download the Windows agent. Extract the download to a local folder.
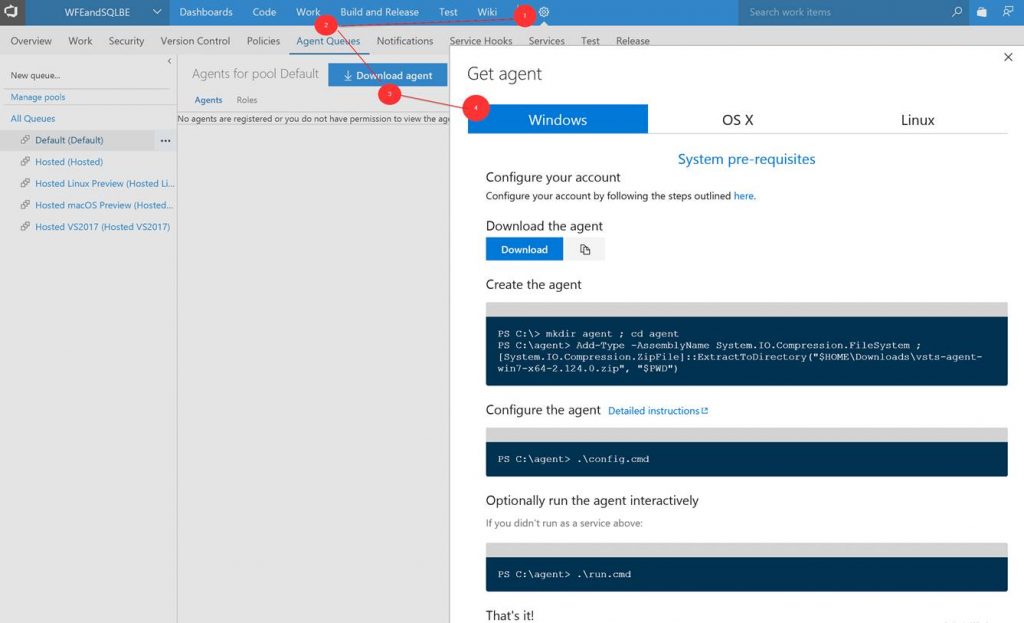
Go to Security under your profile in VSTS.
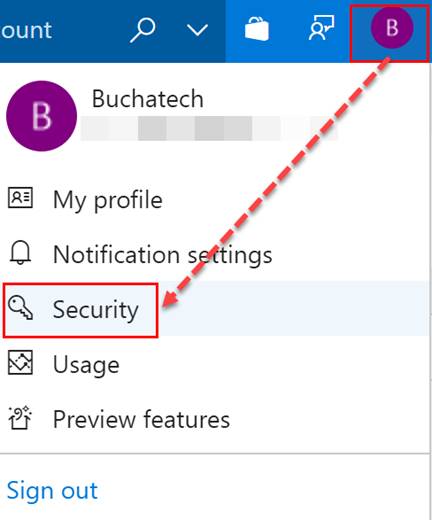
Next add a Personal access token (PAT) for Azure Stack.
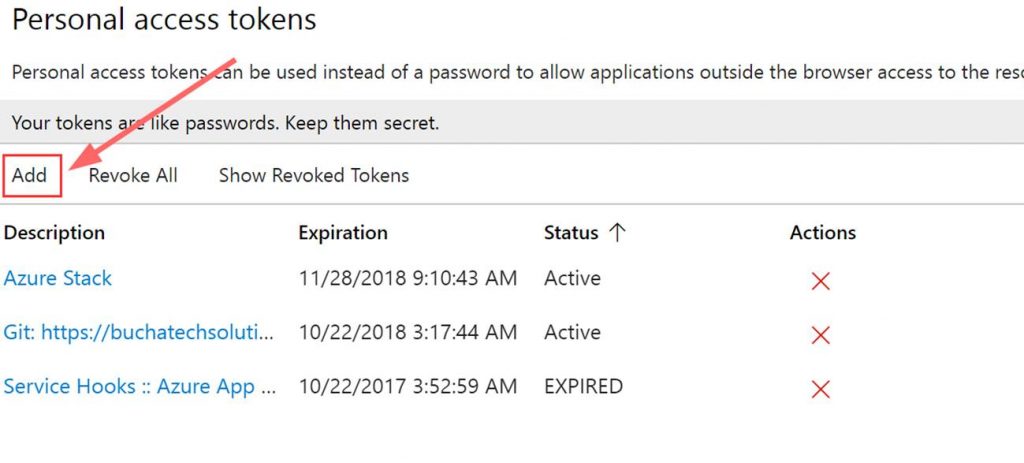
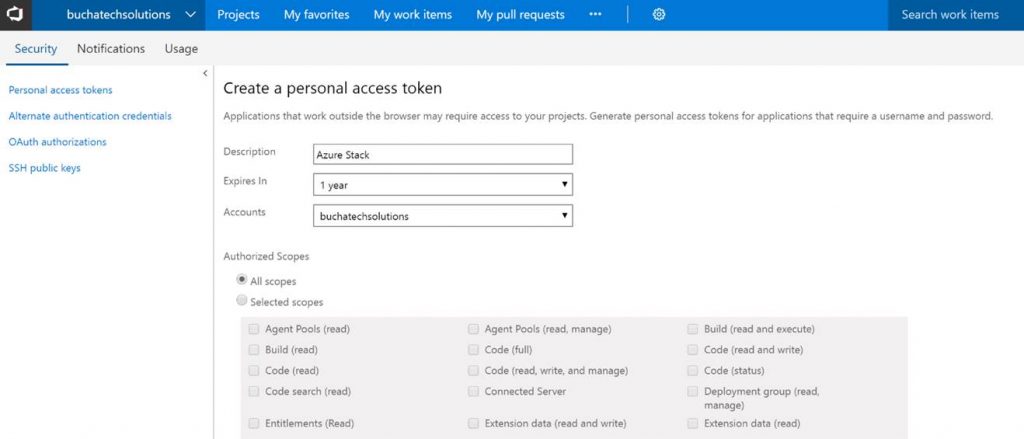
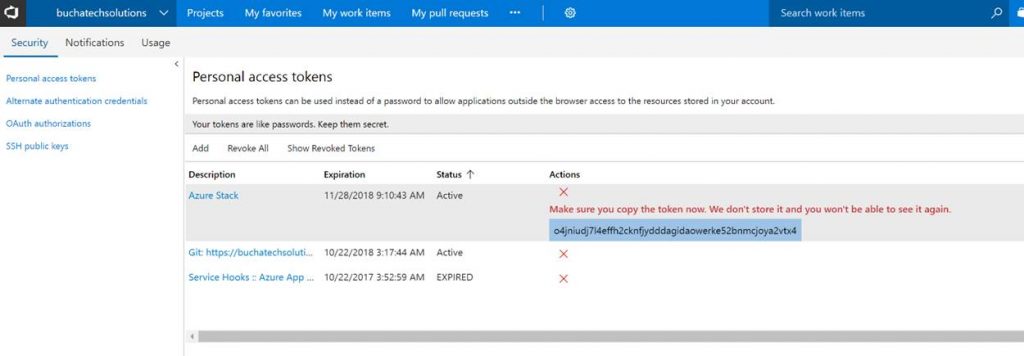
Copy the token. Note it will not be shown again ever after you leave this screen.
In the folder with the extracted build agent you will see the following. We need to run the run.cmd file from an elevated command prompt.

Here is a screenshot of running the run.cmd. I recommend deploying the build agent as a service. You will use your personal access token (PAT) here and the azure stack admin account.
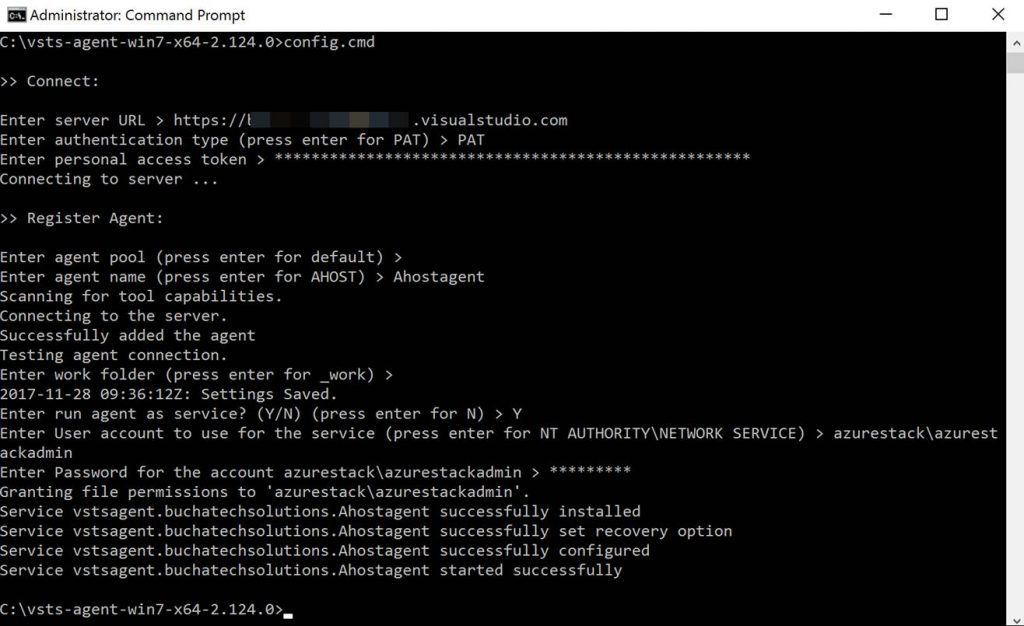
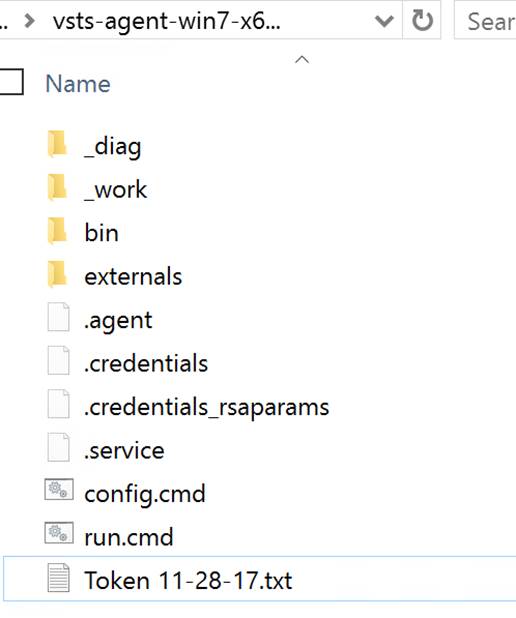
After the run.cmd finished the folder with the extracted contents should look like the following:
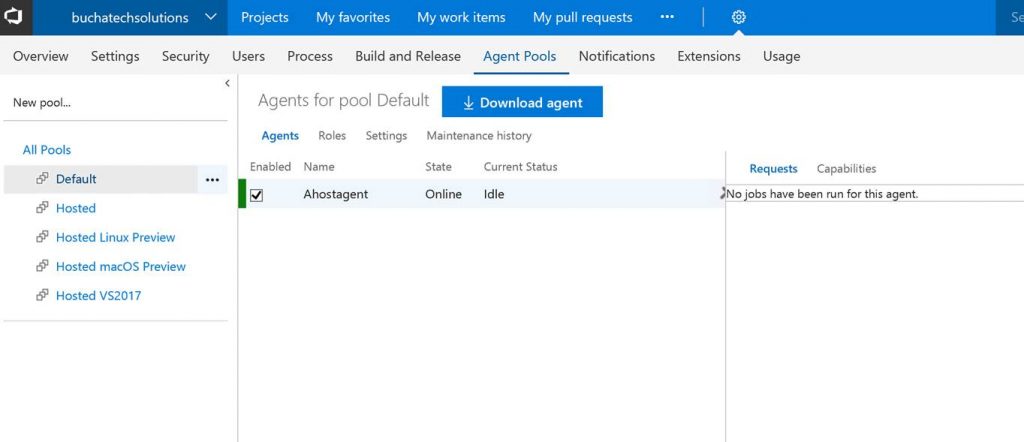
You can now see the agent in VSTS.
That’s it for the setup for connecting VSTS to Azure Stack. Next let’s look at setting up a continuous-integration and-continuous deployment (CI/CD) pipeline for VM-deployment to Azure Stack.


THE BUILD

What I cover here is focused on infrastructure as code (IaC) using ARM templates. If you need to set up CI/CD to Azure Stack for Web Apps, Mobile Apps, Containers, etc the process is the same as it is on Azure with the only difference being that you point to Azure Stack. Also note that in this post I am using the ASDK not multi-node.

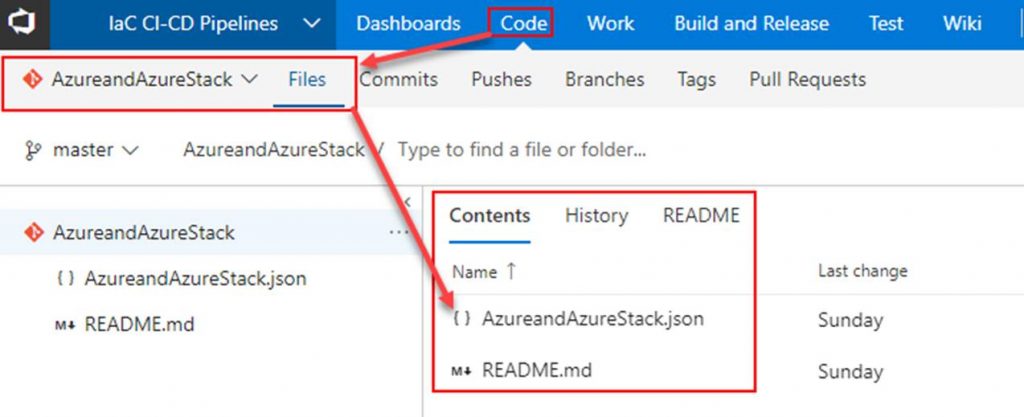
Within VSTS create a new repository and place your ARM template in it.
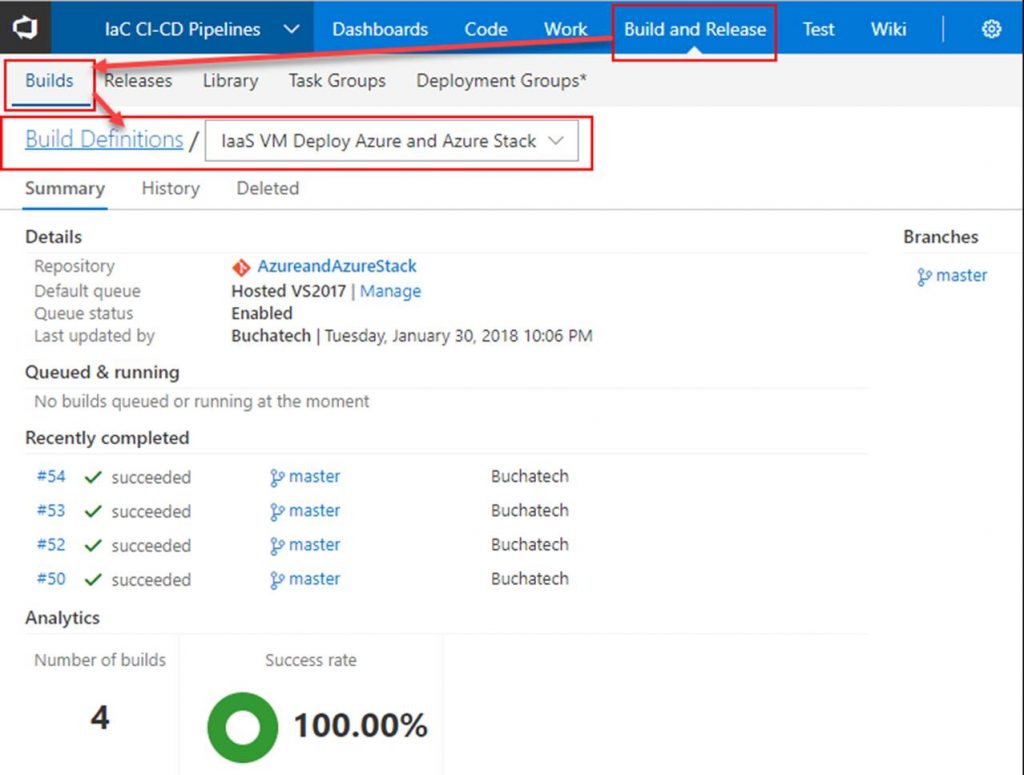
Next click on Build and Release. Create a new Build Definition.
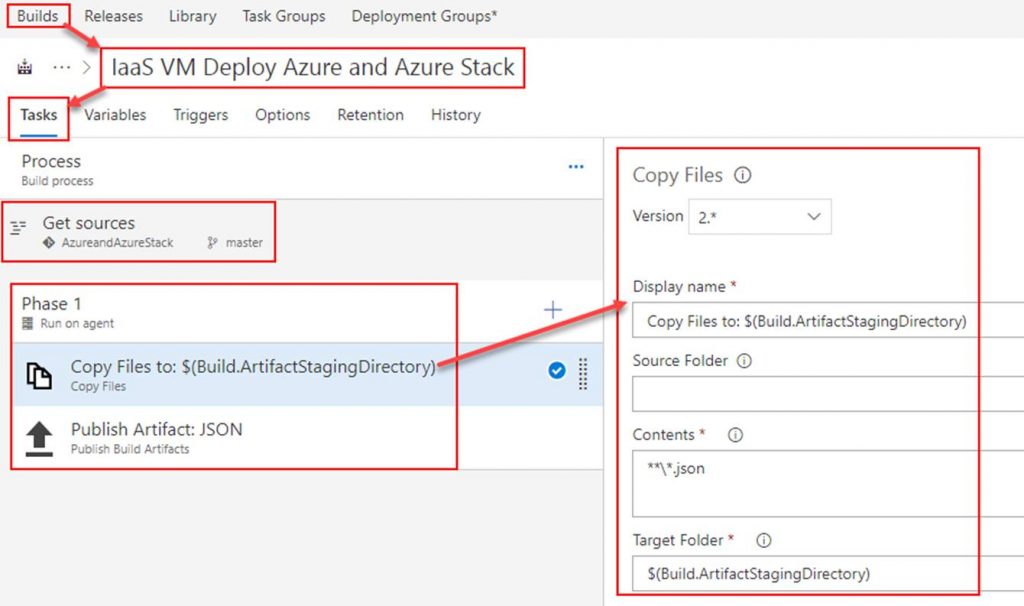
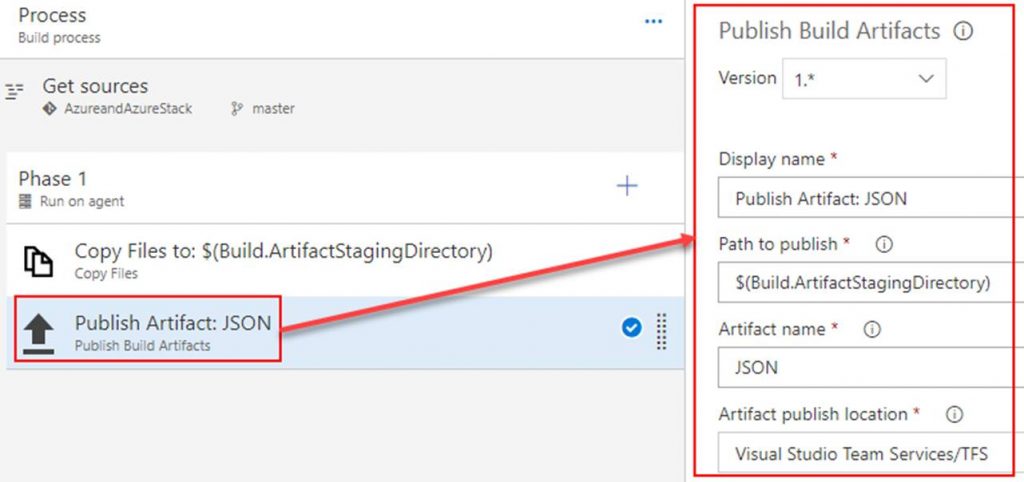
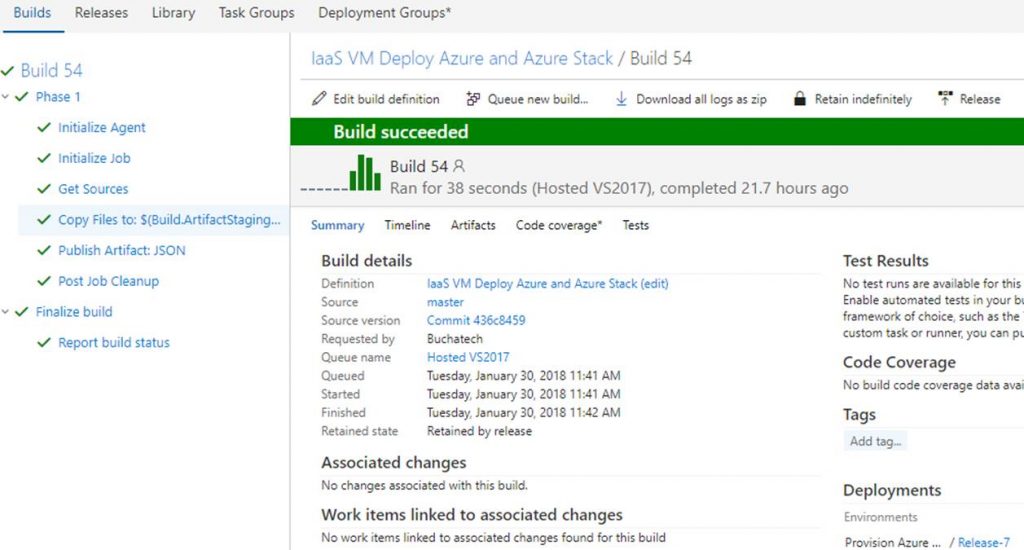
In the build definition. Point the Get sources to the repository you just created. Add 2 tasks under Phase 1. The first task will copy the ARM template to the build staging directory. The second task will publish the ARM template so that a release definition can pick it up. Both tasks are shown in the following screenshots.

Copy Files to task
Publish Artifact task
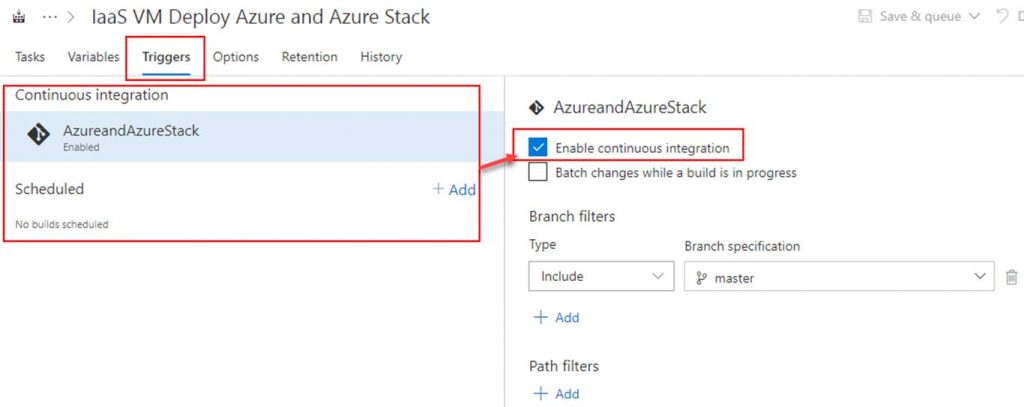
OPTIONAL: To setup continuous integration click on Triggers. Here you can set a schedule to run the builds or you can click on the repository as shown in the screenshot and then check Enable continuous integration. By checking the box next to Enable continuous integration it tells VSTS that anytime content in the repo is changed to run a build.
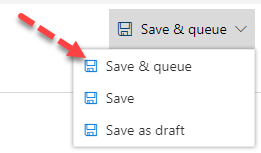
Click on Save & queue. This will start the build.
The build will start. As long as everything is setup properly within your build it will succeed as shown in the following Screenshot.
That’s all for our build. Next up we need to create a release definition (RD) pipeline. The RD will take the build artifacts and deploy to an environment/s you specify.

Read more
Monitor Azure WebJobs Status with Application Insights

Within the Azure App Service is something called WebJobs that enables developers to run a script or program in the background within the same context as a web app, API app, or mobile app. Wejobs are included in app service with no extra cost. Webjobs are often used to run regular jobs and batch work as background services. Webjobs exist to make it easier to develop, run background tasks, and scale your web applications.

Webjobs have been around for a while and are considered a part of the serverless computing available on Azure. Today Azure Functions another newer and improved serveless technology service the evolution of WebJobs. When developers need serverless today Azure Functions is typically chosen over webjobs. There are certain cases and scenarios when webjobs are still used instead of Azure Functions and I will not be diving into that topic in this blog post. For more information on when to use what serverless technology on Azure check out the following links:

– A comparison between WebJobs and Functions: Choose between Flow, Logic Apps, Functions, and WebJobs.

– Minnesota’s Azure user group meeting from December 2017 covered comparing the various serverless technologies in Azure. It was presented by Joe Koletar. The meeting notes and PowerPoint download can be found here:

http://www.mnazureusergroup.com/2017/12/22/december-2017-meeting-serverless-computing-notes-and-download

For more information on Azure WebJobs check out these two links:

– Run Background tasks with WebJobs in Azure App Service

https://docs.microsoft.com/en-us/azure/app-service/web-sites-create-web-jobs

– Develop and deploy WebJobs using Visual Studio – Azure App Service

https://docs.microsoft.com/en-us/azure/app-service/websites-dotnet-deploy-webjobs

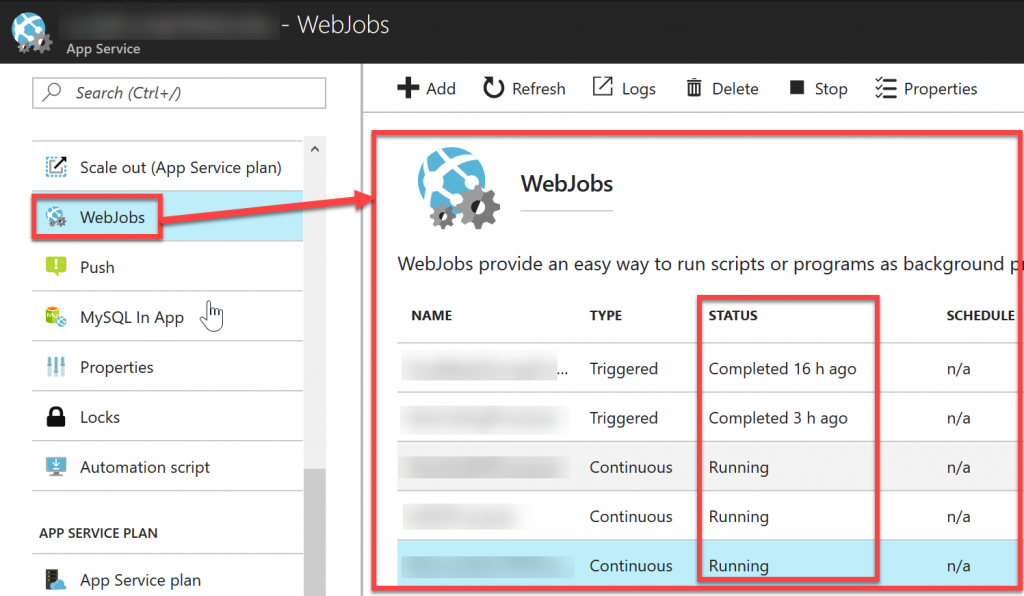
I recently needed to setup monitoring for Azure webjobs status. In this environment there was a mix of continuous webjobs along with some triggered webjobs. Monitoring WebJobs is different compared to monitoring other Azure App Services such as web apps. Web apps can easily be monitored for up/down status and performance for things like in/out traffic, usage, and errors. Background services like WebJobs does not have a defined start or end to the work they do. WebJobs either run continuously or for short amounts of time to perform a task. In this case performance was not a concern but the status of the WebJobs was needed. You can see the status of the WebJobs in the Azure portal as shown in the following screenshot.

The problem here is this is not on a monitoring dashboard, you have to navigate here to see it, you need to click the refresh button for an update, and there is no alert setup when the status is in a non-desired state.

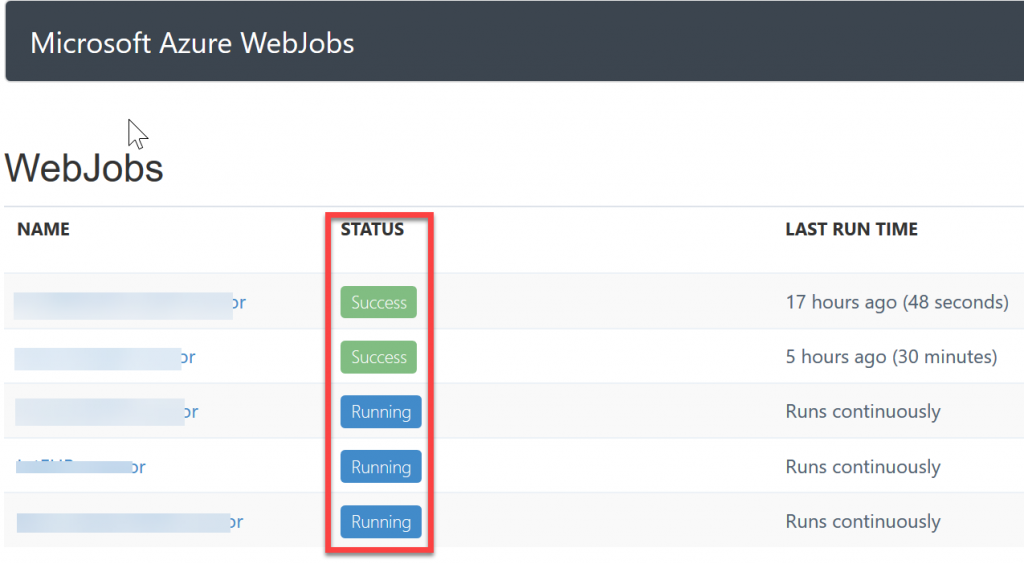
WebJobs does come with a logs website that shows the status of all of your WebJobs and more. This logs site is shown in the following screenshot:

The logs site is nice but the issue with it is that you have to be on the site to see the status of the WebJobs along with the previously mentioned issues viewing the status in the Azure portal. A good solution for monitoring the WebJobs would be a way to check the heartbeat of the WebJobs, the status, and alert you if one of the WebJobs is in a non-desired state. The good news is that this can be accomplished utilizing Application Insights. This is not new but does take some effort to setup.  I am going to detail how to set this up. Here is a summary of what needs to be done.

  1. Need an instance of Application Insights
  2. Need an authorization header from the WebJobs REST API.
  3. Need to create a webtest manually or using Visual Studio enterprise.
  4. Create a multi-step availability test in the Application Insights instance utilizing the webtest file.
  5. Create an alert on the availability test to notify when a WebJob is in a non-desired state.
  6. Add the results of the WebJobs availability test to a dashboard in Azure.

Let’s get started.

Read more

Azure Stack SQL RP – Need Azure PowerShell with version 1.2.9 Error

I ran into this error when installing the Azure Stack SQL RP on the Azure Stack Development Kit:

Azure Powershell Module with 1.2.10 version found. Need Azure Powershell with version 1.2.9. Please uninstall the “current version and rerun the RP setup

If you look at the SQL RP doc here:

https://docs.microsoft.com/en-us/azure/azure-stack/azure-stack-sql-resource-provider-deploy

It says “If you have installed any versions of the AzureRm or AzureStack PowerShell modules other than 1.2.9 or 1.2.10, you will be prompted to remove them or the install will not proceed. This includes versions 1.3 or greater.” on step #6 under Deploy the resource provider.


On my ASDK host I had:

and

The funny part is that in the SQL RP deployment script titled has a line where it installs AzureStack 1.2.10 but this is the version that the SQL RP deployment script is complaining about. Here is the syntax from the SQL deployment script.

# Installs and imports the API Version Profile required by Azure Stack into the current PowerShell session.

Use-AzureRmProfile -Profile 2017-03-09-profile

Install-Module -Name AzureStack -RequiredVersion 1.2.10 -Force

So the next thing I tried to do was run:

Get-Module -ListAvailable | where-Object {$_.Name -like “Azure*”} | Uninstall-Module

It kept throwing these warnings and errors:

WARNING: The version ‘1.0.4.4’ of module ‘Azure.Storage’ is currently in use. Retry the operation after closing the applications.

PackageManagement\Uninstall-Package : Module ‘Azure.Storage’ is in currently in use.

At C:\Program Files\WindowsPowerShell\Modules\PowerShellGet\1.0.0.1\PSModule.psm1:2157 char:21

+ …        $null = PackageManagement\Uninstall-Package @PSBoundParameters

+                    ~~~~~~~~~~~~~~~~~~~~~~~~~~~~~~~~~~~~~~~~~~~~~~~~~~~~~~

    + CategoryInfo          : InvalidOperation: (Microsoft.Power…ninstallPackage:UninstallPackage) [Uninstall-Package], Exception

    + FullyQualifiedErrorId : ModuleIsInUse,Uninstall-Package,Microsoft.PowerShell.PackageManagement.Cmdlets.UninstallPackage

So now I was stuck in this endless loop of PowerShell module uninstall and install hell. For a moment I thought I went insane. After recovering from temporary insanity. I ran this:

Get-InstalledModule -Name “AzureStack” -RequiredVersion 1.2.10 | Uninstall-Module

No errors on this. I then ran:

Get-Module  -ListAvailable | where-Object {$_.Name -like “Azure*”}

to see if the module was gone. Boom it was!

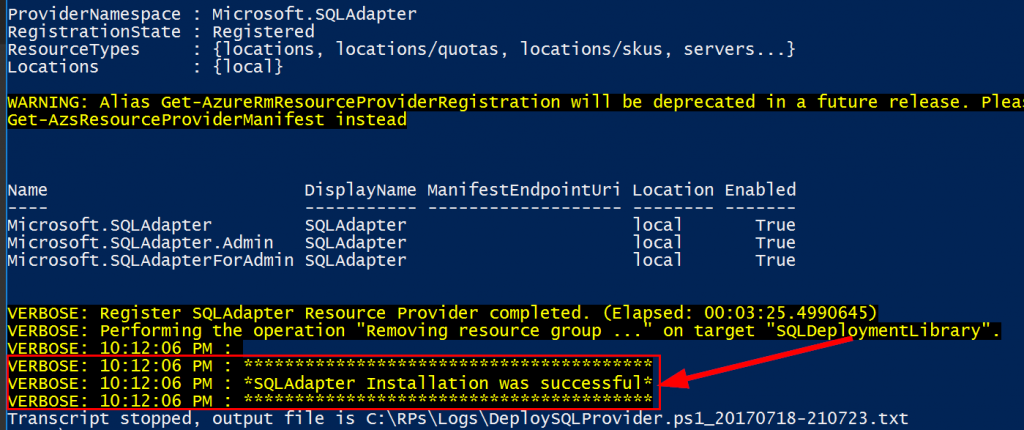
I then kicked off the SQL RP deployment script again and this time it worked!

NOTE: If you somehow have AzureRM version 1.2.10 just run Get-InstalledModule -Name “AzureRM” -RequiredVersion 1.2.10 | Uninstall-Module to get rid of that guy.

Read more

Monitor Azure Stack Fabric with OMS

I wanted to monitor my Azure Stack environment with OMS. This would include only the Azure Stack fabric servers and the host. I did not want to manually install the OMS agent on all of these servers especially since the Azure Stack fabric is a set of known servers. So I decided to put together a quick PowerShell script to handle the install of the OMS agents including the workspace ID and key. Here are details for the script:

<#

.SYNOPSIS
This script can be used to install OMS agents on all of the Azure Stack Fabric servers. This has been tested with TP2.

.DESCRIPTION
This script can be used to install OMS agents on all of the Azure Stack Fabric servers. This has been tested with TP2. This script can be run from PowerShell ISE or a PowerShell console. It is recommended to run this from an elevated window. This script should be run from the Azure Stack host. Ensure you are logged onto the Azure Stack host as azurestack\azurestackadmin. This script allows you to input your OMS workspace ID and key. The Azure Stack Fabric servers that this script will attempt to install on is:

“MAS-Con01”,

“MAS-WAS01”,

“MAS-Xrp01”,

“MAS-SUS01”,

“MAS-ACS01”,

“MAS-CA01”,

“MAS-ADFS01”,

“MAS-ASql01”,

“MAS-Gwy01”,

“MAS-SLB01”,

“MAS-NC01”,

“MAS-BGPNAT01”

Fabric servers can be added or removed from the array list if desired. The script will look for the OMS agent (MMASetup-AMD64.exe) in C:\OMS\ on the Azure Stack host. Ensure you create an OMS folder on your Azure Stack host and download the OMS agent to it. This script also copies the OMS agent to C:\Windows\Temp on each Fabric server. Ensure there is enough free space on the C drive on all of your fabric servers.

.PARAMETER OMSWorkSpaceID
This is Guid ID for your OMS workspace, it can be found in the OMS portal at: https://mms.microsoft.com >> Overview >> Settings >> Connected Sources >> Windows Servers

.PARAMETER OMSKey
This is the OMS API key for your OMS workspace. You can use the primary or secondary key. These keys can be found in the OMS portal at:
https://mms.microsoft.com >> Overview >> Settings >> Connected Sources >> Windows Servers

.INPUTS
None

.OUTPUTS
None

.NOTES
Script Name: AzureStackFabrickOMSAgentInstall.ps1
Version: 1.0
Author: Cloud and Data Center Management MVP – Steve Buchanan
Website: www.buchatech.com
Creation Date: 1-1-2017
Purpose/Change: Install OMS agents on Azure Stack Fabric servers.
Updates: None

.EXAMPLE
.\AzureStackFabricOMSAgentInstall.ps1 -OMSWorkSpaceID “20d4dd92-53cf-41ff-99b0-7acb6c84beedsr” -OMSKey “aazedscsjwh52834u510350423tjjwgogh9w34thg2ui==”
#>

The script can be downloaded here:
https://gallery.technet.microsoft.com/Azure-Stack-Fabric-OMS-3dac666c

To kick off the script run from PowerShell ISE or a PowerShell console. If you run from ISE you will be prompted for the workspace ID and the key. If you run from a PowerShell console run this syntax to kick it off:

.\AzureStackFabricOMSAgentInstall.ps1 -OMSWorkSpaceID “YOURWORKSPACEID” -OMSKey “YOUROMSKEY”

The script will kick off, building an array of the Azure Stack VM’s, looping through each of them to copy over the OMS agent, and then install the OMS agent setting the OMS workspace ID and key.

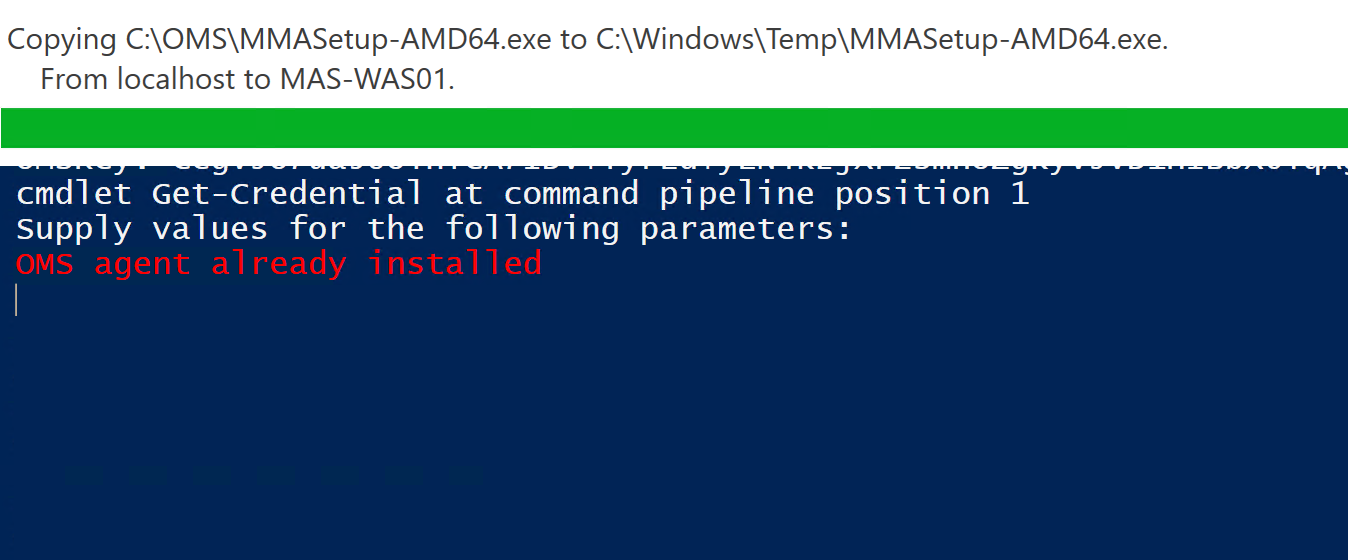
The script will detect if an OMS agent is already installed and will skip that server as shown in the following screenshot.

Otherwise the script will install the OMS agent as shown in the following screenshot.

The following screenshot shows the script running in a PowerShell console vs ISE.

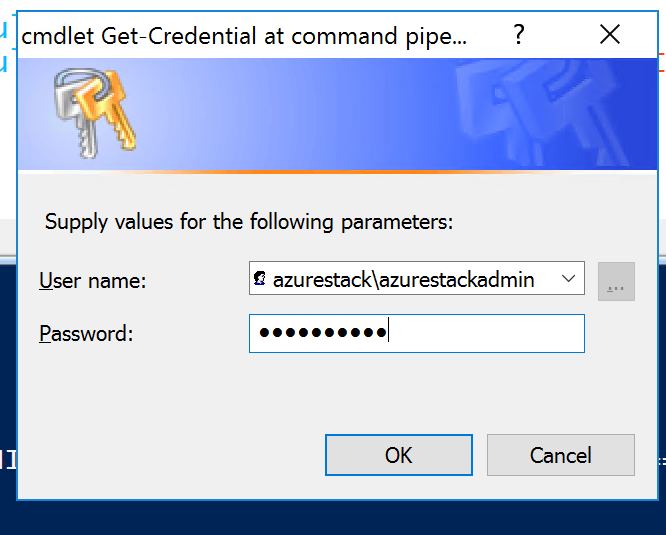
You will be prompted when running the script for credentials. Use Azurestack\azurestackadmin as shown in the following screenshot.

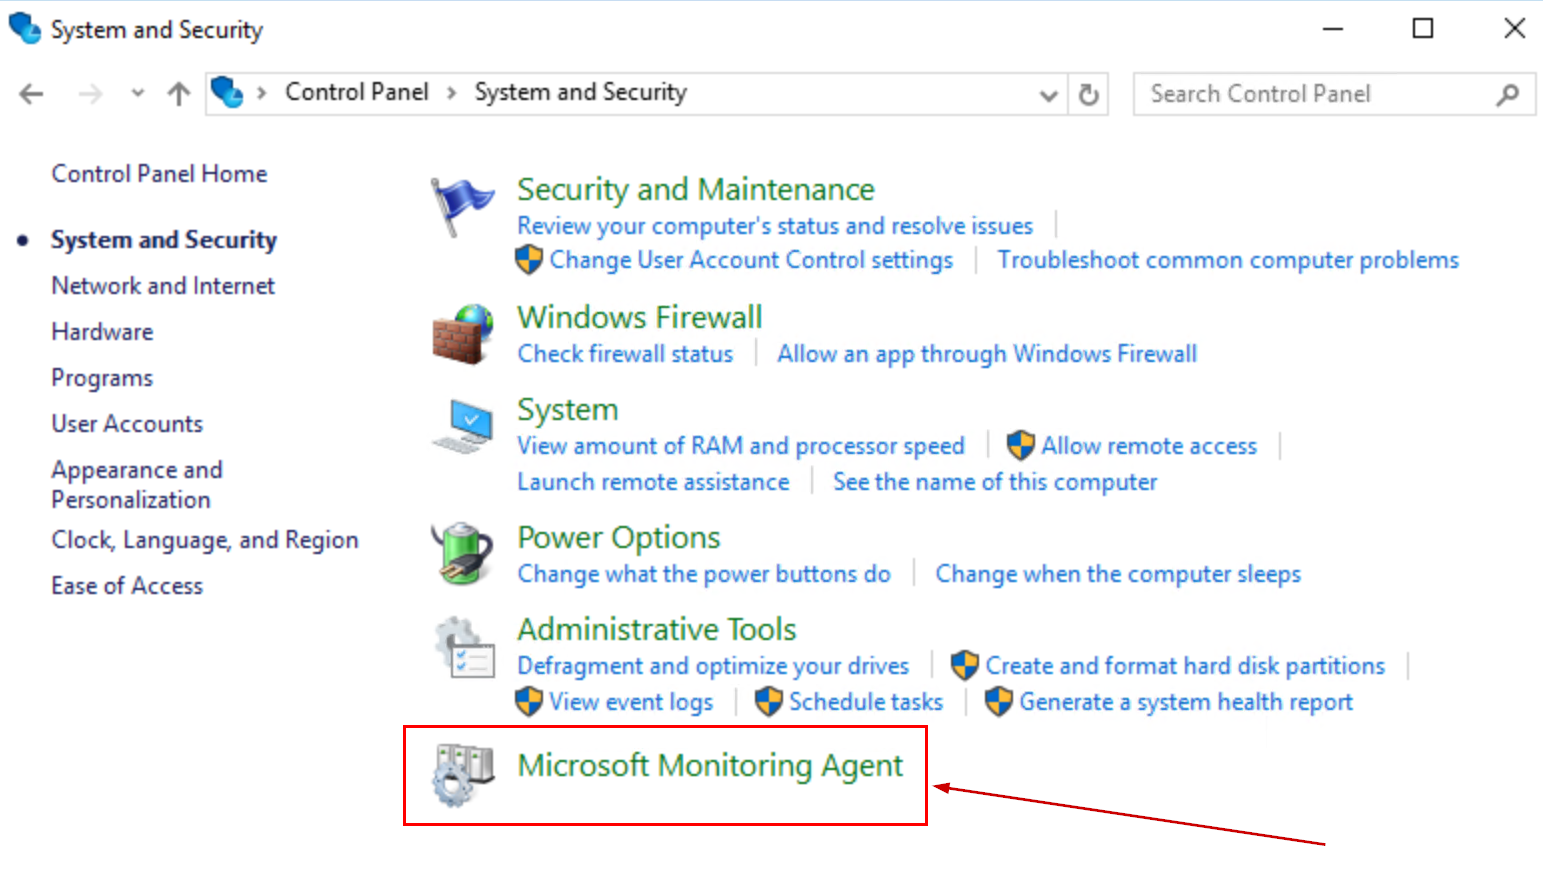
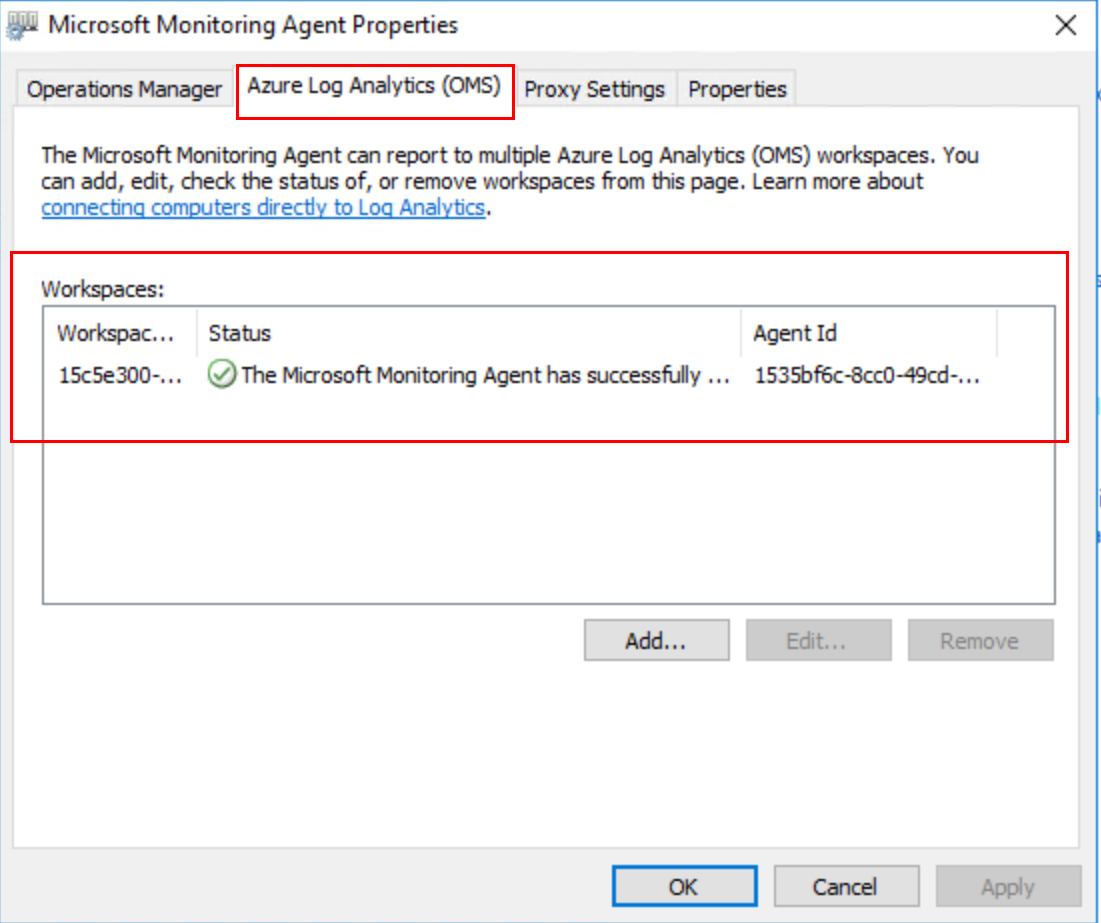
After the OMS agent is installed you should be able to log onto any of the Azure Stack VM’s and see the OMS agent in control panel as shown in the following screenshots.


You can also log onto OMS and see your Azure Stack servers listed under connected computers.

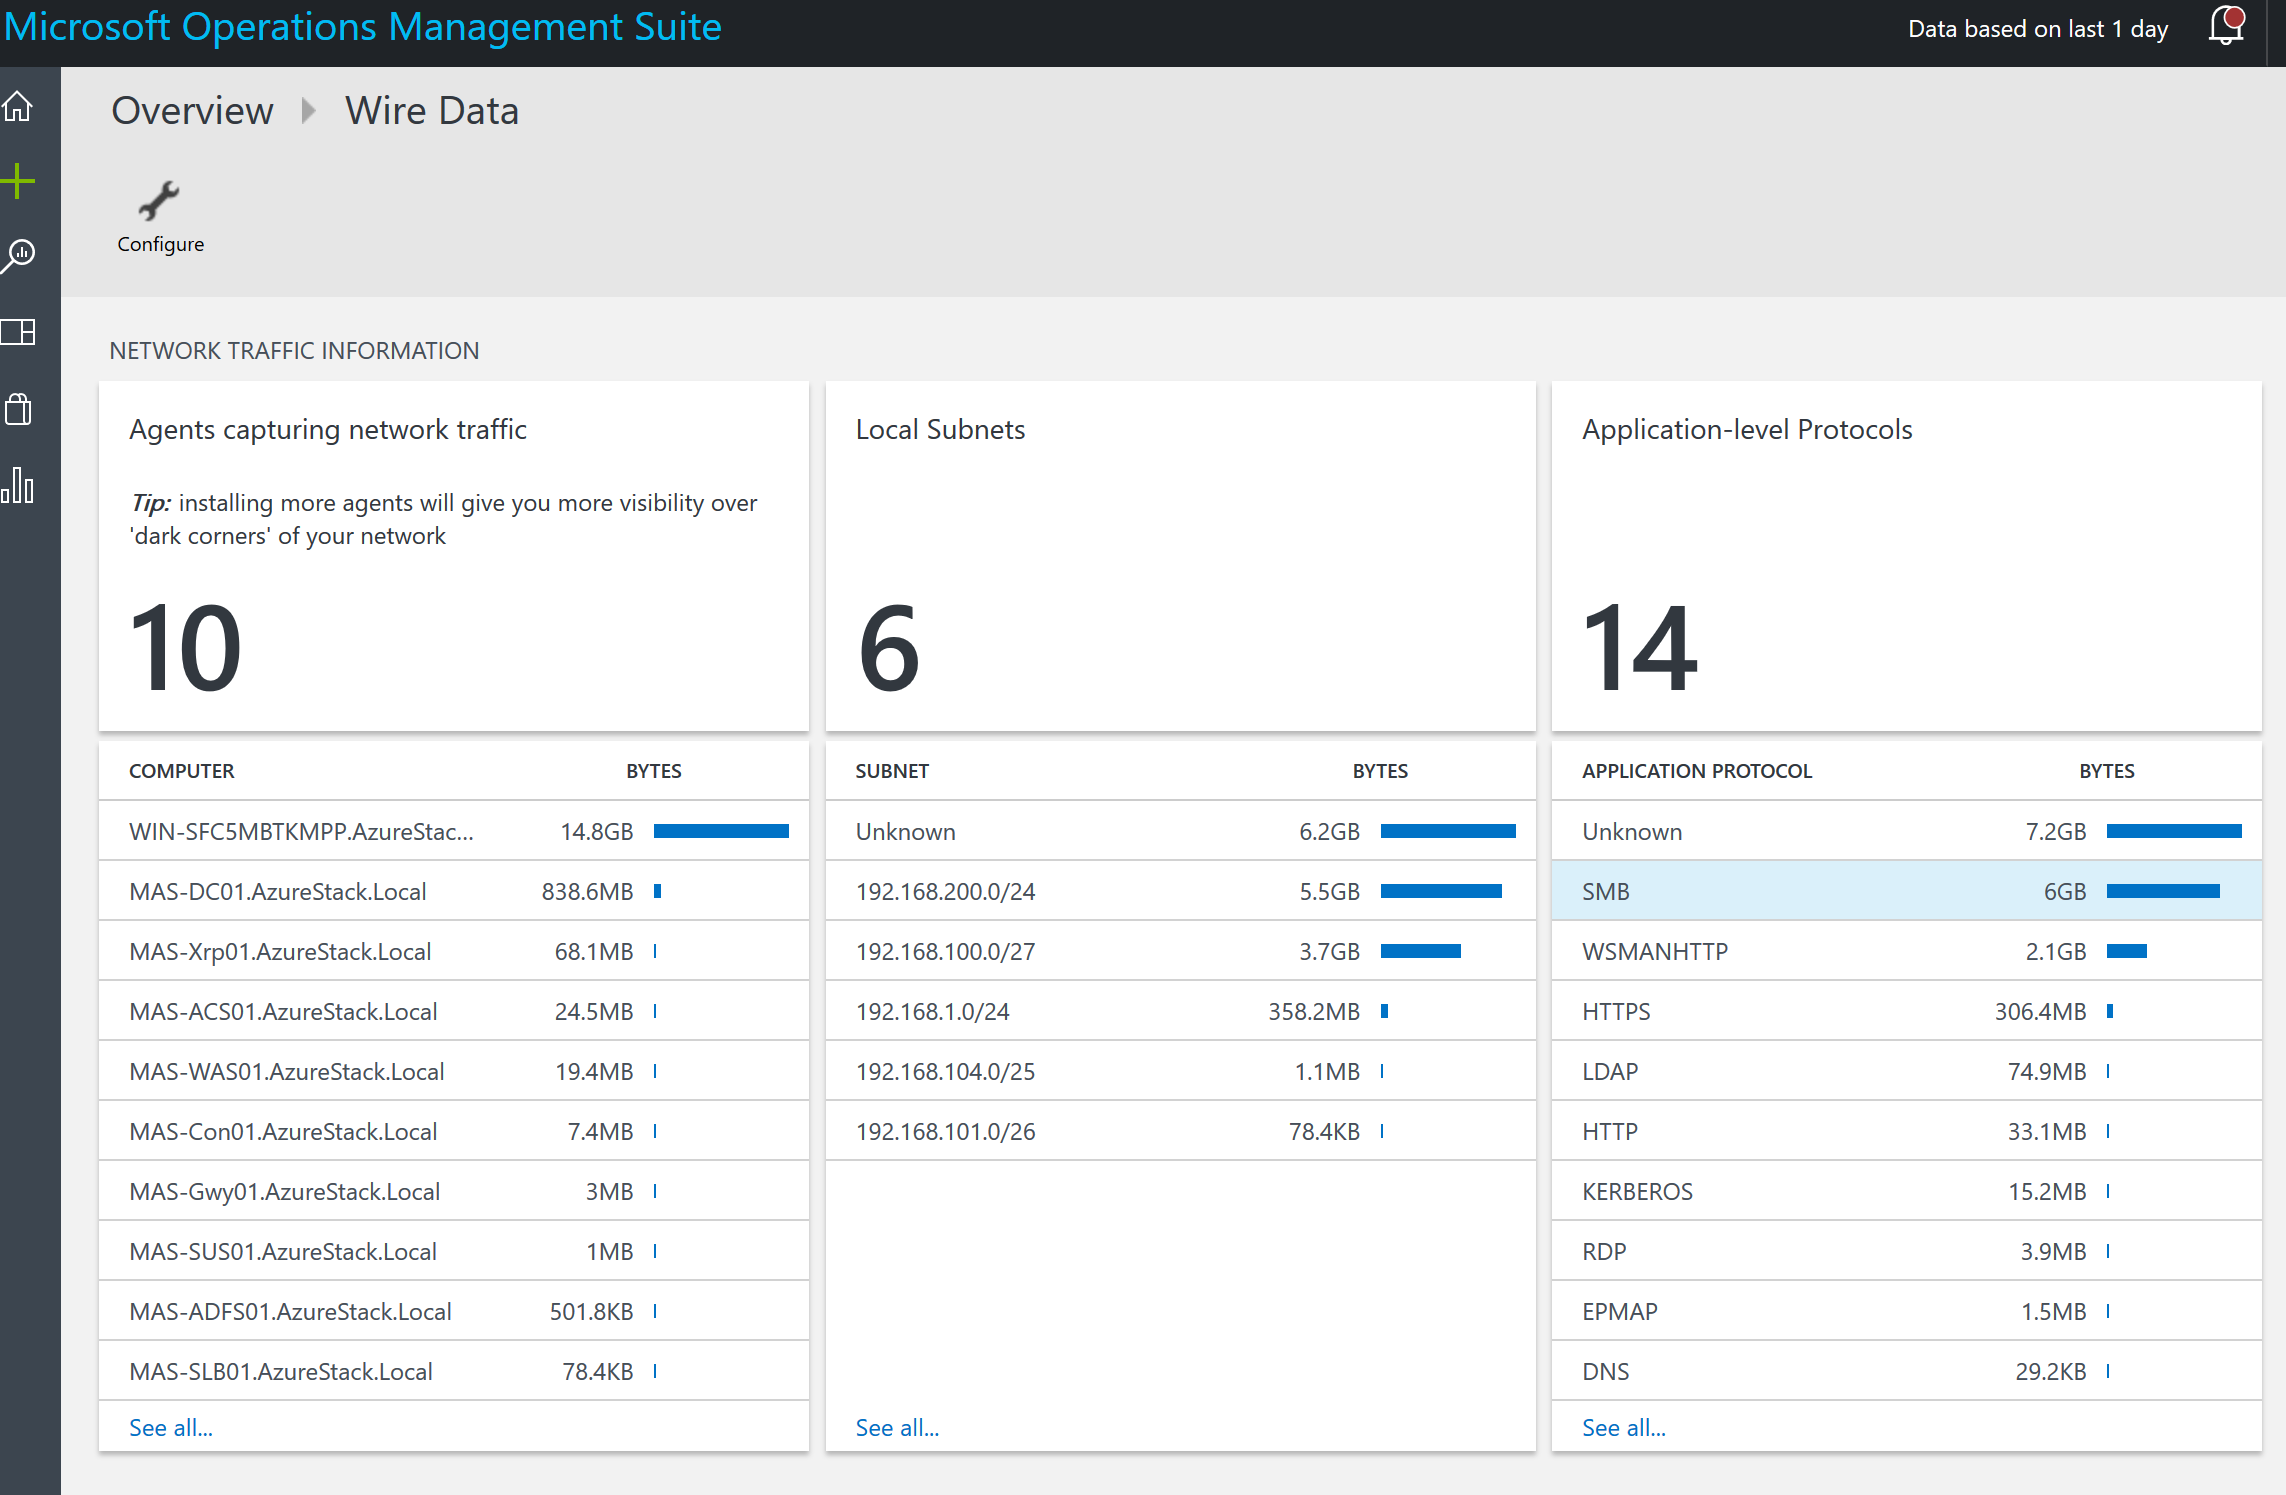
Azure Stack fabric servers wire data:

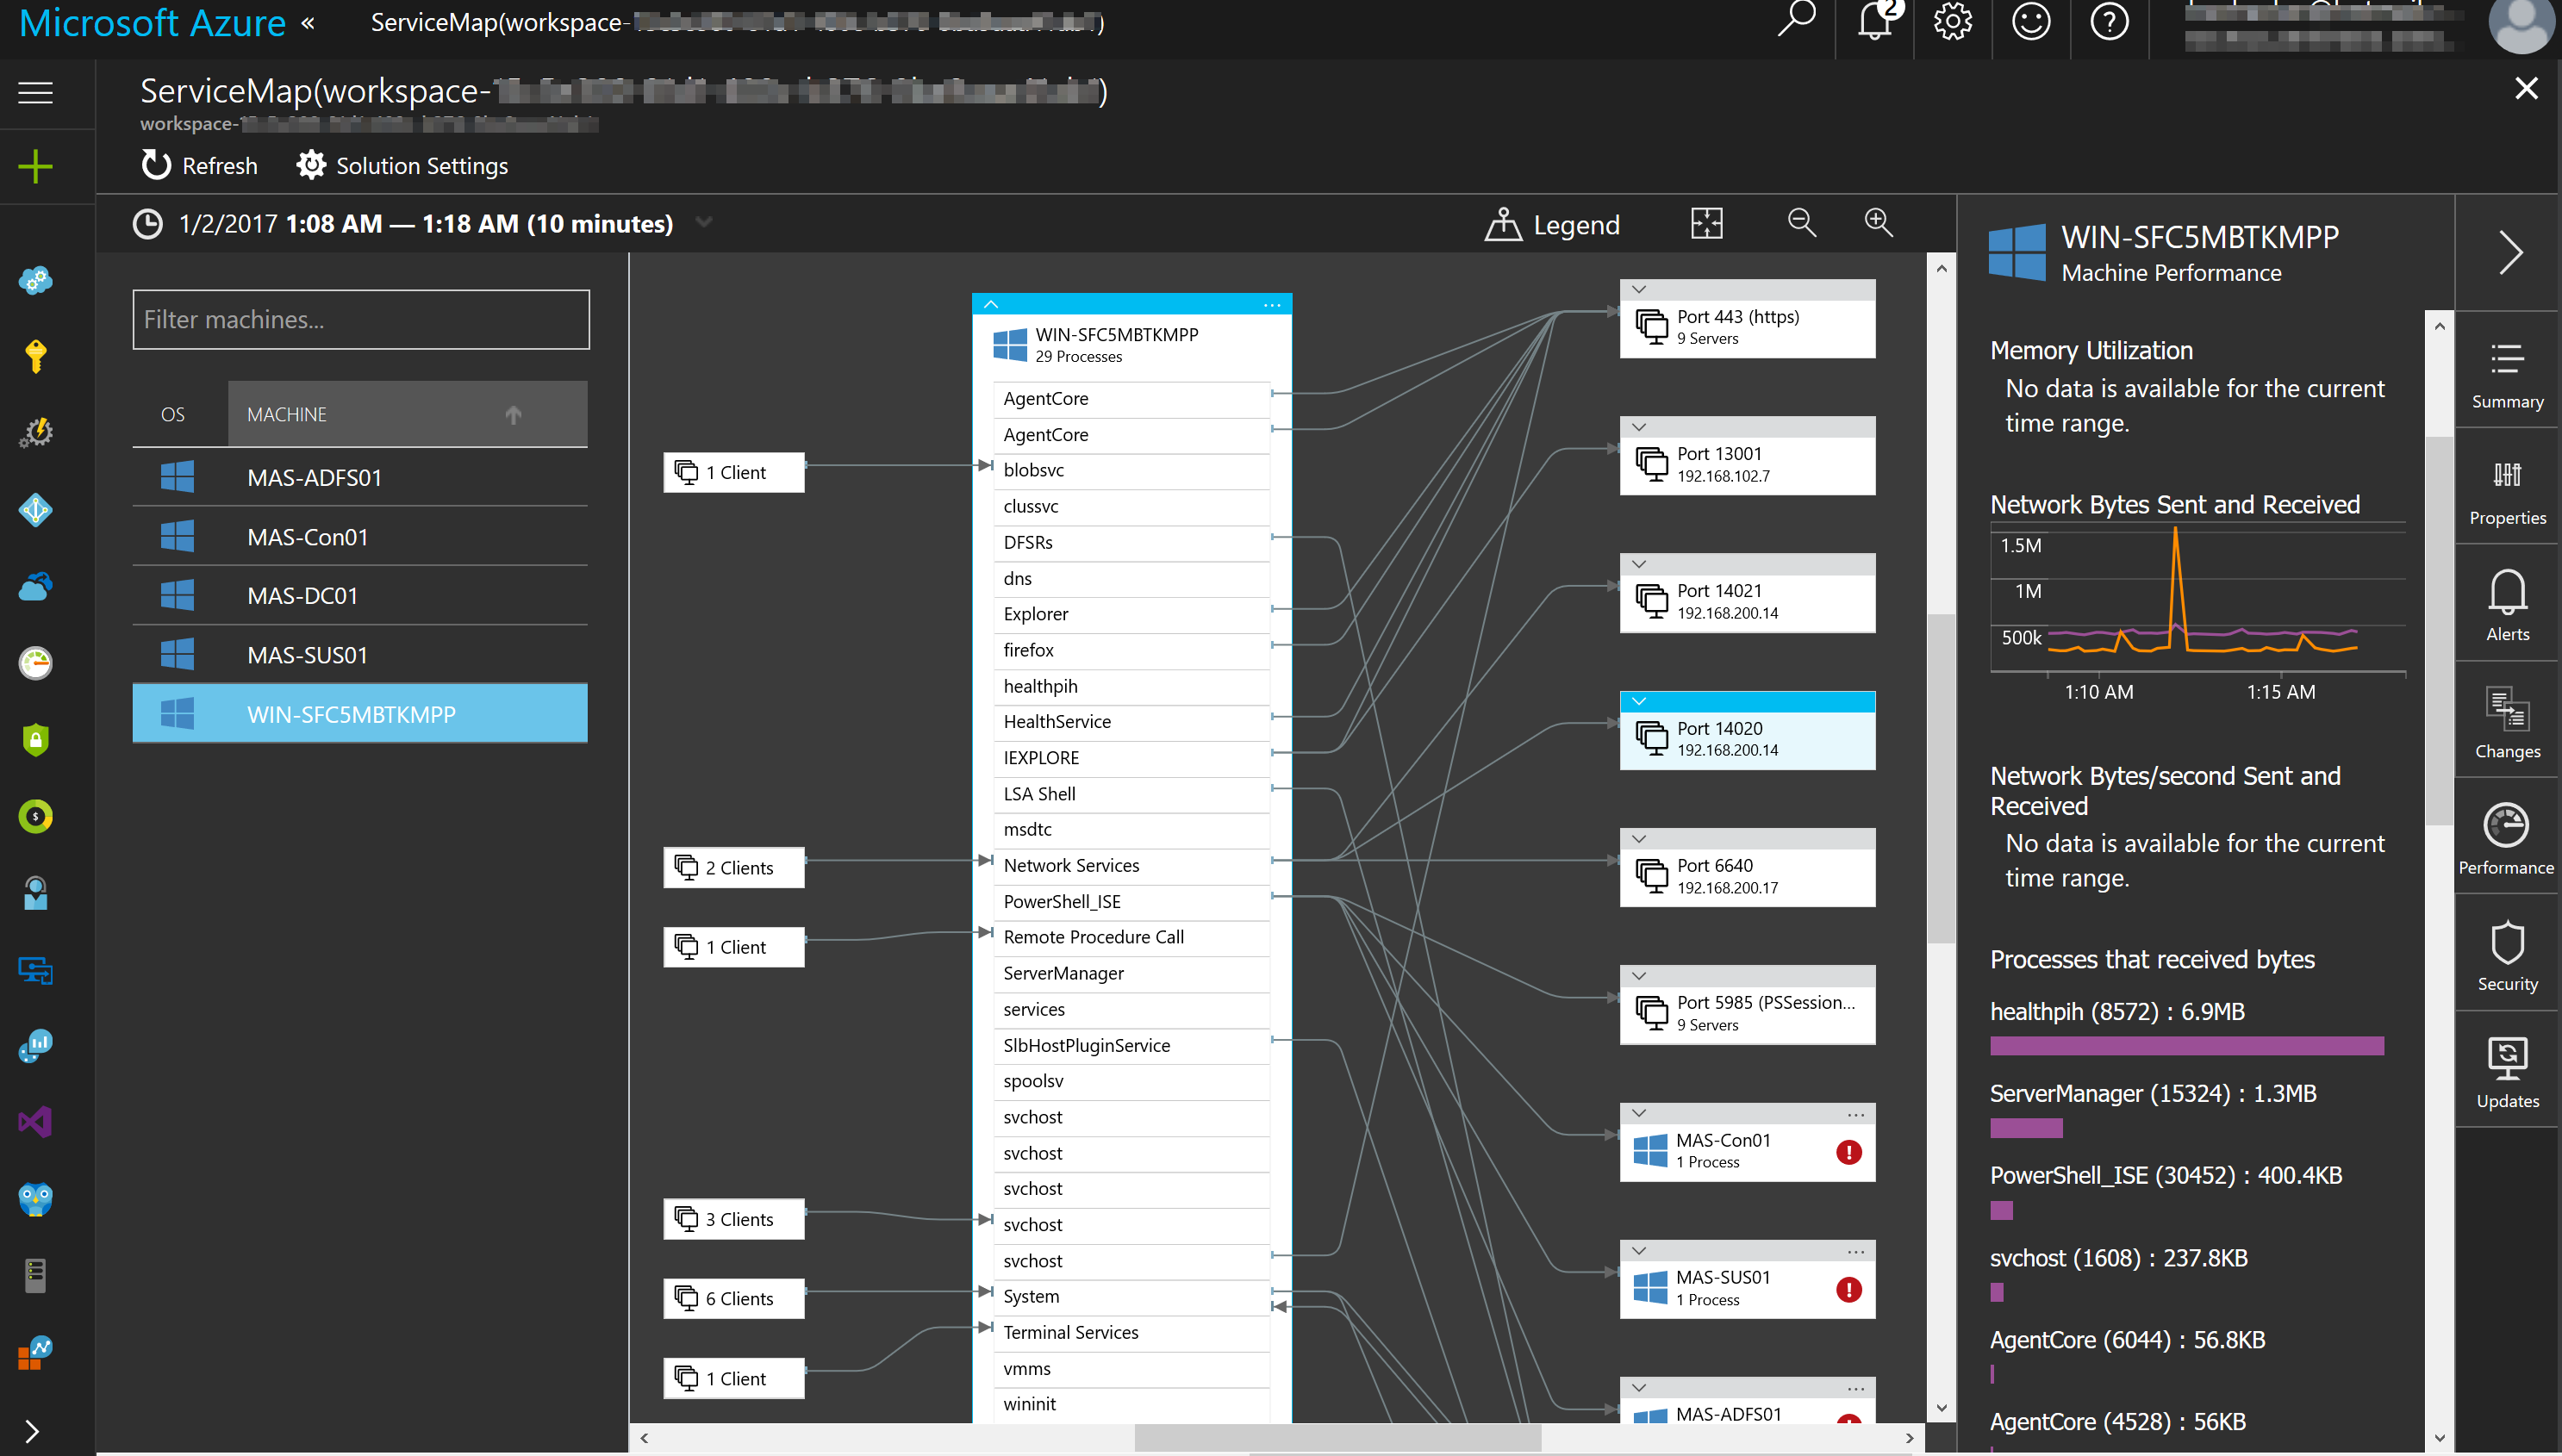
My Azure Stack host in OMS Service Map:

Happy Stacking and OMS’ing!

Read more

External Access to Azure Stack

Here is a little community gift for the new year (2017). Azure Stack expert Ruud Borst (@Ruud_Borst) recently published a blog post titled “Expose the Azure Stack Portal through NAT”. Ruud included a PowerShell script in this blog post that simplifies extending external access to Azure Stack.

The PowerShell script runs on your Azure Stack host and will make the IP mappings in NAT on MAS-BGPNAT01 to expose your Azure Stack instance externally to your network.

We no longer have to work through a bunch of tedious steps to give external access to Azure Stack. Thanks Ruud! Great example of community power. With Ruud’s script it can be done even if you already have Azure Stack deployed. The link to his blog post and script is here:

https://azurestack.eu/2016/12/expose-portal-azurestack-through-nat

Running the script is as easy as running something like this:

.\Expose-AzureStackPortal.ps1 -PortalExternalIP YOURFIRSTIPHERE -ACSExternalIP YOURSECONDIPHERE

Add -AppServiceAPIExternalIP if you are using the App Service RP you will need to specify a 3rd IP. SQL and MySQL both use the -PortalExternalIP so no need for an extra IP for these.

A successful run of the script should look like this:

VERBOSE: Created NAT external addresses 192.168.1.40 and 192.168.1.45 for Portal and ACS.

VERBOSE: Created Static NAT port mappings on 192.168.1.40 to 192.168.102.7 for Portal
VERBOSE: Created Static NAT port mappings on 192.168.1.40 to 192.168.102.12 for XRP
VERBOSE: Created Static NAT port mappings on 192.168.1.45 to 192.168.102.3 for ACS
VERBOSE: Created Static NAT port mappings on 192.168.1.40 to 192.168.102.14 for SQLrp
VERBOSE: Created Static NAT port mappings on 192.168.1.40 to 192.168.102.1 for MySQLrp

The last step in this process is to make sure you add the DNS records on your external network or to the host file on external servers or clients. Ruud explains this in his blog. I extended Azure Stack to my Buchatech lab environment so I went the DNS route.

For DNS entries I used a CSV file and PowerShell to import all of the DNS records I needed for Azure Stack. I used a PowerShell script from a fellow MVP. The blog post with that script can be found here:

http://www.lazywinadmin.com/2012/10/create-dns-entries-using-powershell-and.html

Here is what the CSV file should look like:

name ip type zone dnsserver
 portal 192.168.1.40 A azurestack.local dc.buchatech.com
 api 192.168.1.40 A azurestack.local dc.buchatech.com
 xrp.tenantextensions 192.168.1.40 A azurestack.local dc.buchatech.com
 keyvault.tenantextensions 192.168.1.40 A azurestack.local dc.buchatech.com
 health.adminextensions 192.168.1.40 A azurestack.local dc.buchatech.com
 compute.adminextensions 192.168.1.40 A azurestack.local dc.buchatech.com
 network.adminextensions 192.168.1.40 A azurestack.local dc.buchatech.com
 storage.adminextensions 192.168.1.40 A azurestack.local dc.buchatech.com
*.blob 192.168.1.45 A azurestack.local dc.buchatech.com
*.queue 192.168.1.45 A azurestack.local dc.buchatech.com
*.table 192.168.1.45 A azurestack.local dc.buchatech.com
sqlrp 192.168.1.40 A azurestack.local dc.buchatech.com
mysqlrp 192.168.1.40 A azurestack.local dc.buchatech.com
A azurestack.local dc.buchatech.com

Here is the CSV file I used so you don’t have to create it.

Azure Stack DNS Entries

Notice something different I did with my DNS is I did not add *.azurestack.local. I did not do this because it caused any of the storage DNS entries to respond with the PortalExternalIP instead of the ACSExternalIP. Here is a screenshot of my Azure Stack DNS zone in my Buchatech domain:

After adding the DNS records and installing the Azure Stack certificate in the trusted root authority store I was able to access the Azure Stack portal and connect via PowerShell or Visual Studio without VPN. 🙂

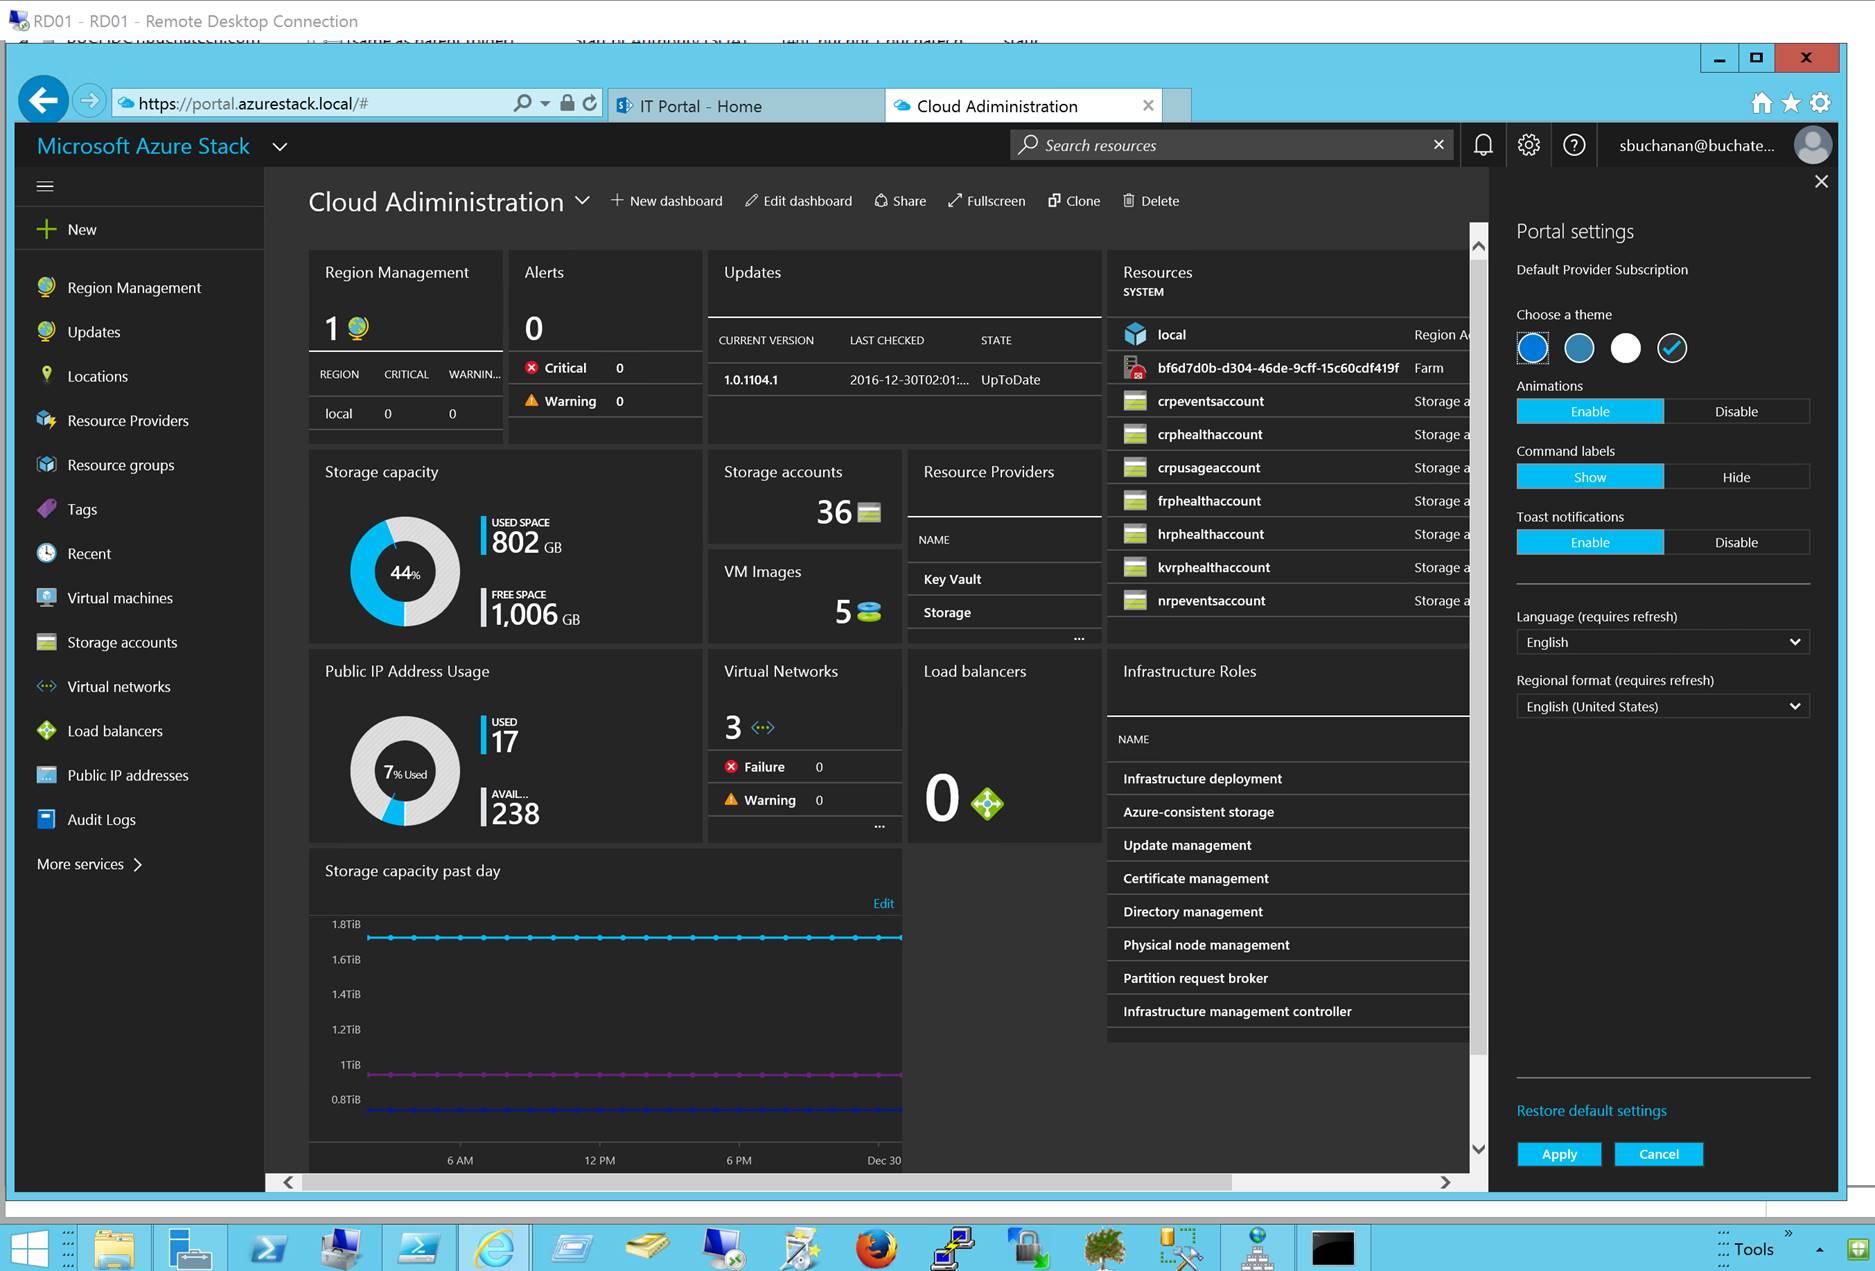
Here is a screenshot of me connecting to Azure Stack’s portal from my Buchatech.com domain on one of my utility servers.

A huge thanks to Ruud for building that PowerShell script. I am excited about bringing access to Azure Stack on my other lab network because this opens up all sorts of possibilities and will net some cool blog posts very soon!

Happy Stacking!

Read more