Microsoft has released a great blog post about customizations that can be done to the Service Manager HTML 5 self-service portal. This article covers the following areas:
- Title
- Logo
- Colors and Tiles
- Icons
- New sidebar link
In the article they talk about what is supported and what is not for customizations. They key is that if you make unsupported customizations be sure to back up your customizations. This is because they might be overwritten when an update rollup is applied and Microsoft will not guarantee those customizations will stay intact. This is no big deal if you back your customizations up as you could simply reapply them after an update rollup.
Here is the link to Microsoft’s blog post on this:
Now I am writing this blog post for few reasons. #1 There are other customizations that have been blogged about by the community that are not included in Microsoft’s article. #2 I want a central location to document all of the customization articles out there. #3 I am using this as a way to document some of the customizations that I have made for later reference. Here is the list:
Customising the Service Manager HTML5 Portal
This a blog post on general customizations of the HTMK5 portal.
By System Center MVP Steve Beaumont: http://www.systemcenter.ninja/2015/12/customising-service-manager-html5-portal.html
HTML5 Portal: Search Query!
This covers changing the Refresh box to Search and adding text to the search input box.
By Ryan Ephgrave:
http://www.ephingadmin.com/service-manager-html5-portal-search-query/
HTML5 Portal: Larger Description Text Box
This covers making the text box on forms larger. I know this is a common ask. This is a great blog post to bookmark.
By Ryan Ephgrave:
http://www.ephingadmin.com/service-manager-html5-portal-larger-description-text-box/
Display “Must Vote” by the side of the user name on Change Request Activity in the portal
”
This can be done by doing following changes in Views\MyActvities\ActtvitiyDetails.cshtml (addition & removal) –
<div class=”name col span_6″ style=”padding:1px;”>@Resources.SelfServicePortalResources.Name</div>
<div class=”name col span_6″ style=”padding:1px;”>Must Vote</div>
<div class=”status col span_6″>@Resources.SelfServicePortalResources.Status</div>
<div class=”comment col span_7″>@Resources.SelfServicePortalResources.Comment</div>
<div class=”voted col span_6 grey-text”>@Resources.SelfServicePortalResources.VotedBy</div>
————————–
<div class=”name col span_6″ style=”padding:1px;”>@reviewerItem.Item1</div>
<div class=”name col span_6″ style=”padding:1px;”>@reviewerDetails[“MustVote”]</div>
<div class=”status col span_6″>@decision</div>
<div class=”comment col span_7″ style=”padding:1px;”>@reviewerDetails[“Comments”]</div>
@if (!reviewerItem.Item2.IsEmpty())
{
<div class=”voted col span_6 grey-text”>@reviewerItem.Item2</div>
}
”
NOTE: When looking for the code to change search for:
@foreach (var item in formData)
Customizations By System Center MVP Steve Buchanan:
GENERAL
In the Web.config file change
<!– Customizable fields starts here –>
FOR TITLE CHANGE:<add key=”CompanyName” value=”Buchatech Self-Service Portal”/>
FOR PORTAL LOGO (COMPANY LOGO) CHANGE: <add key=”CompanyLogoLocation” value=”../Content/images/System Center_Cloud_Logo_Transparent.png”/>
FOR NUMBER CHANGE:<add key=”ITPhone” value=”562-309-4042″/>
FOR EMAIL CHANGE:<add key=”ITEmail” value=”support@buchatech.com”/>
You will notice on my side menu I do not have email address and instead of an IT phone number I have “Service Desk Contact Info:” and my Powered By logo and text are custom.
To change these go to:
C:\inetpub\wwwroot\SelfServicePortal\Views\Shared
And modify the Sidebar.cshtml file.
Find “<div class=”side_nav_bottom”>” and modify:
<div class=”side_nav_report”>
<div>@Resources.SelfServicePortalResources.PoweredBy :</div>
<img src=”~/Content/images/PrivateCloud_logo1.png” alt=”Private Cloud” style=”max-width: 12em;” />
<br /><br />
I COMMENTED OUT THE DEFAULT TEXT HERE: <!–<div>@Resources.SelfServicePortalResources.CantFindSolution</div>–>
<!–<div>@Resources.SelfServicePortalResources.ContactUs</div>–>
I ADDED MY OWN TEXT HERE: <div>Service Desk Contact Info:</div>
</div>
<div class=”row side_nav_phone”>
<span class=”icon-Phone icon-pos icon icon-medium”></span>
<span class=”icon-text icon-text-pos”>@System.Web.Configuration.WebConfigurationManager.AppSettings[“ITPhone”]</span>
</div>
<div class=”row side_nav_mail”>
<span class=”icon-Mail icon-pos icon icon-medium”></span>
<span class=”icon-text icon-text-pos”>@System.Web.Configuration.WebConfigurationManager.AppSettings[“ITEmail”]</span>
</div>
NOTE: Company logo image works best as 32×32.
NOTE: Powered by logo image works best as 36×26.
All images should be stored in: C:\inetpub\wwwroot\SelfServicePortal\Content\images
ICONS
In C:\inetpub\wwwroot\SelfServicePortal\Content\CSS you have to edit the main.css file.
In this file find the [class^=”icon-“].icon-medium{ section.
Here you will see all the font icons. You can add the font icons you want to be available for use in the portals CSS. In the following screenshot I have highlighted the fonts I have added.
As stated on the Microsoft blog post you can find the icons that will work with the portal here:
http://modernicons.io/segoe-mdl2/cheatsheet
In the following section I will mark the font icon placement in custom links in blue. This way you can see how they would be used.
SIDE BAR LINKS
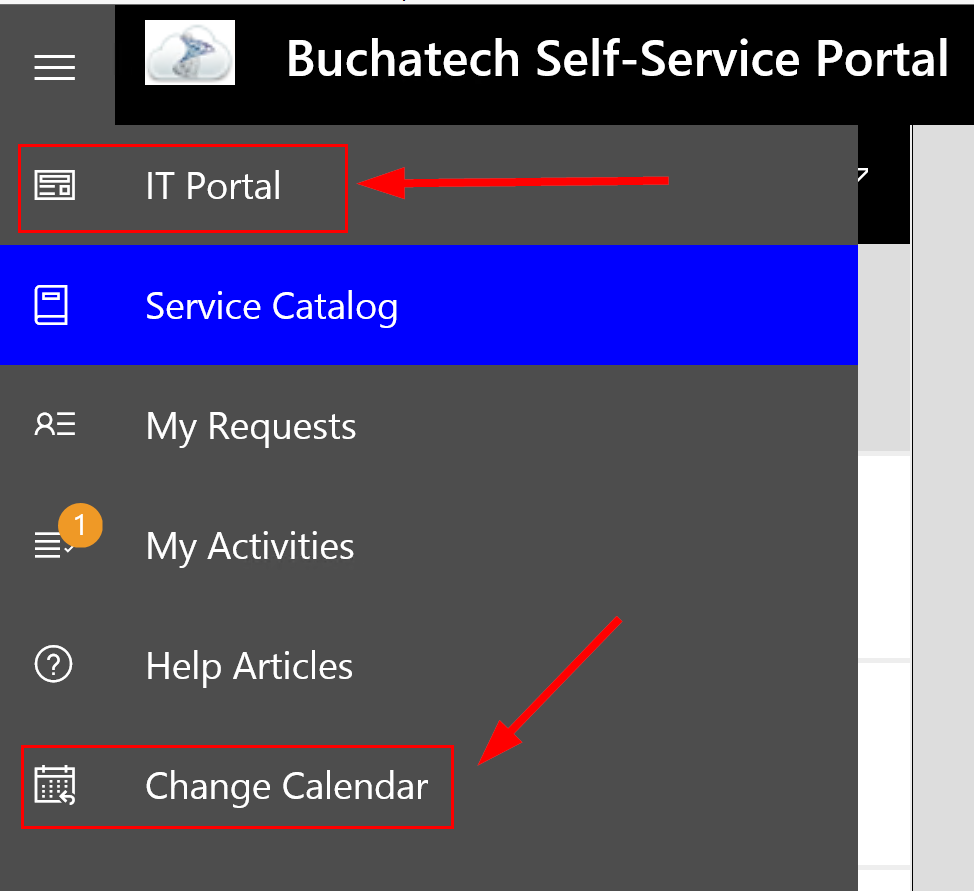
In my portal I added some custom sidebar links.
In C:\inetpub\wwwroot\SelfServicePortal\Views\Shared
Modify the Sidebar.cshtml file.
In the file under “<div class=”side_nav_bar col side_menu”>”
I added the following:
<!– Custom IT Portal Link Begin –>
<div class=”row side_nav_IT Portal” accesskey=”I” tabindex=”4″ data-toggle=”tooltip” title=”IT Portal”>
<a href=”http://portal.buchatech.com” target=”_blank”>
<font color=”white”>
<span class=”icon-PreviewLink icon icon-pos icon-medium”></span>
</font>
</a>
</div>
<!– Custom IT Portal Link End –>
And
<!– Custom Change Calendar Link Begin –>
<div class=”row side_Change Calendar” accesskey=”C” tabindex=”9″ data-toggle=”tooltip” title=”Change Calendar”>
<a href=”http://portal.buchatech.com/_layouts/15/start.aspx#/Lists/Change%20Calendar/calendar.aspx” target=”_blank”>
<font color=”white”>
<span class=”icon-CalendarWeek icon icon-pos icon-medium”></span>
</font>
</a>
</div>
<!– Custom Change Calendar Link End –>
In the file under “<div class=”side_nav_bar_expand col side_menu”>”
I added the following:
<!– Custom IT Portal Link Begin –>
<div class=”row side_nav_IT Portal”>
<span class=”icon-PreviewLink icon-medium icon icon-pos”></span>
<span class=”icon-text icon-text-pos”><a href=”http://portal.buchatech.com” target=”_blank”><font color=”white”>IT Portal</font></a></span>
</div>
<!– Custom IT Portal Link End –>
And
<!– Steve Change Calendar Link Begin –>
<div class=”row side_nav_Change Calendar”>
<span class=”icon-CalendarWeek icon-medium icon icon-pos”></span>
<span class=”icon-text icon-text-pos”><a href=”http://portal.buchatech.com/_layouts/15/start.aspx#/Lists/Change%20Calendar/calendar.aspx” target=”_blank”><font color=”white”>Change Calendar</font></a></span>
</div>
<!– Steve Change Calendar Link End –>
Here is the Microsoft link for adding sidebar links:
COLORS LOOK AND FEEL
Custom Buchatech look and feel:
Default look and feel:


