2019 Review – Blogs, Pluralsight, Speaking, Podcasts, Books, Promotion and more

2019 is at its end closing out the current decade beginning a new decade! The 2010s have been great with a lot of personal and professional growth. I am looking forward to and welcome what the 2020s will bring! Overall 2019 was a great year with lots of fantastic adventures and accomplishments. In this blog post, I am going to reflect on 2019. I am also going to try something new in this blog post. I will recount some failures from this year along with the successes. I typically don’t post about failures or even speak about them publicly but I think it is important to reflect on them as a learning opportunity and share with others as we all win some and lose some.

Ok. Let me briefly recount the losses from 2019. No so good events from 2019 are:

I failed a couple of certifications including the AZ-302 upgrade exam (should have studied more) and the Terraform beta exam. I reviewed an Azure book that did not publish. This one was out of my control but still something this year that I am not proud of but definitely learned to ask more questions about a project like this before saying yes.
In 2019 I was not accepted to speak at Ignite. It’s actually been several years since I have been accepted to speak at Ignite. That is the list. Again we win some things in life and we lose some. The important thing is to learn from any losses, roll with the punches and keep moving forward.

Now for the fun part of this post. Let’s move onto the wins! First off the #1 win of 2019 is that my family was healthy and happy for another year! Also, I was able to continue to focus on Azure and DevOps adding in Containers, Kubernetes and more open source in general. Here is a full recount of what occurred in 2019.

Read more

Docker JumpStart Virtual Workshop

I want to share here about Docker training I will be attending later this month June 24th/25th, 2019. It is a Docker JumpStart Virtual Workshop. I am excited about this training because it will be delivered by a fellow Microsoft MVP’s Dan Wahlin and Mike Pfeiffer. Also Dan Wahlin is a Docker Captain.

For those that don’t know a Docker Captain is like a Microsoft MVP but for Docker. There will even be some Kubernetes covered on day 2. This is shaping up to be some great training.

As of now there is still room in this class and its less than $300 USD! If you have wanted to get up to speed on Docker this is a good low cost way to do it. Here is a link to sign up: Docker JumpStart Workshop

Here is what will be covered across the 2 days (from the training website):

Day 1:

Read more

Enhance Azure ARM Template Authoring in VS Code

For anyone working with Azure sooner or later, you will end up authoring Azure Resource Manager (ARM) Templates. Working with ARM templates, in the beginning, can seem painful but once you get the hang of them it is a great way to build out and deploy your Azure as code. In this blog post, I am not going to go into detail on authoring ARM Templates. In this blog post, I am going to list out the extensions that I use in VS Code to enhance the ARM Template authoring experience. Recently whenever I am demoing or showing others my ARM Templates in VS Code they ask me how they can also make their VS Code look like mine when working with ARM Templates. I figured it makes sense to write up a blog about how I have my VS Code configured for ARM Templates.

If you are not using VS code, you should change that and start using it today! I use it pretty much for any scripting such as PowerShell, coding, any time I need a text editor and more. I even use it to work directly with Azure via cloud shell and to work with Docker containers and Kubernetes clusters. Here is a quick snapshot of what VS Code is for anyone not familiar with it. VS Code is an open source – code editor developed by Microsoft that is cross-platform able to run on Windows, Linux and macOS.​ At a high level here is what VS Code includes:

  • Has support for hundreds of languages.​
  • Has Integrated Terminal.​
  • Powerful developer tool with functionality, like IntelliSense code completion and debugging. ​
  • Includes syntax highlighting, bracket-matching, auto-indentation, box-selection, snippets, and more.​
  • Integrates with build and scripting tools to perform common tasks making everyday workflows faster. ​
  • Has support for Git to work with source control systems such as Azure DevOps, Bitbucket and more.​
  • Large Extension Marketplace of third-party extensions.​

As you can see there is a ton of stuff you can do with VS Code. VS Code is a must have for anyone doing CloudOps work with Azure and more. Now let’s look at the VS Code extensions I use for ARM Templates. I am including the link for each extension I will talk about. You can also simply load these right in VS Code.

Azure Resource Manager Tools:   https://marketplace.visualstudio.com/items?itemName=msazurermtools.azurerm-vscode-tools​

The Azure Resource Manager Tools extension provides language support for ARM Templates and language expressions. It can be used to create and edit Azure Resource Manager templates. ​High-level features include:

  • ARM Template Outline.​
  • IntelliSense.​
  • Support for built-in ARM functions, Parameter references, Variable references, resourceGroup() properties, subscription() properties, and more.
  • Bracket matching, Errors/Warnings and more.​

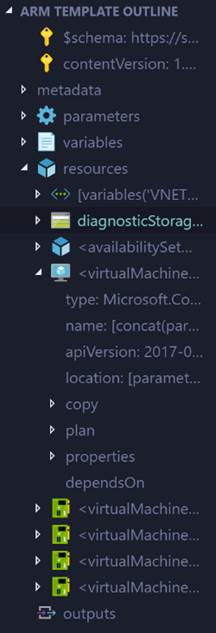
VS Code natively supports JSON. Azure Resource Manager Tools makes VS Code ARM Template aware. One of the biggest benefits it gives me is the ARM Template Outline making it much easier and faster to navigate the sections of an ARM Template. Here is what it looks like.

Next up is two extensions that both should be added. It is Material Theme and Material Theme Icons.

Material Theme –   https://marketplace.visualstudio.com/items?itemName=Equinusocio.vsc-material-theme

This extension gives you some very cool themes and works in combination with the Azure Resource Manager Tools extension to give you the new color coding of your ARM Template code. The color coding highlights different parts of the ARM Template code such as parameters, variables, functions and more making it much easier to read through all of the code in ARM templates. Here is an example:

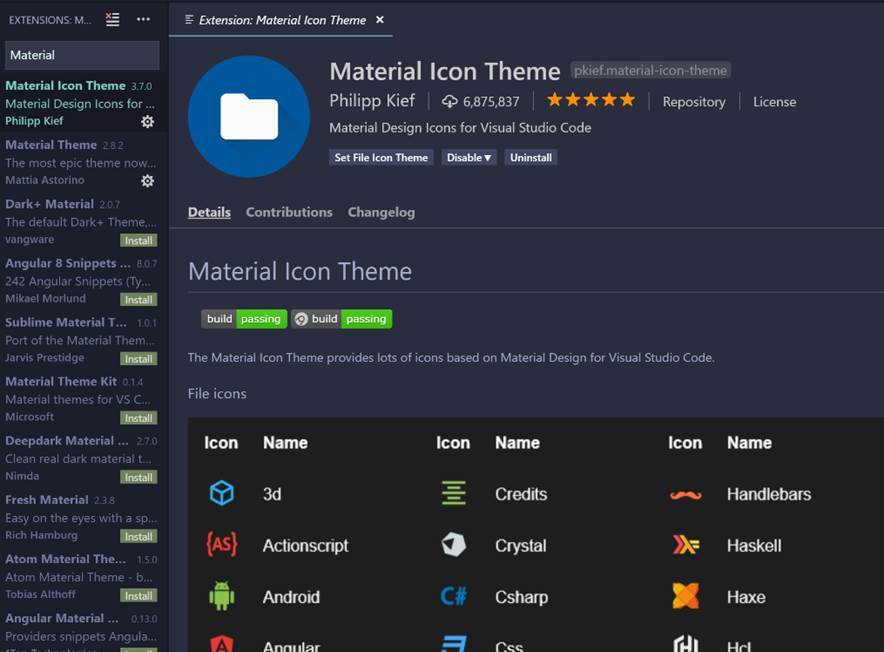
Material Icons Themehttps://marketplace.visualstudio.com/items?itemName=PKief.material-icon-theme

This extension adds a nice set of icons to your VS code. This extends beyond just ARM Templates. Again this makes it visually easier when navigating around VS code and ARM Templates. I typically use a PowerShell deployment script to deploy ARM Templates from VS Code into Azure. This icon them makes it easy to see ARM Template files and PowerShell files.

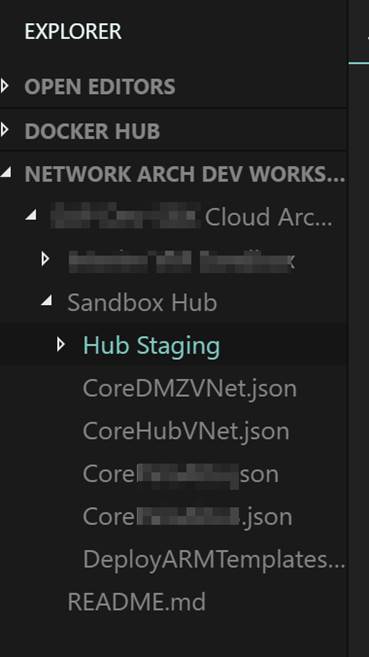
Here is a what it looks like without and with the Materials Icon Theme.

Without it:

With it:

ARM Snippets –  https://marketplace.visualstudio.com/items?itemName=samcogan.arm-snippets

The final extension I want to cover is ARM Snippets. This extension was developed by Sam Cogan (@samcogan) a fellow Microsoft MVP. In addition to the aforementioned marketplace link for this extension, you can find Sam’s Github repo for it here https://github.com/sam-cogan/arm-snippets-vscode.

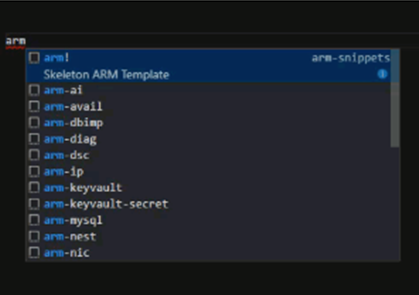
This extension adds snippets to VS Code for creating Azure Resource Manager Templates. This is helpful when you are working in VS Code and need to add something to your template for example a parameter, resource etc. You simply type arm and a menu appears with a list of the available snippets. For example if you want to add a virtual machine you could type arm-vm and a list of Windows and Linux VM resources snippets will appear. Click on the one you want and it will add the code block for you. This makes authroing templates much-much faster. This is shown in the following screenshot:

​The snippets include:​

  • Skeleton ARM Template​ (Note: This will load a skeleton for a fresh new ARM Template.)
  • Windows and Linux Virtual Machines​
  • Azure Web Apps​
  • Azure Functions​
  • Azure SQL​
  • Virtual Networks, Subnets and NSG’s​
  • Keyvault​
  • Network Interfaces and IP’s​
  • Redis​
  • Application Insights​
  • DNS​
  • Virtual Machines​
  • And more……

Note that the ARM Snippets extension is derived from the Cross Platform Tooling Samples. The Cross Platform Tooling Samples are a set of templates, snippets, and scripts for creating and deploying Azure Resource Management Templates in cross-platform environments. It sounds like this is updated more often and worth looking into loading. It does not have a friendly installer though like the ARM Snippets extension does though. Here is the link to the Cross Platform Tooling Samples Github repo: https://github.com/Azure/azure-xplat-arm-tooling

End Result:

Below is a screenshot of what your ARM Templates will look like after loading all of the extensions mentioned in this blog post into your VS Code.

That wraps up this blog post. I hope this is helpful to those out there working with ARM Templates in VS Code. If you have any additional tips to share please add a comment. Happy authoring!

Read more

Speaking at MMS 2019

In a week I will be speaking at MMS 2019! I will be presenting 3 sessions and co-hosting 2 panels. If you are attending MMS check out my sessions and the panels. Here is the rundown:

Sessions:

Monday, May 6 • 1:00pm – 2:45pm
Deploying Infrastructure as Code with Azure and Terraform – With fellow Microsoft MVP Ned Bellavance
https://sched.co/N6cC

Tuesday, May 7 • 8:00am – 9:45am
Improving your on-prem and cloud security with Azure Security Center – With fellow Microsoft MVP Ned Bellavance
https://sched.co/N6c9

Thursday, May 9 • 1:00pm – 2:45pm
Mastering Azure with Visual Studio Code – With fellow Microsoft MVP Peter De Tender.
https://sched.co/N6d4

Panels:

Tuesday, May 7 • 3:00pm – 4:45pm
Azure Governance and Management Panel
https://sched.co/N6gD

This panel includes an all-star group from Microsoft including:

Tim Benjamin
Principal Group PM Manager, Microsoft

Michael Greene
Principal Program Manager, Microsoft

Jim Britt
Senior Program Manager, Microsoft

and

Eamon O’Reilly
Principal Program Manager, Microsoft

Thursday, May 9 • 3:00pm – 4:45pm
Azure Stack Panel Discussion – (400)
https://sched.co/N6hE

This panel consists of a bunch of Microsoft MVP rockstars and Microsoft staff including:

Ned Bellavance
Founder / Microsoft MVP, Ned in the Cloud LLC

Thomas Maurer
Senior Cloud Advocate, Microsoft

Kristopher Turner
Sr. Cloud Architect/Microsoft MVP, NTT Data Services

Bert Wolters
Principal Consultant, Class-IT

Here is the MMS website:
https://mmsmoa.com

Read more

Featured on Cloudskills.fm and New Azure course

FEATURED ON CLOUDSKILLS.FM ~

CloudSkills.fm is a podcast by fellow Microsoft MVP Mike Pfeiffer and veteran in the tech space with 5 books under his belt and numerous courses on Pluralsight. The podcast can be found here: cloudskills.fm. Mike is an all around good guy and I was honored to be a featured guest on one of his podcast episodes. The podcast is weekly with technical tips and career advice for people working in the cloud computing industry. The podcast is geared for developers, IT pros, those making move into cloud.

On this episode Mike and I talked about managing both the technical and non-technical aspects of your career in the cloud computing industry. We also discuss DevOps stuff around Docker, Azure Kubernetes Service, Terraform and cloud stuff around Azure management including my 5 points to success with cloud. You can listen to the podcast here:

https://cloudskills.fm/015

Also on you can listen here: iTunes: https://podcasts.apple.com/ca/podcast/cloudskills-fm/id1448194100 and PlayerFM: https://player.fm/series/cloudskillsfm/ep-015-managing-your-cloud-career .

NEW AZURE COURSE ~

I’m very excited Opsgility recently published a new Azure course by me titled: “Deploy and Configure Infrastructure”. This course is part of the AZ 300 certification learning path for Microsoft Azure Architect Technologies. More about the AZ 300 certification can be found here: https://www.microsoft.com/en-us/learning/exam-az-300.aspx. The course is over 4 hours of Azure content!

Description of the course:

In the course learn how to analyze resource utilization and consumption, create and configure storage accounts, create and configure a VM for Windows and Linux, create connectivity between virtual networks, implement and manage virtual networking, manage Azure Active Directory, and implement and manage hybrid identities.

Objectives of the course:

  • Configure diagnostic settings on resources
  • Create baseline for resources
  • Utilize Log Search query functions
  • Configure network access to the storage account
  • Implement Azure storage replication
  • Configure high availability
  • Deploy and configure scale sets
  • Modify ARM Templates
  • Configure Azure Disk Encryption for VMs
  • Create and configure VNET peering
  • Install and configure Azure AD Connect

It can be watched here:

https://skillmeup.com/courses/player/deploy-and-configure-infrastructure

Read more

Deploy Rancher on Azure for Kubernetes Management

Lately I have been hearing a lot about a solution named Rancher in the Kubernetes space. Rancher is an open source Kubernetes Multi-Cluster Operations and Workload Management solution. You can learn more about Rancher here: https://www.rancher.com.

In short you can use Rancher to deploy and manage Kubernetes clusters deployed to Azure, AWS, GCP their managed Kubernetes offerings like GCE, EKS, AKS or even if you rolled your own. Rancher also integrates with a bunch of 3rd party solutions for things like authentication such as Active Directory, Azure Active Directory, Github, and Ping and logging solutions such as Splunk, Elasticsearch, or a Syslog endpoint.

Recently training opened up for some Rancher/Kubernetes/Docker training so I decided to go. The primary focus was on Rancher while also covering some good info on Docker and Kubernetes. This was really good training with a lot of hands on time, however there was one problem with the labs. The labs had instructions and setup scripts ready to go to run Rancher local on your laptop or on AWS via Terraform. There was nothing for Azure.

I ended up getting my Rancher environment running on Azure but it would have been nice to have some scripts or templates ready to go to spin up Rancher on Azure. I did find some ARM templates to spin up Rancher but they deployed an old version and it was not clear in the templates on where they could be updated to deploy the new version of Rancher. I decided to spend some time building out a couple of ARM templates that can be used to quickly deploy Rancher on Azure and add a Kubernetes host to Rancher. In the ARM template I pulled together it pulls the Rancher container from Docker Hub so it will always deploy the latest version. In this blog post I will spell out the steps to get your Rancher up and running in under 15 minutes.

First off you can find the ARM Templates here on my Github here: https://github.com/Buchatech/DeployRanchertoAzure.

The repository consists of ARM templates for deploying Rancher and a host VM for Kubernetes. NOTE: These templates are intended for labs to learn Rancher. They are not intended for use in production.

In the repo ARM Template #1 named RancherNode.JSON will deploy an Ubuntu VM with Docker and the latest version of Rancher (https://hub.docker.com/r/rancher/rancher) from Docker Hub. ARM Template #2 named RancherHost.JSON will deploy an Ubuntu VM with Docker to be used as a Kubernetes host in Rancher.

Node Deployment

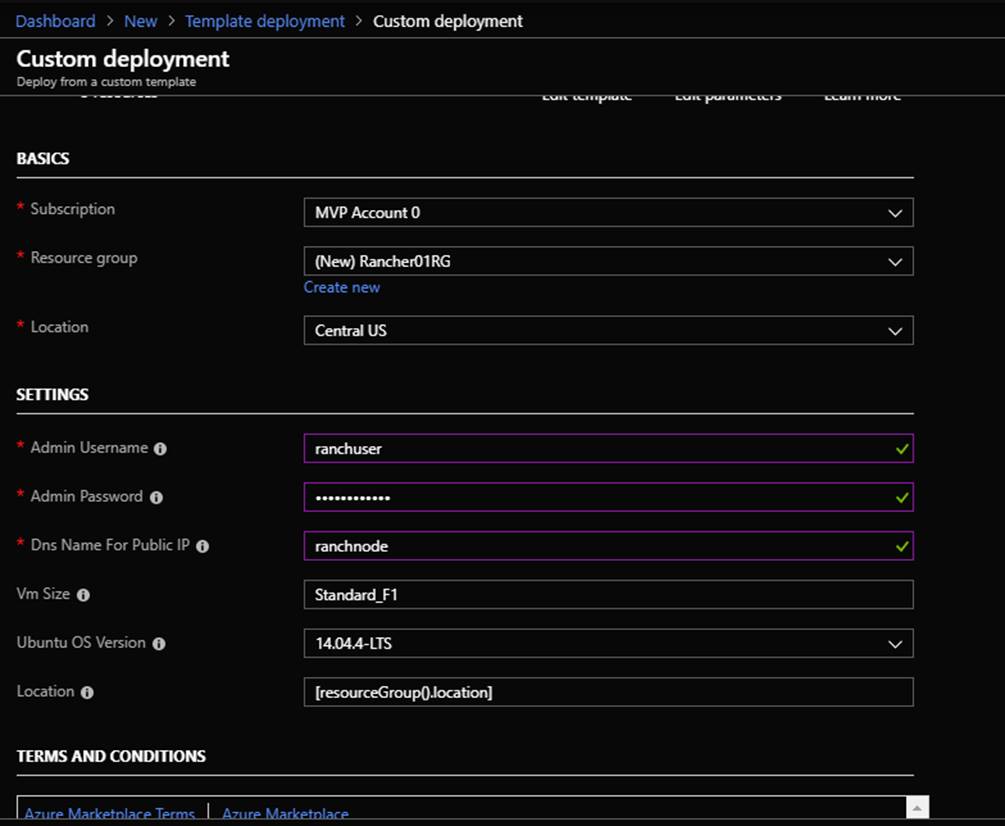
Deploy the RancherNode.JSON ARM template to your Azure subscription through “Template Deployment” or other deployment method. You will be prompted for the following info shown in the screenshot:

Host Deployment

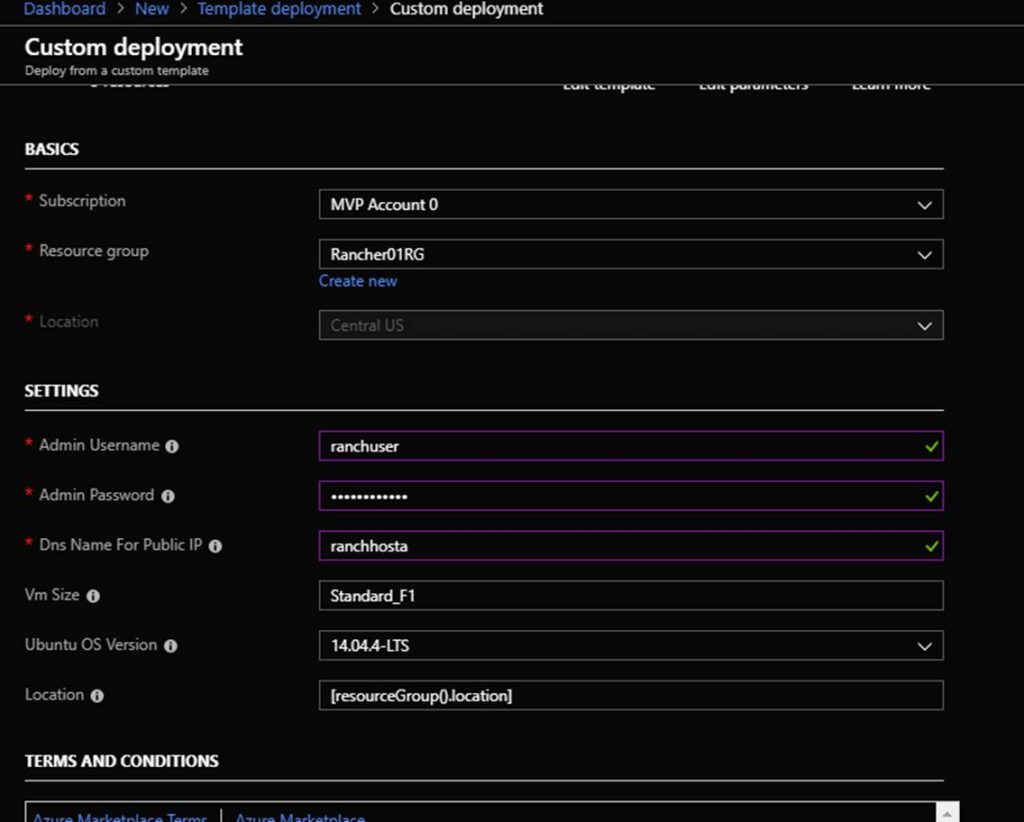
Deploy the RancherHost.JSON ARM template to your Azure subscription through “Template Deployment” or other deployment method. Note that that should deploy this into the same Resource Group that you deployed the Rancher Node ARM template into. You will be prompted for the following info shown in the screenshot:

After the Rancher Node and Rancher Host ARM templates are deployed you should see the following resources in the new Resource Group:

NameType
RancherVNet Virtual network
RancherHost Virtual machine
RancherNode Virtual machine
RancherHostPublicIP Public IP address
RancherNodePublicIP Public IP address
RancherHostNic Network interface
RancherNodeNic Network interface
RancherHost_OSDisk Disk
RancherNode_OSDisk Disk

Next navigate the Rancher portal in the web browser. The URL is the DNS name of the Rancher Node VM. You can find the DNS name by clicking on the Rancher Node VM in the Azure portal on the overview page. Here is an example of the URL:

https://ranchernode.centralus.cloudapp.azure.com

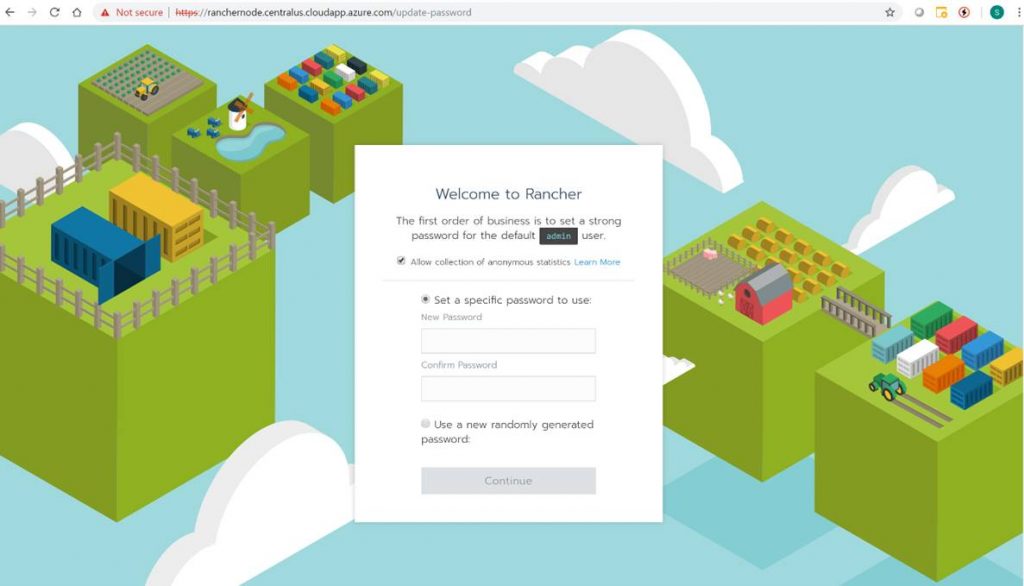
The Rancher portal will prompt you to set a password. This is shown in the following screenshot.

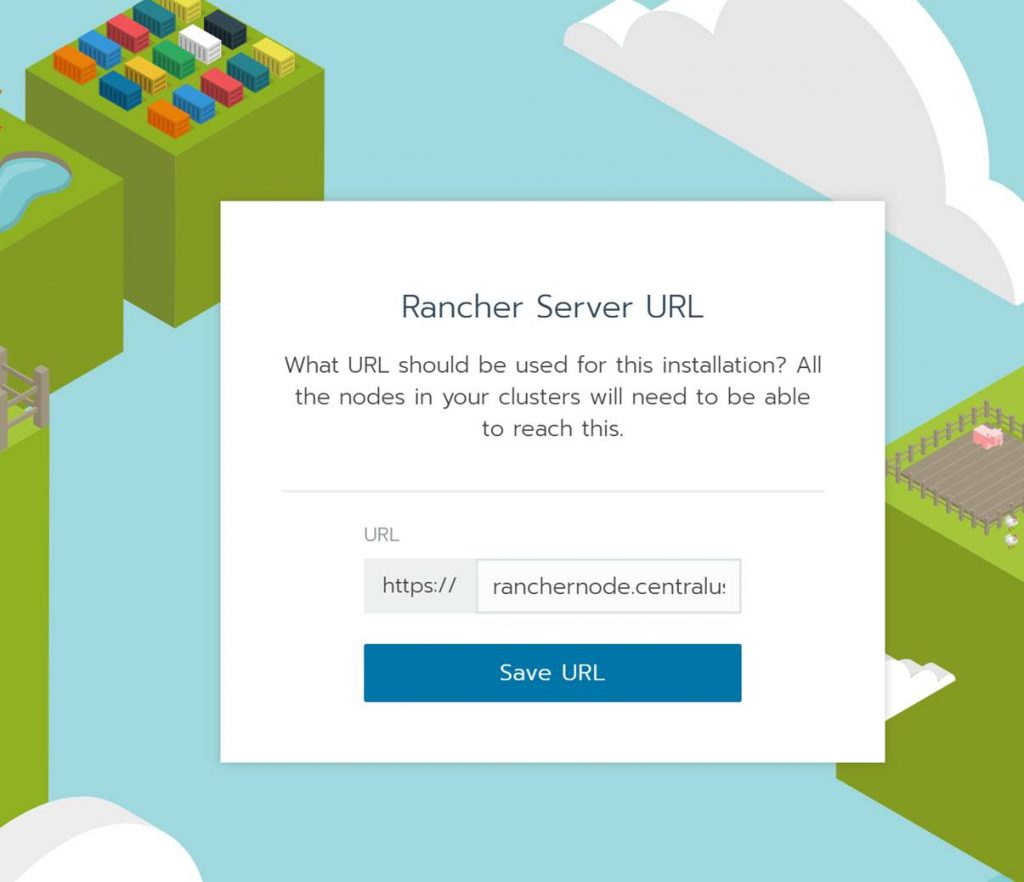
After setting the password the Rancher portal will prompt you for the correct Rancher Server URL. This will automatically be the Rancher Node VM DNS name. Click Save URL.

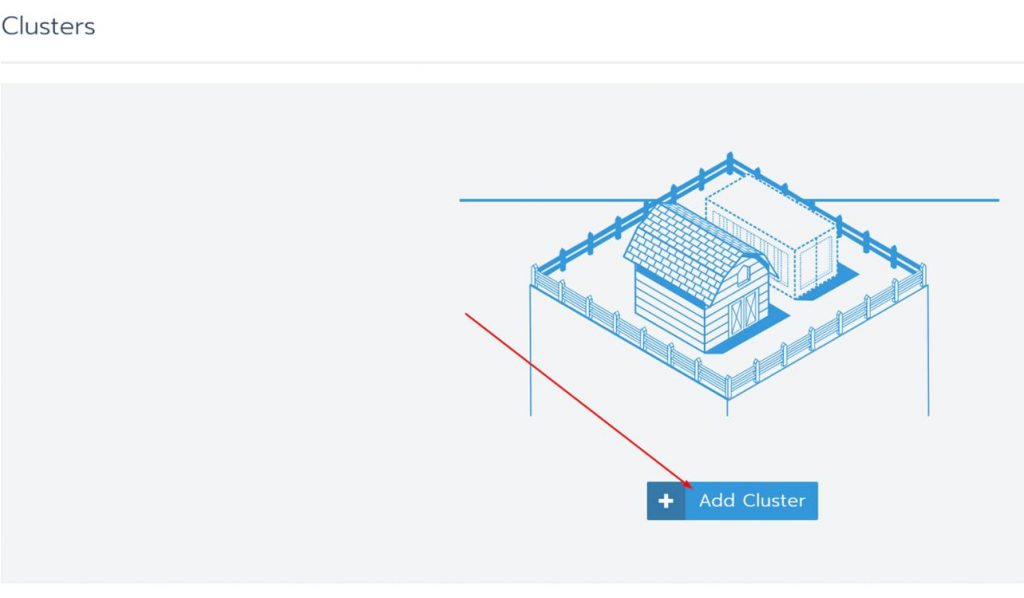
You will then be logged into the Rancher portal. You will see the cluster page. From here you will want to add a cluster. Doing this is how you add a new Kubernetes cluster to Rancher. In this post I will show you how to add a cluster to the Rancher Host VM. When it’s all said and done Rancher will have successfully deployed Kubernetes to the Rancher Host VM. Note that you could add a managed Kubernetes such as AKS but we won’t do that in this blog. I will save that for a future blog post!

Click on Add Cluster

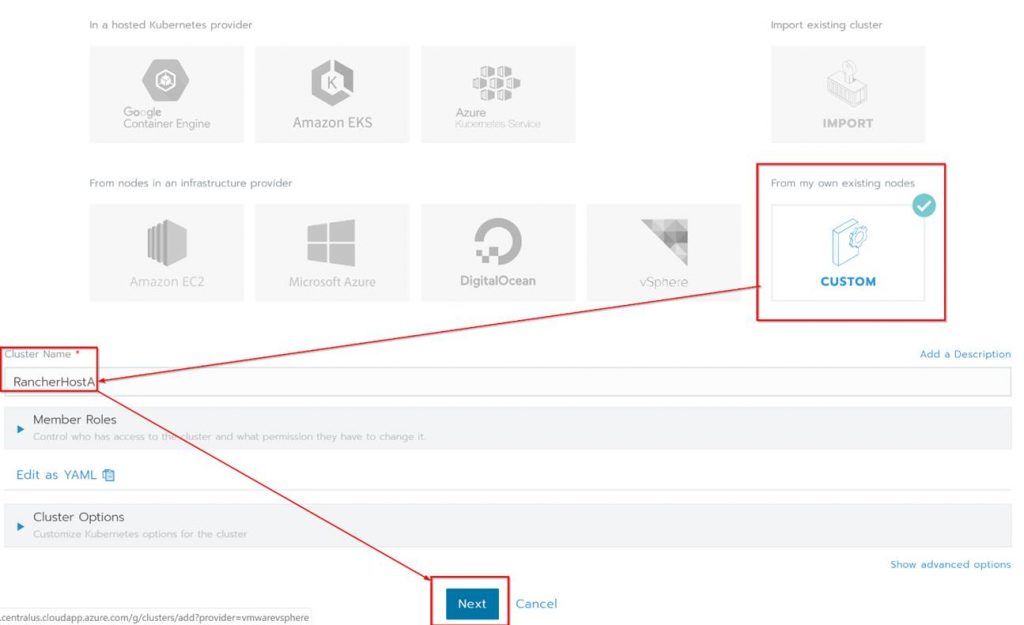
Under “From my own existing nodes” Click on custom, give the cluster a name and click Next.

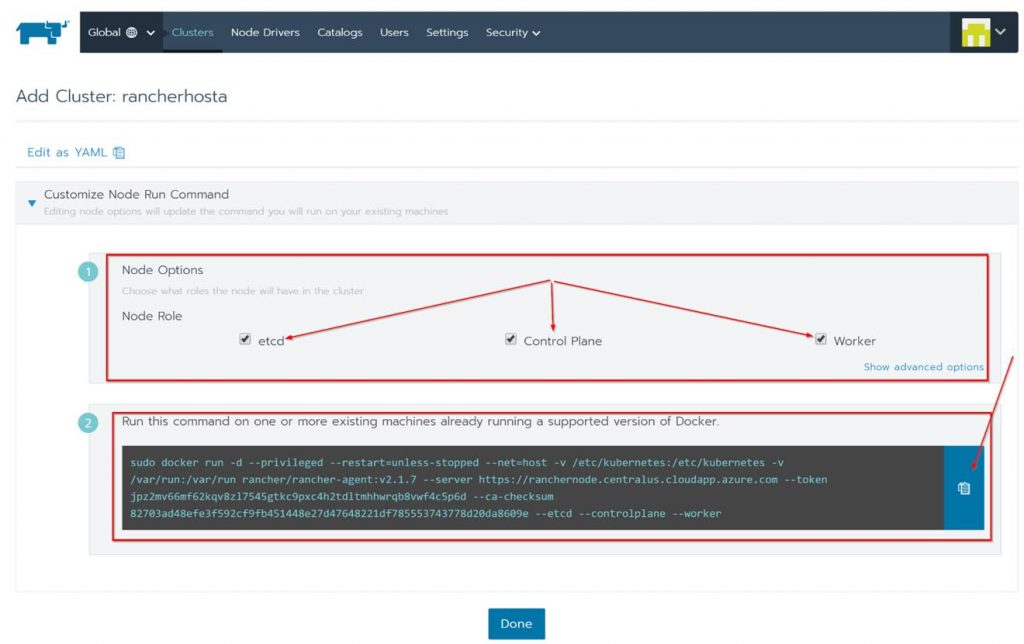
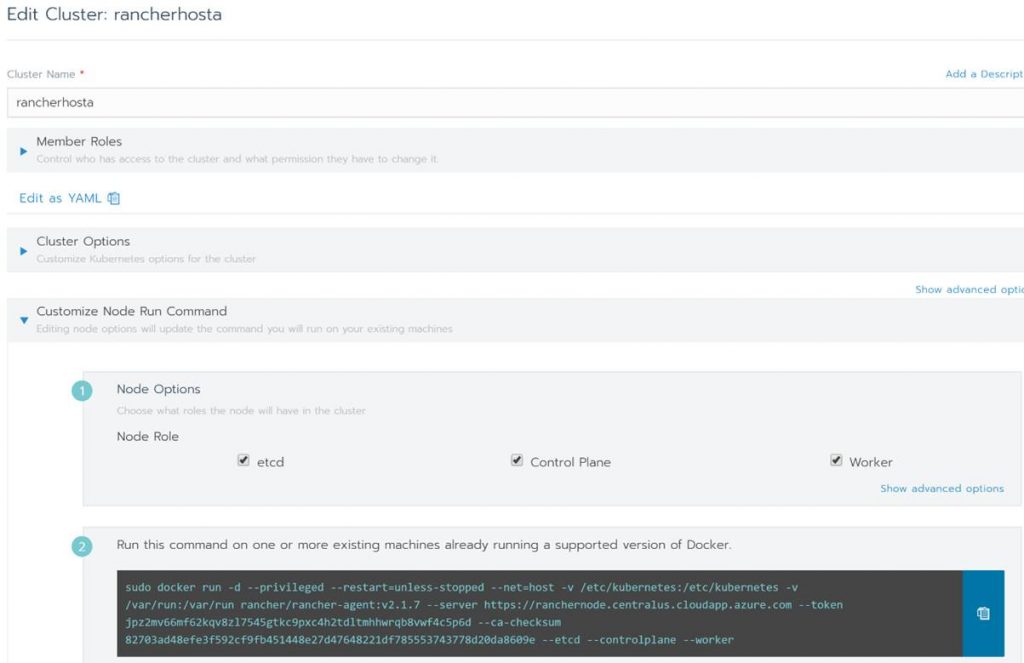
Next check all the boxes for the Node Options since all the roles will be on a single Kubernetes cluster. Copy the code shown at the bottom of the page, click done and run the code on the Rancher Host.

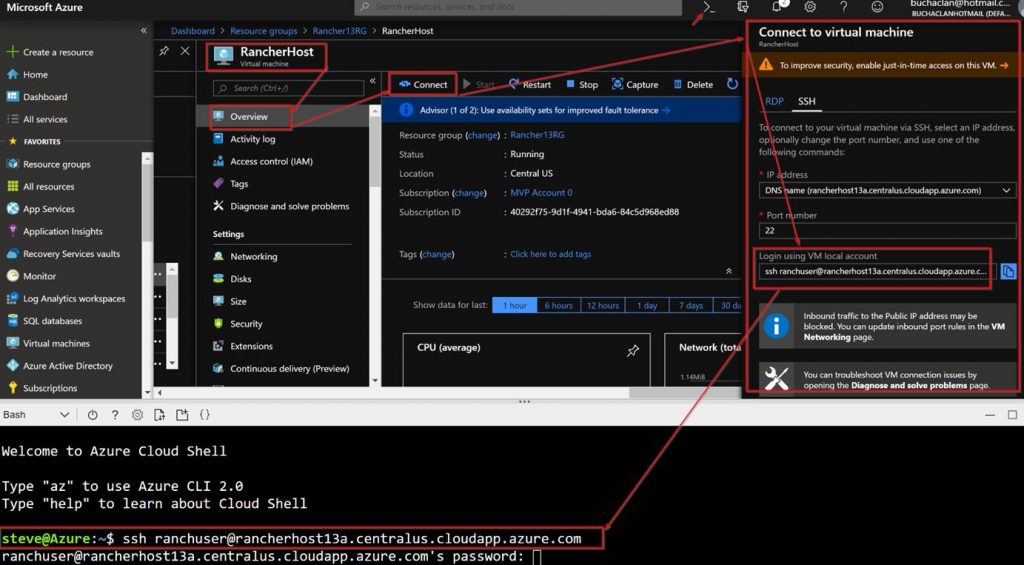
In order to run the code on the Rancher Host you need to SSH in and run it from there. To do this follow these steps:

  1. In the Azure Portal, from within the resource group click on the Rancher Host VM.
  2. On the Overview page click on Connect.
  3. Copy “ssh ranchuser@rancherhost.centralus.cloudapp.azure.com” from the Connect to virtual machine pop up screen.
  4. Open a terminal in either Azure cloud shell or with something like a terminal via VS Code and past the “ssh ranchuser@rancherhost.centralus.cloudapp.azure.com” in.

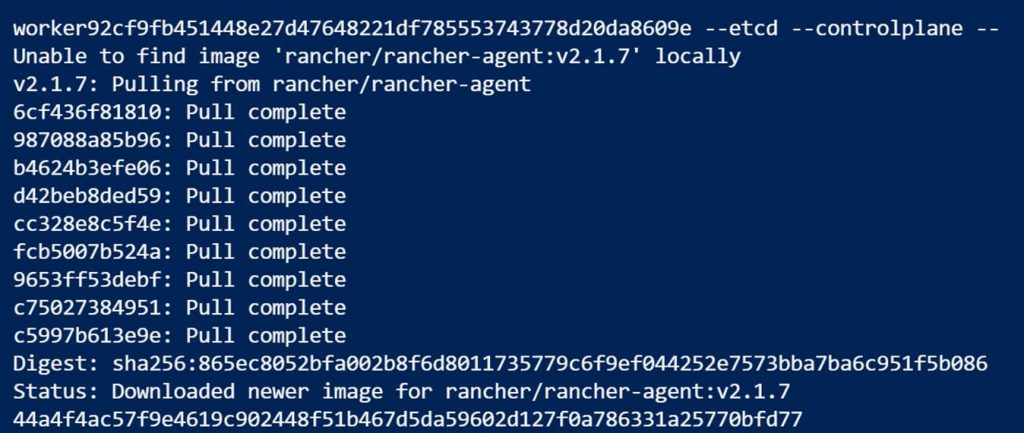
Running the code will look like this:

When done you can run Docker PS to see that the Rancher agent containers are running.

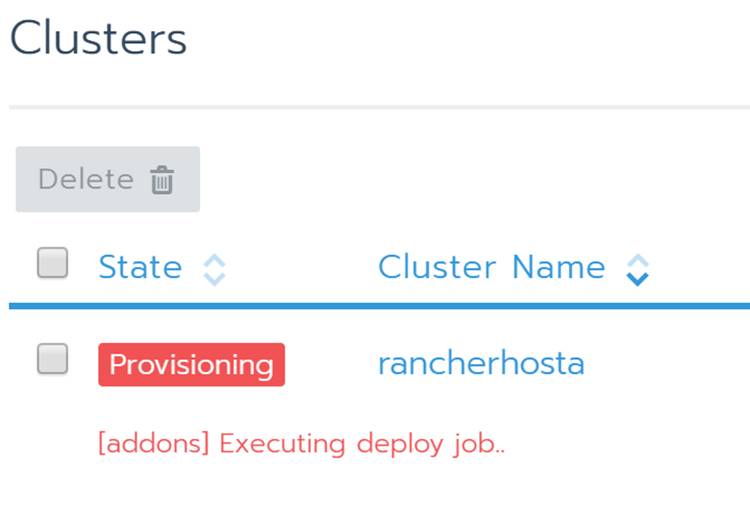
In the Rancher portal under clusters you will see the Rancher host being provisioned

The status will change as Kubernetes is deployed.

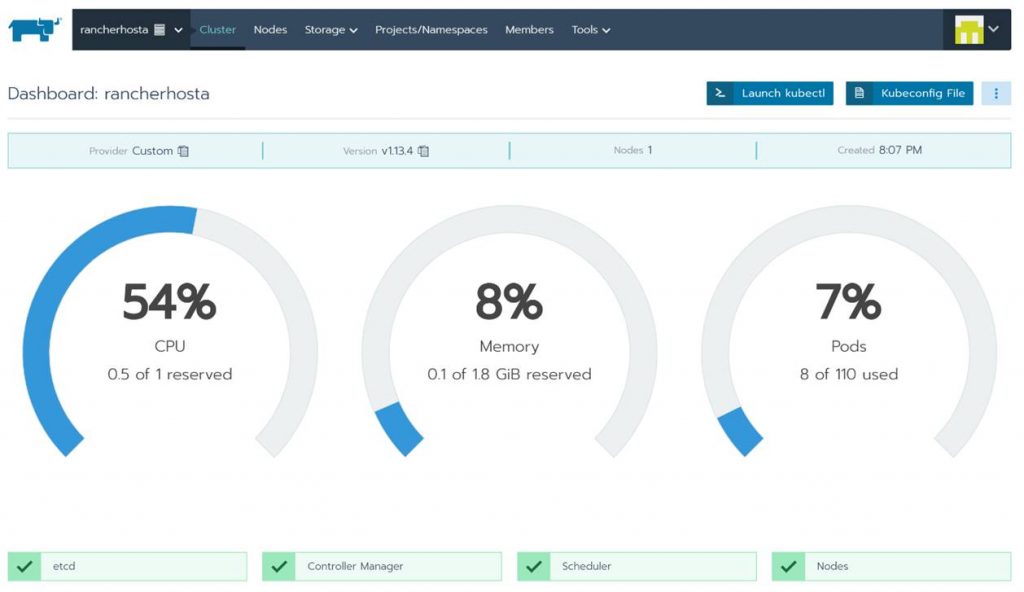
Once it’s done provisioning you will see your Kubernetes cluster as Active.

From here you can see a bunch of info about your new Kubernetes cluster. Also notice that you could even launch Kubectl right from hereand start running commands! Take some time to click around to see all the familiar stuff you are used to working with in Kubernetes. This is pretty cool and simplifies the management experience for Kubernetes. 

If you want to add more nodes or need the configuration code again just click the ellipsis button and edit.

In Edit Cluster you can change the cluster name, get and change settings and copy the code to add more VMs to the cluster.

That’s the end of this post. Thanks for reading. Check back for more Azure, Kubernetes, and Rancher blog posts.

Read more

Where to host Docker Containers on Azure (AKS, ASE, or ASF)?

Azure Kubernetes Service (AKS) service Azure App Service Environment (ASE) Azure Service Fabric (ASF) Comparison

Scenario:

So, your team recently has been tasked with developing a new application and running it. The team made the decision to take a microservices based approach to the application. Your team also has decided to utilize Docker containers and Azure as a cloud platform. Great, now it’s time to move forward right? Not so fast. There is no question that Docker containers will be used, but what is in question is where you will run the containers. In Azure containers can run on Azure’s managed Kubernetes (AKS) service, an App Service Plan on Azure App Service Environment (ASE), or Azure Service Fabric (ASF). Let’s look at each one of these Azure services including an overview, pro’s, cons, and pricing.

This Azure Kubernetes Service (AKS) Pros and Cons chart is clickable.
This Azure App Service Environment (ASE) Pros and Cons chart is clickable.
This Azure Service Fabric (ASF) Pros and Cons chart is clickable.

Conclusion:

Choose Azure Kubernetes Service if you need more control, want to avoid vendor lock-in (can run on Azure, AWS, GCP, on-prem), need features of a full orchestration system, flexibility of auto scale configurations, need deeper monitoring, flexibility with networking, public IP’s, DNS, SSL, need a rich ecosystem of addons, will have many multi-container deployments, and plan to run a large number of containers. Also, this is a low cost.

Choose Azure App Service Environment if don’t need as much control, want a dedicated SLA, don’t need deep monitoring or control of the underlying server infrastructure, want to leverage features such as deployment slots, green/blue deployments, will have simple and a low number of multi-container deployments via Docker compose, and plan to run a smaller number of containers. Regarding cost, running a containerized application in an App Service Plan in ASE tends to be more expensive compared to running in AKS or Service Fabric. The higher cost of running containers on ASE is because with an App Service Plan on ASE, you are paying costs for a combination of resources and the managed service. With AKS and ASF you are only paying for the resources used.

Choose Service Fabric if you want a full micros services platform, need flexibility now or in the future to run in cloud and or on-premises, will run native code in addition to containers, want automatic load balancing, low cost.

A huge thanks to my colleague Sunny Singh (@sunnys101) for giving his input and reviewing this post. Thanks for reading and check back for more Azure and container contents soon.

Read more

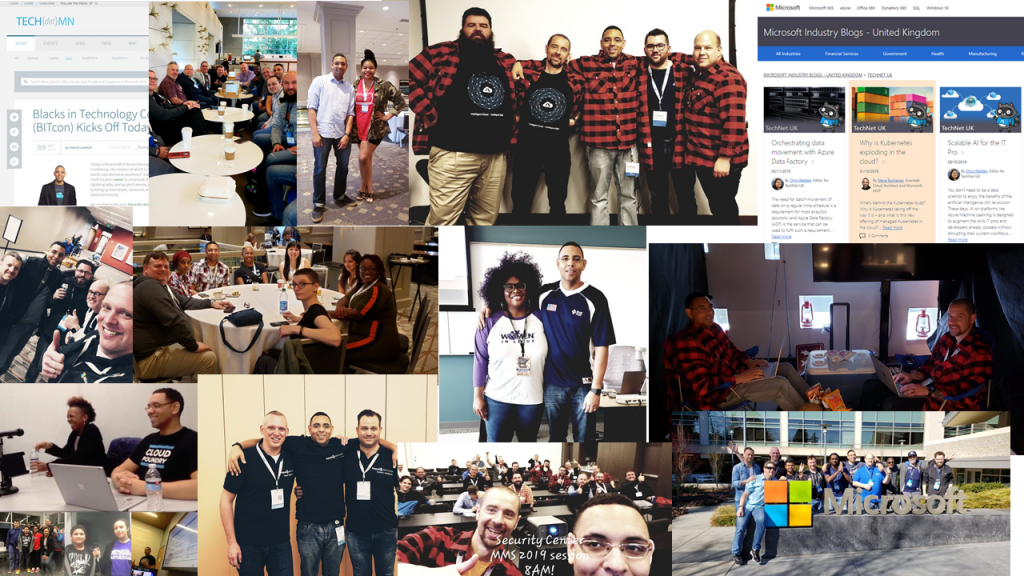
2018 Review – Speaking, Blogs, New job, and more…

2018 is almost over and it was an exciting year jam packed full of adventures! In this post I will recap some of the highlights from 2018.

New job

At the start of 2018 I started a new job with Avanade as a Group Manager: Cloud Transformation/DevOps. Who is Avanade? Avanade 35,000 plus employees and is a global consulting firm focused on the Microsoft platform. Avanade is owned by Accenture and Microsoft. I have been at the firm for exactly a year. It has been a fun ride so far working with really smart people on some exciting and very large projects. After I joined Avanade featured me on a Q&A spotlight blog.

You can check out the Q&A post here: https://www.avanade.com/en/blogs/inside-avanade/employee-stories/q-and-a-with-steve-buchanan

Moved from System Center focus to Azure/Azure Stack and DevOps

I moved away from System Center related work to only working on Azure, Azure Stack, and DevOps project. I had been making this shifting in this direction for a couple of years but the new job helped me transition to the type of work I wanted to do. I am a firm believer in change and through change comes growth. I still have my System Center skills but for me it was time to make a change in my career focus to be challenged and keep growing. Looking back I would make the same choice over again. You can see this change reflected in the blog topics I have posted, topics I have presented on this past year. My new role with Avanade has also helped me move my focus to cloud and DevOps.

Certifications/Training

I focused on and completed some Azure and DevOps certifications including: 70-535: Architecting Microsoft Azure Solutions and AZ-400: Microsoft Azure DevOps Solutions. However the one I am most proud of is the Microsoft Professional Program: DevOps. It took me 2 months to finish the training and all the labs to obtain the certificate. Here is a blog I posted about the training experience for the MPP: DevOps https://www.buchatech.com/2018/04/microsoft-professional-program-for-devops-finished. Here is a link to the my certificate: https://academy.microsoft.com/en-us/certificates/67284e84-8afe-4f13-b477-d7620949fb18.

I highly recommend any of the Microsoft Professional Program tracks. It is excellent training!

Changes in user group involvement

I stepped down from the MN System Center user group board after 6 years. The board is filled with great people and is as strong as ever. I will continue to speak at the UG from time to time when it makes sense and may even attend some of the meetings. I needed to step down to step up my Azure community focus. I have been leading the MN Azure user group for the past few years and now I am able to step up my involvement with this UG. More info about the MN Azure user group can be found here: http://mnazureusergroup.com  Some of the key meetings/topics in my opinion from 2018 are

April Azure User Group Meeting: DevOps Best Practices for Azure and VSTS presented by Abel Wang, a Microsoft Cloud Developer Advocate. – https://www.meetup.com/Minneapolis-Azure-Cloud-Computing-Meetup/events/kdbbdpyxgbhb

May Azure User Group Meeting: Automate & Configure using Azure presented by Jenny Hunter – Program Manager Azure Management & Eamon O’Reilly – Principal Program Manager Azure Management. – https://www.meetup.com/Minneapolis-Azure-Cloud-Computing-Meetup/events/kdbbdpyxhbfb

August Azure User Group: Microsoft APIs presented by Kyle Weeks, an IT professional for the University of Minnesota. – https://www.meetup.com/Minneapolis-Azure-Cloud-Computing-Meetup/events/dtbmtpyxlbdb

September Azure User Group: Azure Bots with Node.js presented by Kamran Ayub, a software engineer for Target corporation & Pluralsight author. – https://www.meetup.com/Minneapolis-Azure-Cloud-Computing-Meetup/events/dtbmtpyxmbjb

October Azure User Group: Azure Resource Manager Concepts – Simplified presented by Brian Moore, a Program Manager on the Azure Resource Manager Team. – https://www.meetup.com/Minneapolis-Azure-Cloud-Computing-Meetup/events/dtbmtpyxnbgb

As you can see we had some really great speakers both from the community and Microsoft. We do our best to collect the slides from presenters and upload them on the UG site. Past meeting info is here: http://mnazureusergroup.com/category/past-meetings

Key blog posts

With everything else going on I did my best to keep up with new blogs over the year. Same theme with my blog topics being focused on Azure and DevOps. Some of my key blogs from 2018 are:

ARCHITECT YOUR CLOUD WITH AZURE BLUEPRINTS

https://www.buchatech.com/2018/09/architect-your-cloud-with-azure-blueprints

SETUP CI/CD PIPELINE WITH VSTS & AZURE STACK

https://www.buchatech.com/2018/02/setup-ci-cd-pipeline-with-vsts-azure-stack

NATIVE CLOUD MANAGEMENT IN AZURE

https://www.buchatech.com/2018/03/native-cloud-management-in-azure

AZURE MANAGEMENT GROUPS

https://www.buchatech.com/2018/03/azure-management-groups

AZURE COST MANAGEMENT (CLOUDYN)

https://www.buchatech.com/2018/03/azure-cost-management-cloudyn

AZURE POLICY

https://www.buchatech.com/2018/03/azure-policy

CLOUD SECURITY VIA SECURITY CENTER

https://www.buchatech.com/2018/09/cloud-security-via-security-center

In 2018 I had a really cool opportunity to write a blog for the official Azure blog on Azure Stack and DevOps. Here is the title and link.

The importance of Azure Stack for DevOps” on the official Azure blog:

https://azure.microsoft.com/en-us/blog/the-importance-of-azure-stack-for-devops

Speaking

2018 was full of speaking opportunities from speaking at Azure events for Avanade, user groups, conferences and even on another continent. Here are highlights from where I presented in 2018.

MN Azure User Group

I was honored to kick of the MN Azure User group meetings last year with a session on Azure Stack. It was the February Azure User Group where I presented on Azure Stack Unleashed in 45 minutes to 131 attendees. Here is the link to the past meeting:  https://www.meetup.com/Minneapolis-Azure-Cloud-Computing-Meetup/events/245935696

MMS 2018  – https://mmsmoa.com

I was a speaker at MMS again in 2018. This time I delivered “5” sessions. Whoa! That was a whirlwind. Here is my MMS 2018 profile: https://mms2018.sched.com/steve_buchanan.1sw4e0n3. Here is a list of the 5 sessions:

Hybrid Cloud Unleashed with Azure Stack and Azure – With Microsoft MVP’s Steve Buchanan and Florent Appointaire

https://mms2018.sched.com/event/EeQy/hybrid-cloud-unleashed-with-azure-stack-and-azure

Insight into the Micro-Service & Container Technology that Powers Microsoft’s Cloud – With Microsoft MVP’s Steve Buchanan and Lee Berg

https://mms2018.sched.com/event/EeR3/insight-into-the-micro-service-container-technology-that-powers-microsofts-cloud

Monitoring Azure PaaS – With Microsoft MVP’s Steve Buchanan and Cameron Fuller

https://mms2018.sched.com/event/EeTC/monitoring-azure-paas

Soup to Nuts of Azure Site Recovery – With Microsoft MVP’s Steve Buchanan and Robert Hedblom

https://mms2018.sched.com/event/EeR4/soup-to-nuts-of-azure-site-recovery

ITSM Tools and Log Analytics: The Perfect Integration – With Microsoft MVP’s Steve Buchanan and Florent Appointaire

https://mms2018.sched.com/event/EeR1/itsm-tools-and-log-analytics-the-perfect-integration

Note you can download the decks from any of the sessions on the previous links.

BITCon 2018   – https://www.bitcon2018.com

This was the Inaugural conference for Blacks in Technology. BITCon brought together all walks of life in tech such as professionals, entrepreneurs, influencers, subject matter experts, students, and thought leaders.

Read more

Setup CI/CD pipeline with VSTS & Azure Stack

We all know that DevOps brings together people, processes, and technology. In the Microsoft DevOps world A large part of the technology piece is utilizing Visual Studio Team Services (VSTS) for continuous deployment of workloads to Azure.

Microsoft launched their Hybrid Cloud on July 10th 2017. Azure Stack is the secret sauce of Microsoft’s the Hybrid Cloud. Microsoft’s offering is the only one true Hybrid Cloud in the market bringing Azure to on-premises data centers.

As Microsoft continues to move their Hybrid Cloud forward the DevOps integration and capabilities we have for Azure extend to Azure Stack. Again I was fortunate to participate in a preview of the VSTS integration with Azure Stack. I was happy to see Microsoft putting a priority on this functionality because DevOps on Azure Stack is a HUGE need. Cloud is often the catalyst to helping organizations adopt a DevOps culture fostering digital transformation. Some organizations not being able to put all workloads in public cloud Azure Stack is a good way for them to get the same cloud capabilities on-premises DevOps integration being one of them. The setup and integration between VSTS and Azure Stack is working nicely. The team at Microsoft has given me permission to share about this topic via my blog.

In this blog post I am going to cover setting up VSTS to work with Azure and setting up a continuous-integration and-continuous deployment (CI/CD) pipeline to Azure Stack. With Microsoft DevOps you can utilize the pieces of VSTS that make sense for you to use leaving the control up to you. Through VSTS you can use many other DevOps tools such as Jenkins, Octopus deploy, GitHub, Bitbucket etc into your pipeline making Azure Stack just as flexible as Azure is. Let’s Jump in!

Steps to prep Azure Stack for Visual Studio Team Services (VSTS)

#1 Ensure you have installed the Azure Stack PowerShell and Azure PowerShell modules.

Details can be found here:

https://docs.microsoft.com/en-us/azure/azure-stack/azure-stack-powershell-install

#2 Add the Azure Stack environment using the following syntax

# Navigate to the downloaded folder and import the **Connect** PowerShell module

Set-ExecutionPolicy RemoteSigned

Import-Module PATH\AzureStack.Connect.psm1

# Register an AzureRM environment that targets your Azure Stack instance

Add-AzureRMEnvironment `

-Name “AzureStackAdmin” `

-ArmEndpoint “https://adminmanagement.local.azurestack.external

# Set the GraphEndpointResourceId value

Set-AzureRmEnvironment `

-Name “AzureStackAdmin” `

-GraphAudience “https://graph.windows.net/

# Get the Active Directory tenantId that is used to deploy Azure Stack

$TenantID = Get-AzsDirectoryTenantId `

-AADTenantName “YOURDOMAIN.onmicrosoft.com” `

-EnvironmentName “AzureStackAdmin”

# Sign in to your environment

Login-AzureRmAccount `

-EnvironmentName “AzureStackAdmin” `

-TenantId $TenantID

NOTE: You will need the environment name and the tenant ID for the next script.

#3 Create SPN

Original SPN creation script can be found here:

https://github.com/Microsoft/vsts-rm-documentation/blob/master/Azure/SPNCreation.ps1

Documentation on creating an SPN can be found here:

https://www.visualstudio.com/en-us/docs/build/concepts/library/service-endpoints#sep-azure-rm

Below I will display the script I used. Note that you will need the following parameters for the script:

$subscriptionName

“Enter Azure Stack Subscription name. You need to be Subscription Admin to execute the script”)]

$password

“Provide a password for SPN application that you would create”

$environmentName

“Provide Azure Stack environment name for your subscription”

$AzureStackTenantID

“Provide tenant ID from when Azure Stack enviroment was added”

EXAMPLE:

.\CreateSPN.ps1 -subscriptionName “Default Provider Subscription” -password PASSWORDHERE -environmentName AzureStackAdmin -AzureStackTenantID ID HERE

Here is the script I used that you can run:

param

(

[Parameter(Mandatory=$true, HelpMessage=”Enter Azure Stack Subscription name. You need to be Subscription Admin to execute the script”)]

[string] $subscriptionName,

[Parameter(Mandatory=$true, HelpMessage=”Provide a password for SPN application that you would create”)]

[string] $password,

[Parameter(Mandatory=$false, HelpMessage=”Provide a SPN role assignment”)]

[string] $spnRole = “owner”,

[Parameter(Mandatory=$false, HelpMessage=”Provide Azure Stack environment name for your subscription”)]

[string] $environmentName,

[Parameter(Mandatory=$false, HelpMessage=”Provide tenant ID from when Azure Stack enviroment was added”)]

[string] $AzureStackTenantID

)

#Initialize

$ErrorActionPreference = “Stop”

$VerbosePreference = “SilentlyContinue”

$userName = $env:USERNAME

$newguid = [guid]::NewGuid()

$displayName = [String]::Format(“VSO.{0}.{1}”, $userName, $newguid)

$homePage = “http://” + $displayName

$identifierUri = $homePage

#Initialize subscription

$isAzureModulePresent = Get-Module -Name AzureRM* -ListAvailable

if ([String]::IsNullOrEmpty($isAzureModulePresent) -eq $true)

{

Write-Output “Script requires AzureRM modules to be present. Obtain AzureRM from https://github.com/Azure/azure-powershell/releases. Please refer https://github.com/Microsoft/vsts-tasks/blob/master/Tasks/DeployAzureResourceGroup/README.md for recommended AzureRM versions.” -Verbose

return

}

Import-Module -Name AzureRM.Profile

Write-Output “Provide your credentials to access Azure subscription $subscriptionName” -Verbose

Login-AzureRmAccount -SubscriptionName $subscriptionName -EnvironmentName $environmentName -TenantId $AzureStackTenantID

$azureSubscription = Get-AzureRmSubscription -SubscriptionName $subscriptionName

$connectionName = $azureSubscription.SubscriptionName

$tenantId = $azureSubscription.TenantId

$id = $azureSubscription.SubscriptionId

#Create a new AD Application

Write-Output “Creating a new Application in AAD (App URI – $identifierUri)” -Verbose

$azureAdApplication = New-AzureRmADApplication -DisplayName $displayName -HomePage $homePage -IdentifierUris $identifierUri -Password $password -Verbose

$appId = $azureAdApplication.ApplicationId

Write-Output “Azure AAD Application creation completed successfully (Application Id: $appId)” -Verbose

#Create new SPN

Write-Output “Creating a new SPN” -Verbose

$spn = New-AzureRmADServicePrincipal -ApplicationId $appId

$spnName = $spn.ServicePrincipalName

Write-Output “SPN creation completed successfully (SPN Name: $spnName)” -Verbose

#Assign role to SPN

Write-Output “Waiting for SPN creation to reflect in Directory before Role assignment”

Start-Sleep 20

Write-Output “Assigning role ($spnRole) to SPN App ($appId)” -Verbose

New-AzureRmRoleAssignment -RoleDefinitionName $spnRole -ServicePrincipalName $appId

Write-Output “SPN role assignment completed successfully” -Verbose

#Print the values

Write-Output “`nCopy and Paste below values for Service Connection” -Verbose

Write-Output “***************************************************************************”

Write-Output “Connection Name: $connectionName(SPN)”

Write-Output “Subscription Id: $id”

Write-Output “Subscription Name: $connectionName”

Write-Output “Service Principal Id: $appId”

Write-Output “Service Principal key: <Password that you typed in>”

Write-Output “Tenant Id: $tenantId”

Write-Output “***************************************************************************”

Output should be similar to this:
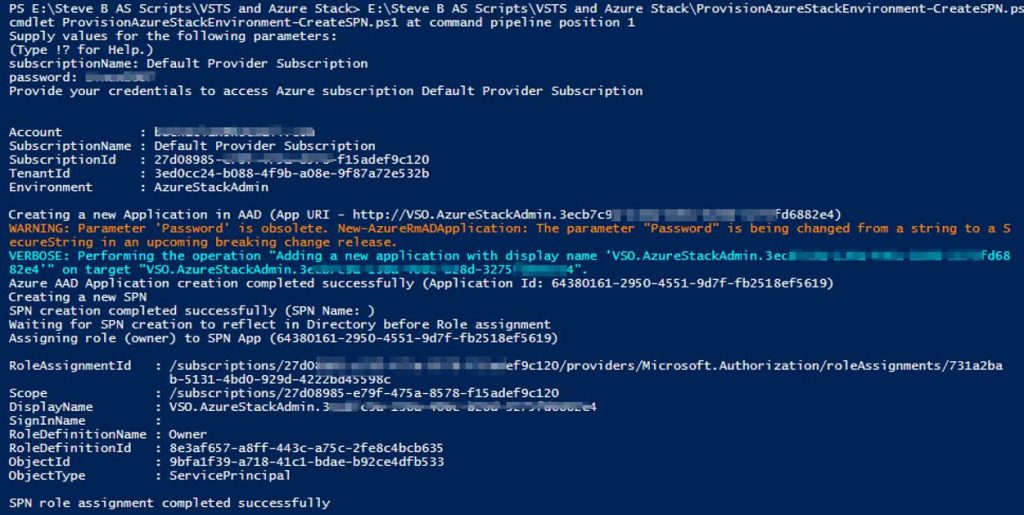
You will use information from the Service Connection output in the next step.

Steps to configure Azure Stack as a Service Endpoint in VSTS

Log into your VSTS account at visalstudio.com

Navigate to one of your projects.

Go into Settings.

Click on Services.

Click on New Service Endpoint
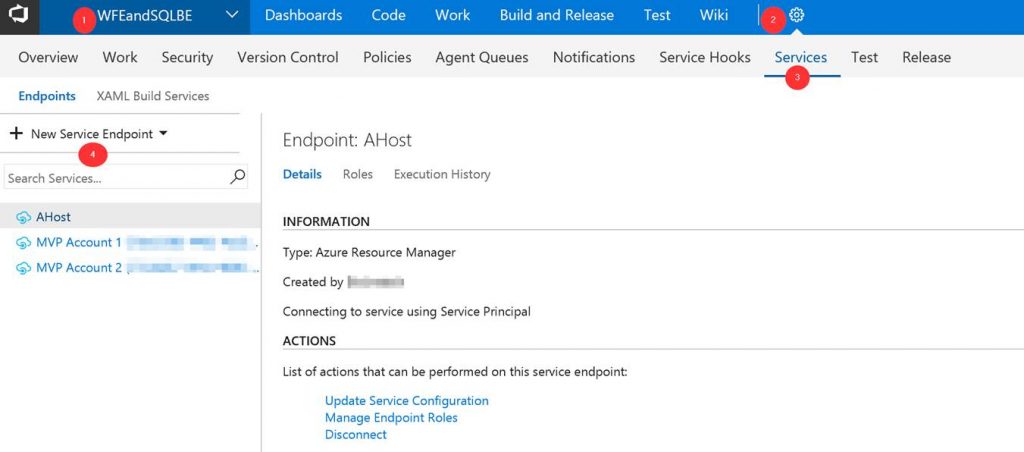
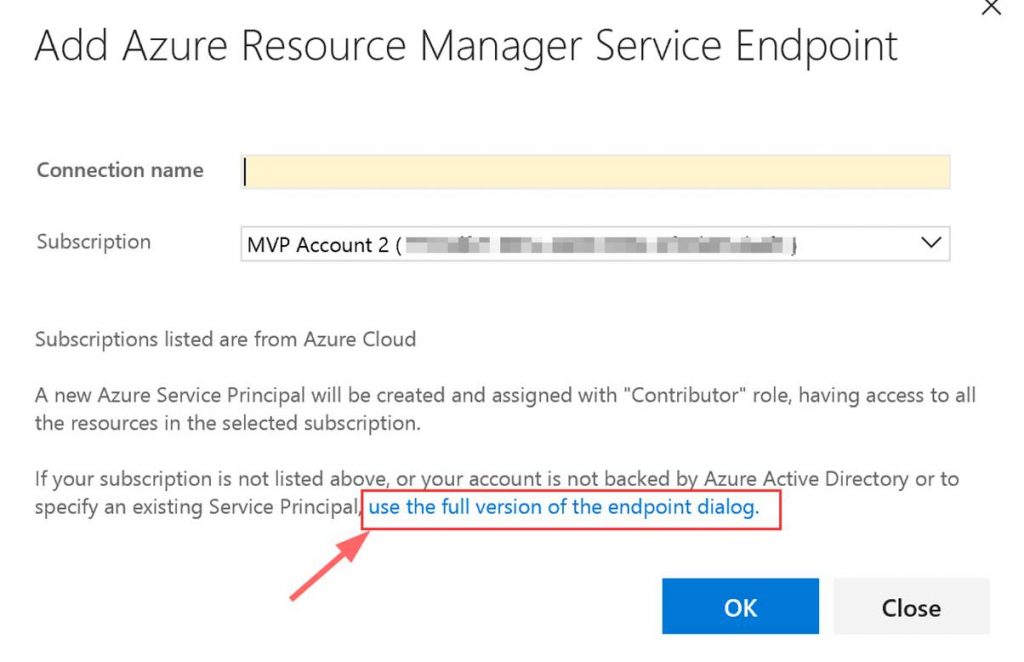
A window will pop up. Click on “use full version of the endpoint dialog.”
Next input the needed data. This data comes from the Service Connection info that you copied.
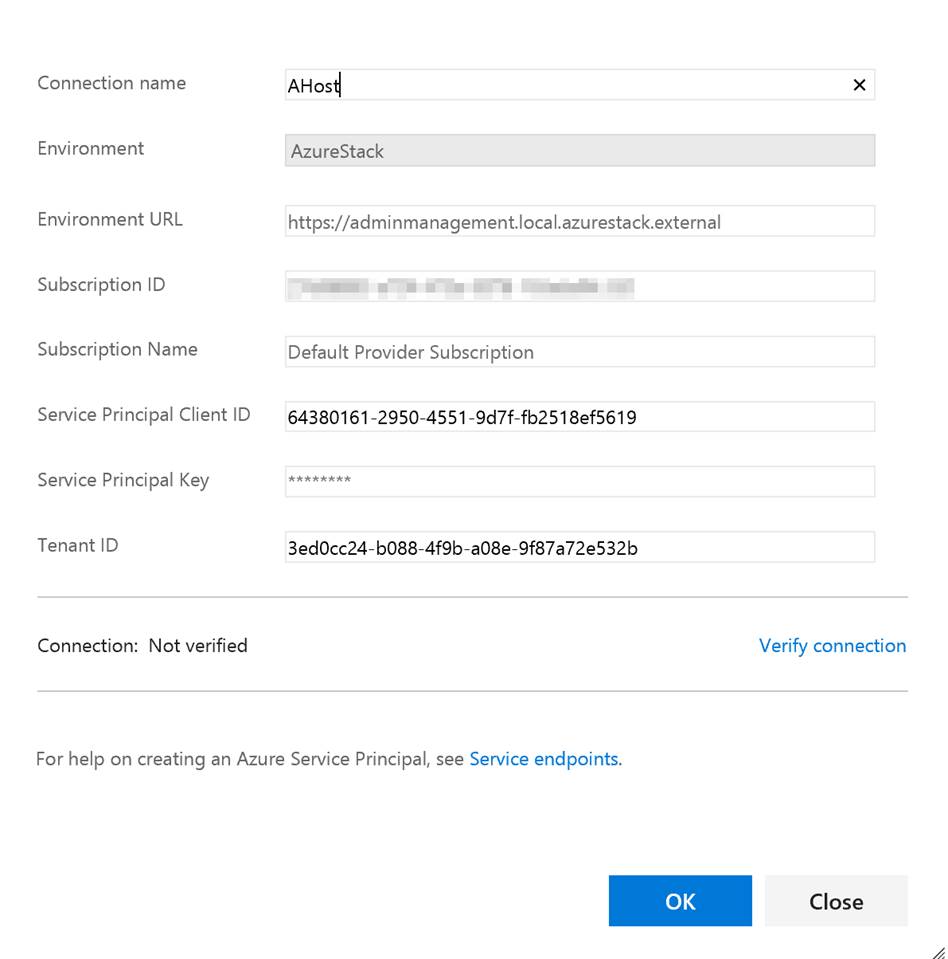
You can put whatever you want in the Connection name and the Subscription Name. Note do not verify the connection. It will not succeed as VSTS cannot access your private Azure Stack yet. Click OK when done.

Setup build agent on Azure Stack host

Next you need to setup the build agent on the Azure Stack host. (Note: In this post I am using the ASDK.) From within VSTS download the Windows agent. Extract the download to a local folder.
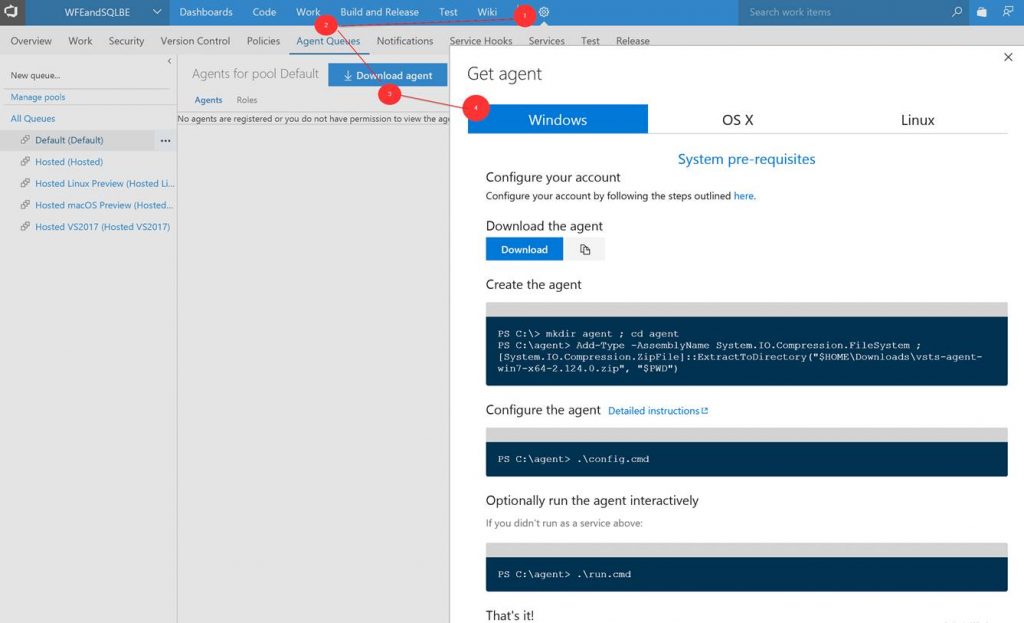
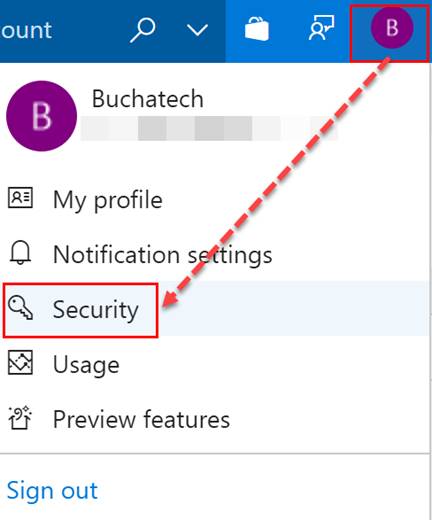
Go to Security under your profile in VSTS.
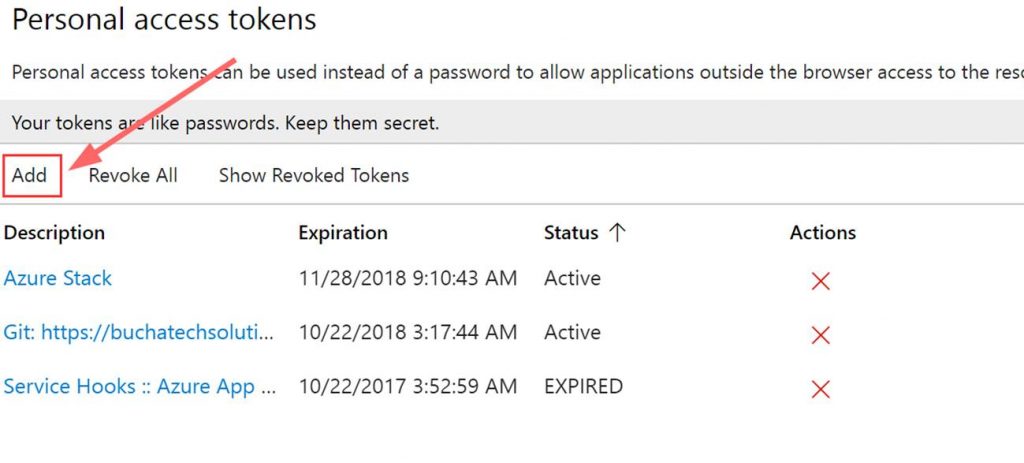
Next add a Personal access token (PAT) for Azure Stack.
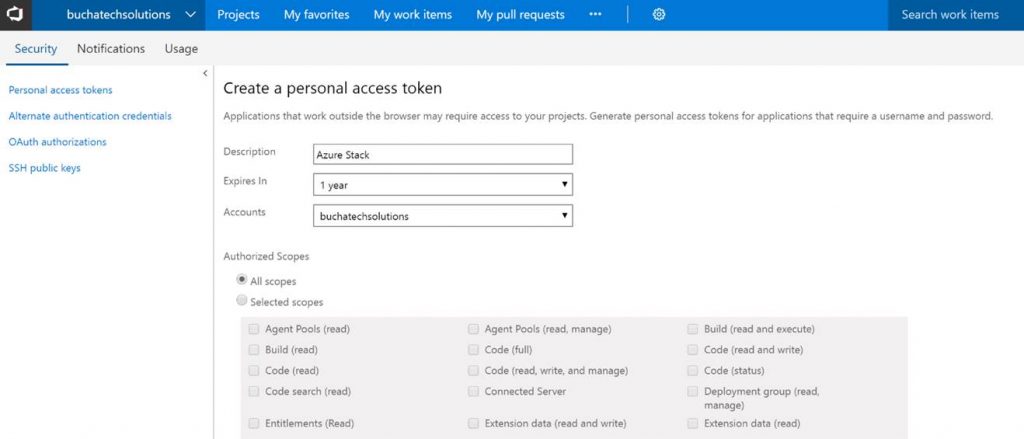
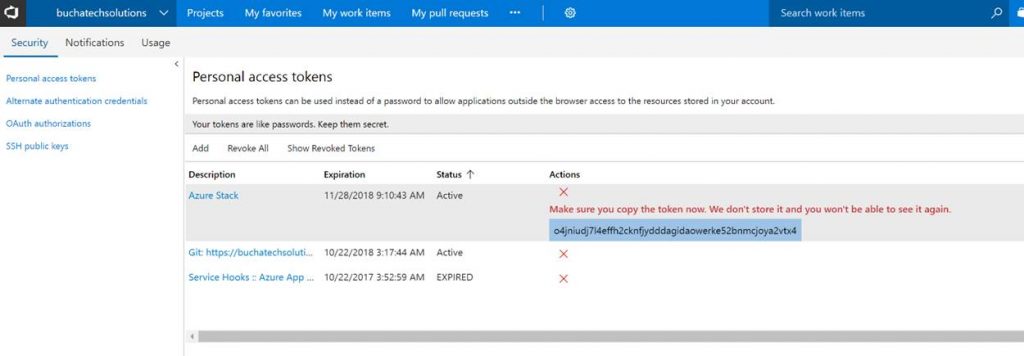
Copy the token. Note it will not be shown again ever after you leave this screen.
In the folder with the extracted build agent you will see the following. We need to run the run.cmd file from an elevated command prompt.

Here is a screenshot of running the run.cmd. I recommend deploying the build agent as a service. You will use your personal access token (PAT) here and the azure stack admin account.
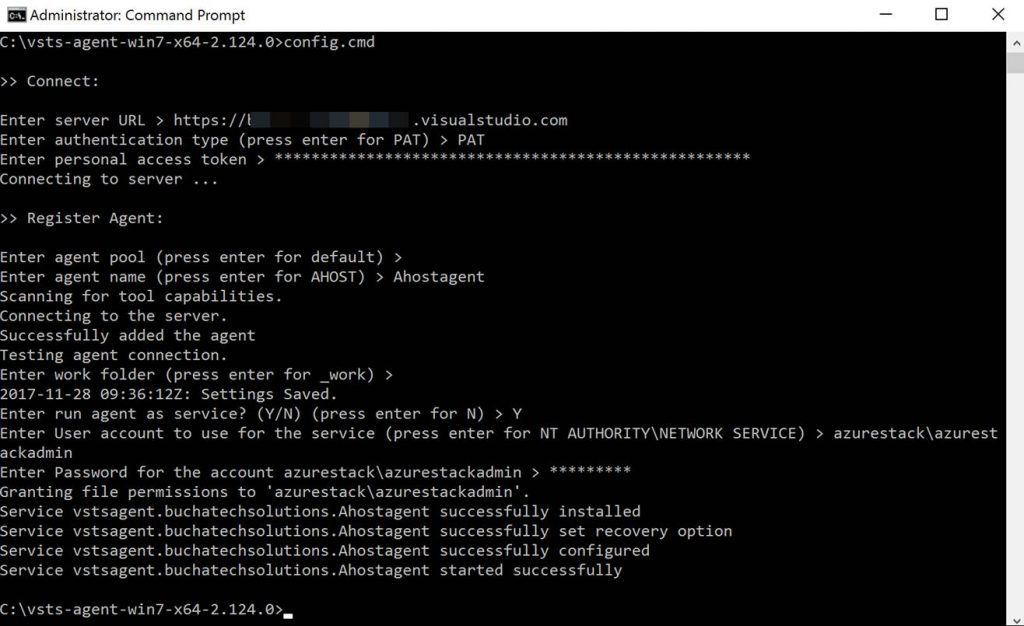
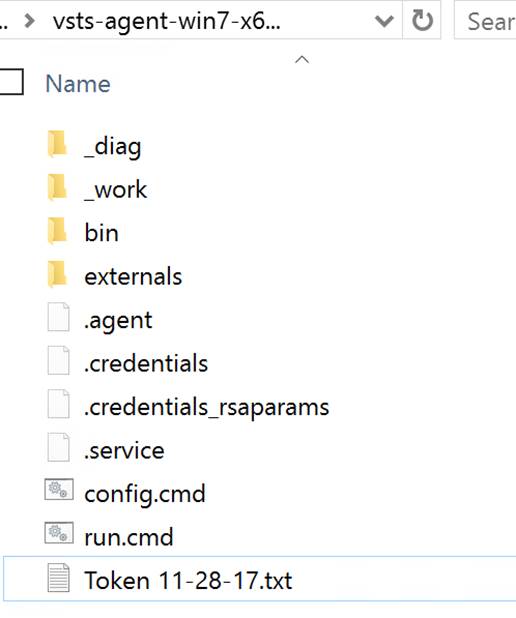
After the run.cmd finished the folder with the extracted contents should look like the following:
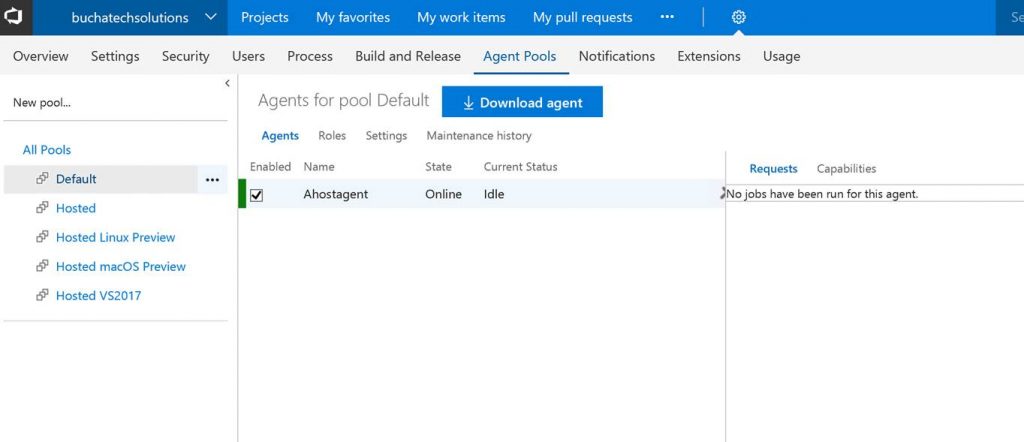
You can now see the agent in VSTS.
That’s it for the setup for connecting VSTS to Azure Stack. Next let’s look at setting up a continuous-integration and-continuous deployment (CI/CD) pipeline for VM-deployment to Azure Stack.


THE BUILD

What I cover here is focused on infrastructure as code (IaC) using ARM templates. If you need to set up CI/CD to Azure Stack for Web Apps, Mobile Apps, Containers, etc the process is the same as it is on Azure with the only difference being that you point to Azure Stack. Also note that in this post I am using the ASDK not multi-node.

Within VSTS create a new repository and place your ARM template in it.
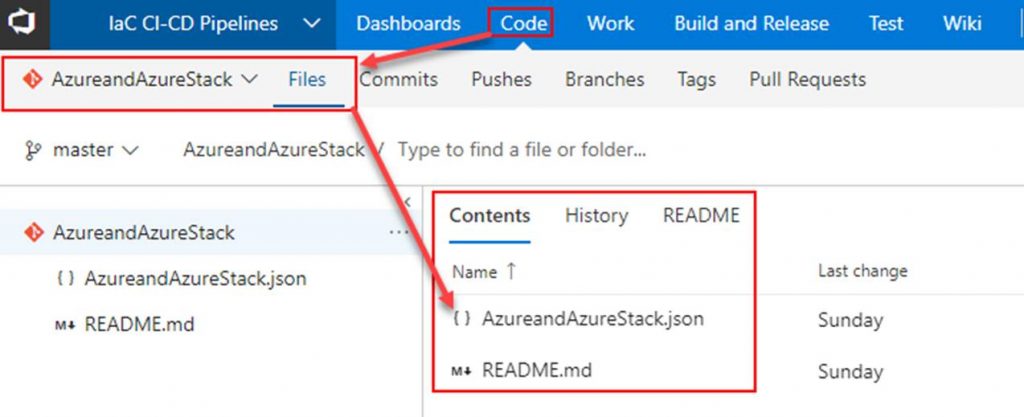
Next click on Build and Release. Create a new Build Definition.
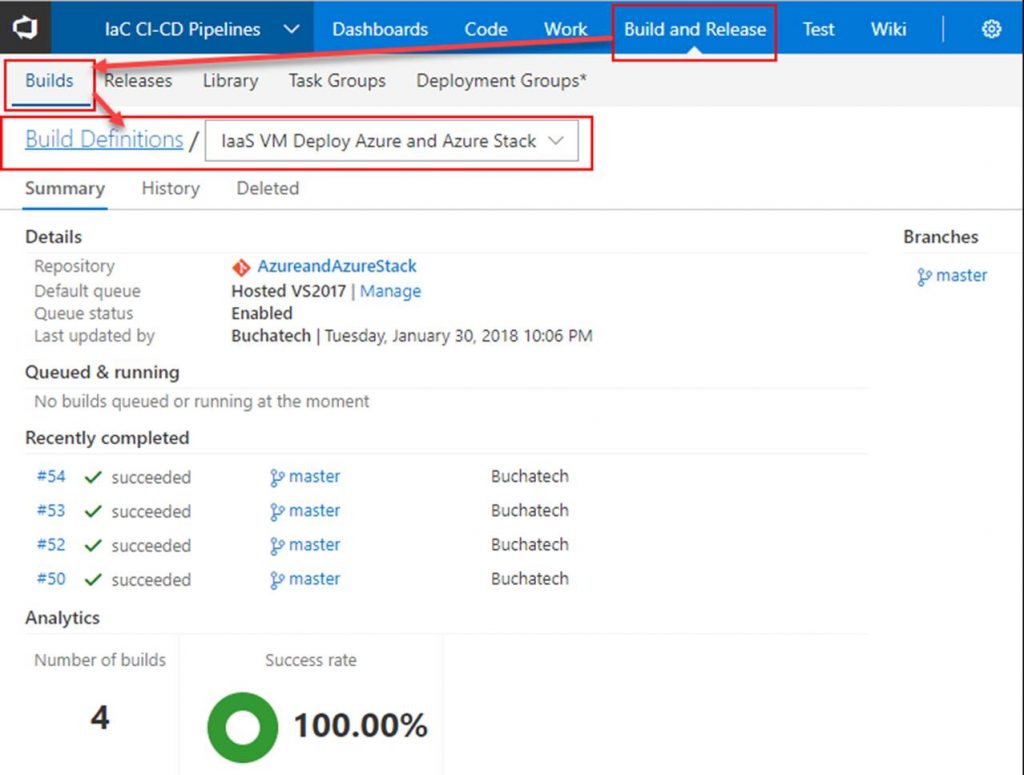
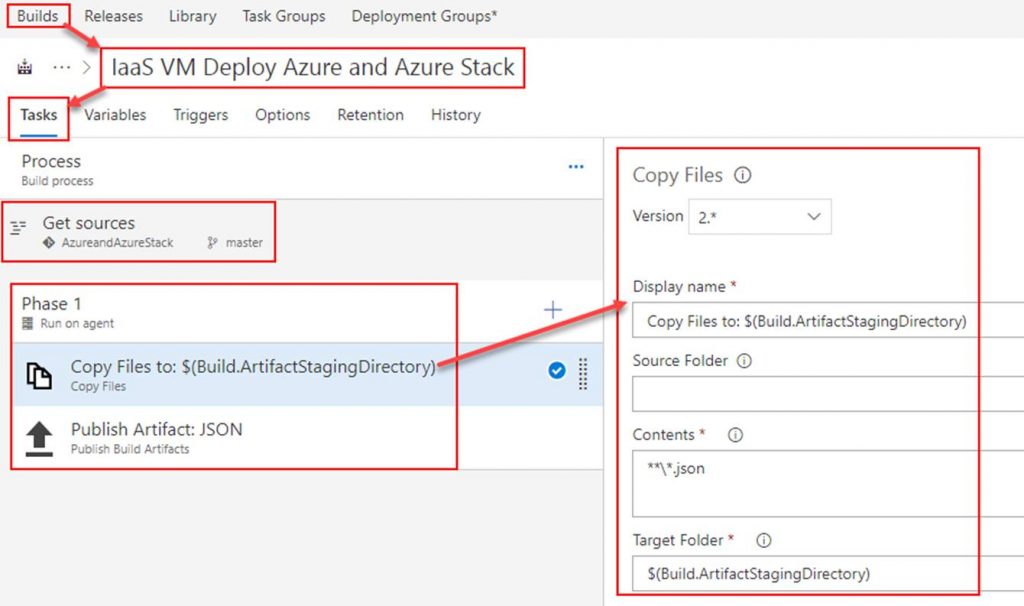
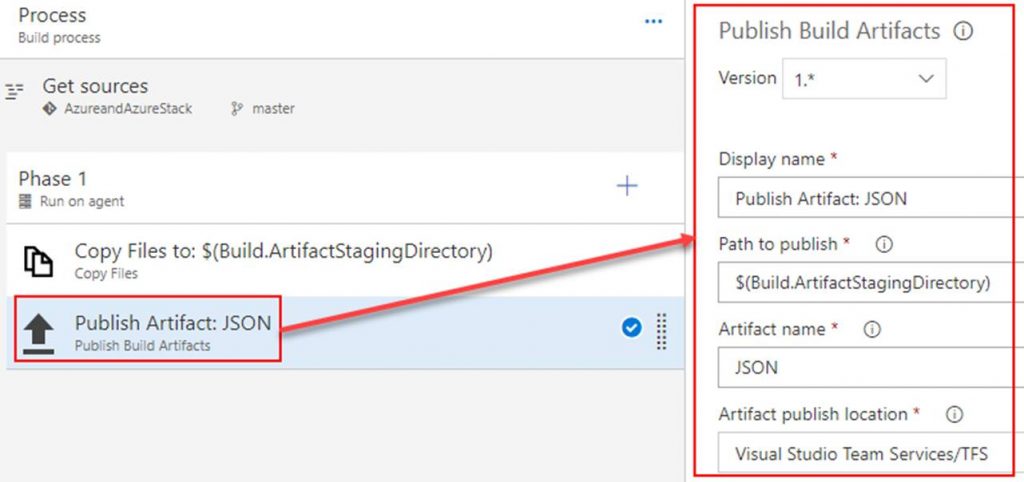
In the build definition. Point the Get sources to the repository you just created. Add 2 tasks under Phase 1. The first task will copy the ARM template to the build staging directory. The second task will publish the ARM template so that a release definition can pick it up. Both tasks are shown in the following screenshots.

Copy Files to task
Publish Artifact task
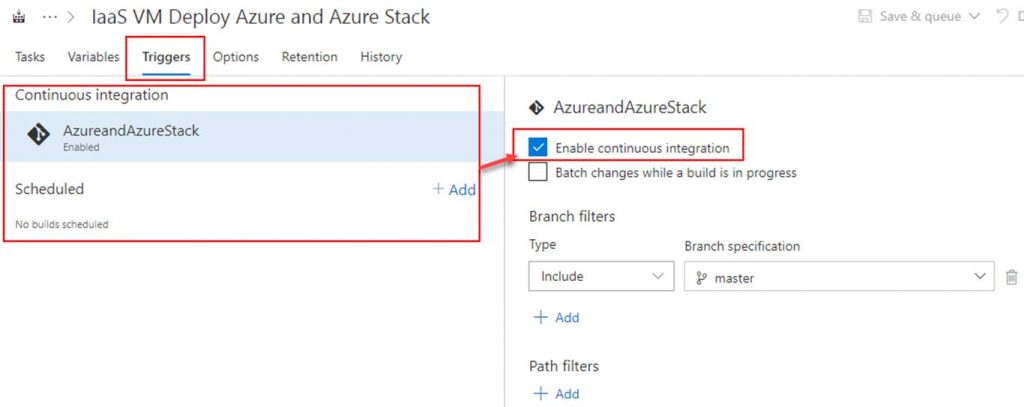
OPTIONAL: To setup continuous integration click on Triggers. Here you can set a schedule to run the builds or you can click on the repository as shown in the screenshot and then check Enable continuous integration. By checking the box next to Enable continuous integration it tells VSTS that anytime content in the repo is changed to run a build.
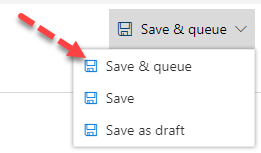
Click on Save & queue. This will start the build.
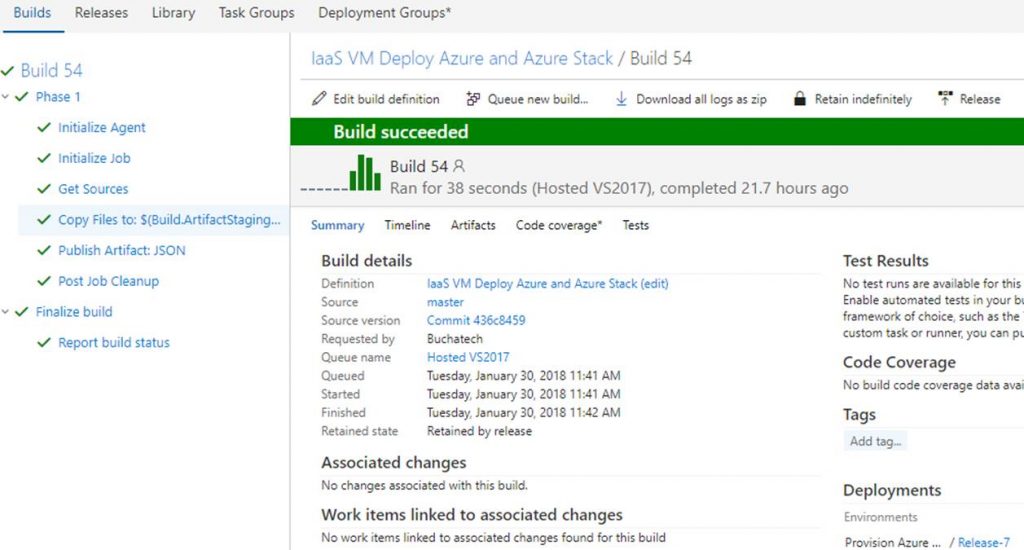
The build will start. As long as everything is setup properly within your build it will succeed as shown in the following Screenshot.
That’s all for our build. Next up we need to create a release definition (RD) pipeline. The RD will take the build artifacts and deploy to an environment/s you specify.

Read more
Monitor Azure WebJobs Status with Application Insights

Within the Azure App Service is something called WebJobs that enables developers to run a script or program in the background within the same context as a web app, API app, or mobile app. Wejobs are included in app service with no extra cost. Webjobs are often used to run regular jobs and batch work as background services. Webjobs exist to make it easier to develop, run background tasks, and scale your web applications.

Webjobs have been around for a while and are considered a part of the serverless computing available on Azure. Today Azure Functions another newer and improved serveless technology service the evolution of WebJobs. When developers need serverless today Azure Functions is typically chosen over webjobs. There are certain cases and scenarios when webjobs are still used instead of Azure Functions and I will not be diving into that topic in this blog post. For more information on when to use what serverless technology on Azure check out the following links:

– A comparison between WebJobs and Functions: Choose between Flow, Logic Apps, Functions, and WebJobs.

– Minnesota’s Azure user group meeting from December 2017 covered comparing the various serverless technologies in Azure. It was presented by Joe Koletar. The meeting notes and PowerPoint download can be found here:

http://www.mnazureusergroup.com/2017/12/22/december-2017-meeting-serverless-computing-notes-and-download

For more information on Azure WebJobs check out these two links:
– Run Background tasks with WebJobs in Azure App Service

https://docs.microsoft.com/en-us/azure/app-service/web-sites-create-web-jobs

– Develop and deploy WebJobs using Visual Studio – Azure App Service

https://docs.microsoft.com/en-us/azure/app-service/websites-dotnet-deploy-webjobs

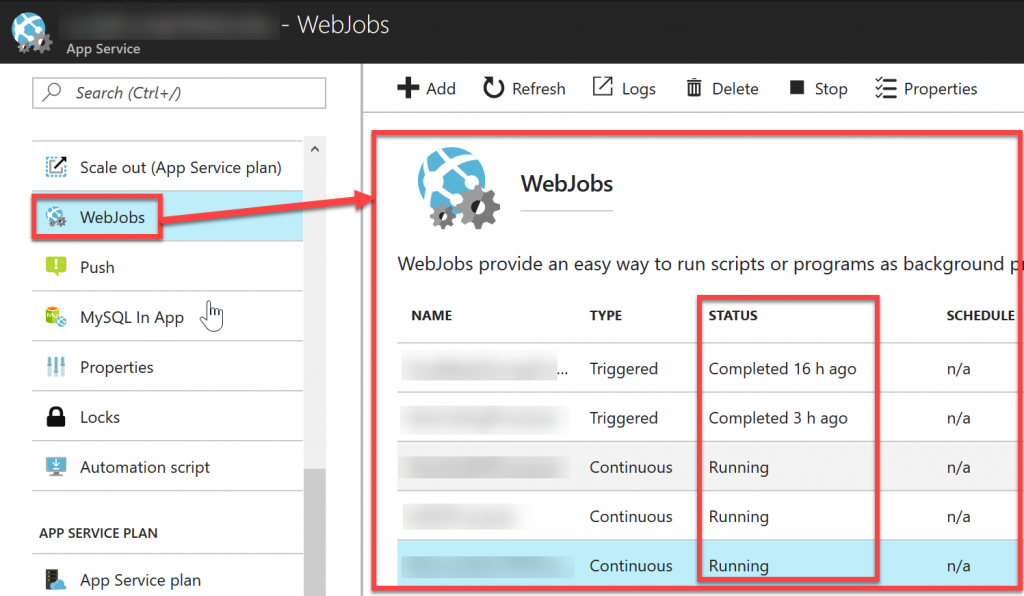
I recently needed to setup monitoring for Azure webjobs status. In this environment there was a mix of continuous webjobs along with some triggered webjobs. Monitoring WebJobs is different compared to monitoring other Azure App Services such as web apps. Web apps can easily be monitored for up/down status and performance for things like in/out traffic, usage, and errors. Background services like WebJobs does not have a defined start or end to the work they do. WebJobs either run continuously or for short amounts of time to perform a task. In this case performance was not a concern but the status of the WebJobs was needed. You can see the status of the WebJobs in the Azure portal as shown in the following screenshot.

The problem here is this is not on a monitoring dashboard, you have to navigate here to see it, you need to click the refresh button for an update, and there is no alert setup when the status is in a non-desired state.

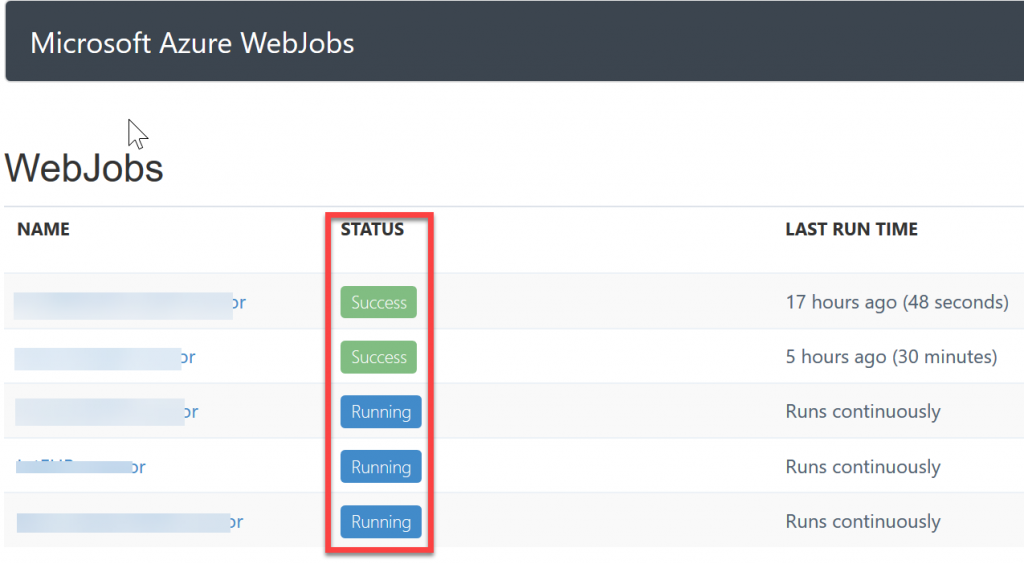
WebJobs does come with a logs website that shows the status of all of your WebJobs and more. This logs site is shown in the following screenshot:

The logs site is nice but the issue with it is that you have to be on the site to see the status of the WebJobs along with the previously mentioned issues viewing the status in the Azure portal. A good solution for monitoring the WebJobs would be a way to check the heartbeat of the WebJobs, the status, and alert you if one of the WebJobs is in a non-desired state. The good news is that this can be accomplished utilizing Application Insights. This is not new but does take some effort to setup.  I am going to detail how to set this up. Here is a summary of what needs to be done.

  1. Need an instance of Application Insights
  2. Need an authorization header from the WebJobs REST API.
  3. Need to create a webtest manually or using Visual Studio enterprise.
  4. Create a multi-step availability test in the Application Insights instance utilizing the webtest file.
  5. Create an alert on the availability test to notify when a WebJob is in a non-desired state.
  6. Add the results of the WebJobs availability test to a dashboard in Azure.

Let’s get started.

Read more