Featured on Cloudskills.fm and New Azure course

FEATURED ON CLOUDSKILLS.FM ~

CloudSkills.fm is a podcast by fellow Microsoft MVP Mike Pfeiffer and veteran in the tech space with 5 books under his belt and numerous courses on Pluralsight. The podcast can be found here: cloudskills.fm. Mike is an all around good guy and I was honored to be a featured guest on one of his podcast episodes. The podcast is weekly with technical tips and career advice for people working in the cloud computing industry. The podcast is geared for developers, IT pros, those making move into cloud.

On this episode Mike and I talked about managing both the technical and non-technical aspects of your career in the cloud computing industry. We also discuss DevOps stuff around Docker, Azure Kubernetes Service, Terraform and cloud stuff around Azure management including my 5 points to success with cloud. You can listen to the podcast here:

https://cloudskills.fm/015

Also on you can listen here: iTunes: https://podcasts.apple.com/ca/podcast/cloudskills-fm/id1448194100 and PlayerFM: https://player.fm/series/cloudskillsfm/ep-015-managing-your-cloud-career .

NEW AZURE COURSE ~

I’m very excited Opsgility recently published a new Azure course by me titled: “Deploy and Configure Infrastructure”. This course is part of the AZ 300 certification learning path for Microsoft Azure Architect Technologies. More about the AZ 300 certification can be found here: https://www.microsoft.com/en-us/learning/exam-az-300.aspx. The course is over 4 hours of Azure content!

Description of the course:

In the course learn how to analyze resource utilization and consumption, create and configure storage accounts, create and configure a VM for Windows and Linux, create connectivity between virtual networks, implement and manage virtual networking, manage Azure Active Directory, and implement and manage hybrid identities.

Objectives of the course:

  • Configure diagnostic settings on resources
  • Create baseline for resources
  • Utilize Log Search query functions
  • Configure network access to the storage account
  • Implement Azure storage replication
  • Configure high availability
  • Deploy and configure scale sets
  • Modify ARM Templates
  • Configure Azure Disk Encryption for VMs
  • Create and configure VNET peering
  • Install and configure Azure AD Connect

It can be watched here:

https://skillmeup.com/courses/player/deploy-and-configure-infrastructure

Read more

Deploy Rancher on Azure for Kubernetes Management

Lately I have been hearing a lot about a solution named Rancher in the Kubernetes space. Rancher is an open source Kubernetes Multi-Cluster Operations and Workload Management solution. You can learn more about Rancher here: https://www.rancher.com.

In short you can use Rancher to deploy and manage Kubernetes clusters deployed to Azure, AWS, GCP their managed Kubernetes offerings like GCE, EKS, AKS or even if you rolled your own. Rancher also integrates with a bunch of 3rd party solutions for things like authentication such as Active Directory, Azure Active Directory, Github, and Ping and logging solutions such as Splunk, Elasticsearch, or a Syslog endpoint.

Recently training opened up for some Rancher/Kubernetes/Docker training so I decided to go. The primary focus was on Rancher while also covering some good info on Docker and Kubernetes. This was really good training with a lot of hands on time, however there was one problem with the labs. The labs had instructions and setup scripts ready to go to run Rancher local on your laptop or on AWS via Terraform. There was nothing for Azure.

I ended up getting my Rancher environment running on Azure but it would have been nice to have some scripts or templates ready to go to spin up Rancher on Azure. I did find some ARM templates to spin up Rancher but they deployed an old version and it was not clear in the templates on where they could be updated to deploy the new version of Rancher. I decided to spend some time building out a couple of ARM templates that can be used to quickly deploy Rancher on Azure and add a Kubernetes host to Rancher. In the ARM template I pulled together it pulls the Rancher container from Docker Hub so it will always deploy the latest version. In this blog post I will spell out the steps to get your Rancher up and running in under 15 minutes.

First off you can find the ARM Templates here on my Github here: https://github.com/Buchatech/DeployRanchertoAzure.

The repository consists of ARM templates for deploying Rancher and a host VM for Kubernetes. NOTE: These templates are intended for labs to learn Rancher. They are not intended for use in production.

In the repo ARM Template #1 named RancherNode.JSON will deploy an Ubuntu VM with Docker and the latest version of Rancher (https://hub.docker.com/r/rancher/rancher) from Docker Hub. ARM Template #2 named RancherHost.JSON will deploy an Ubuntu VM with Docker to be used as a Kubernetes host in Rancher.

Node Deployment

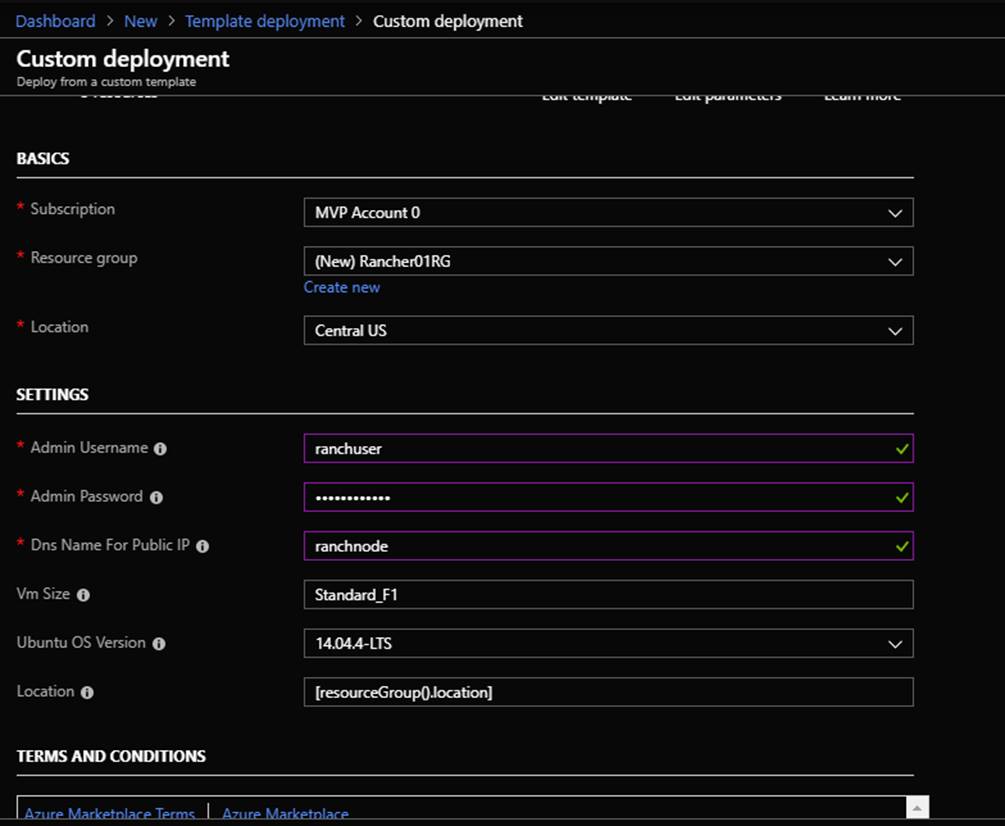
Deploy the RancherNode.JSON ARM template to your Azure subscription through “Template Deployment” or other deployment method. You will be prompted for the following info shown in the screenshot:

Host Deployment

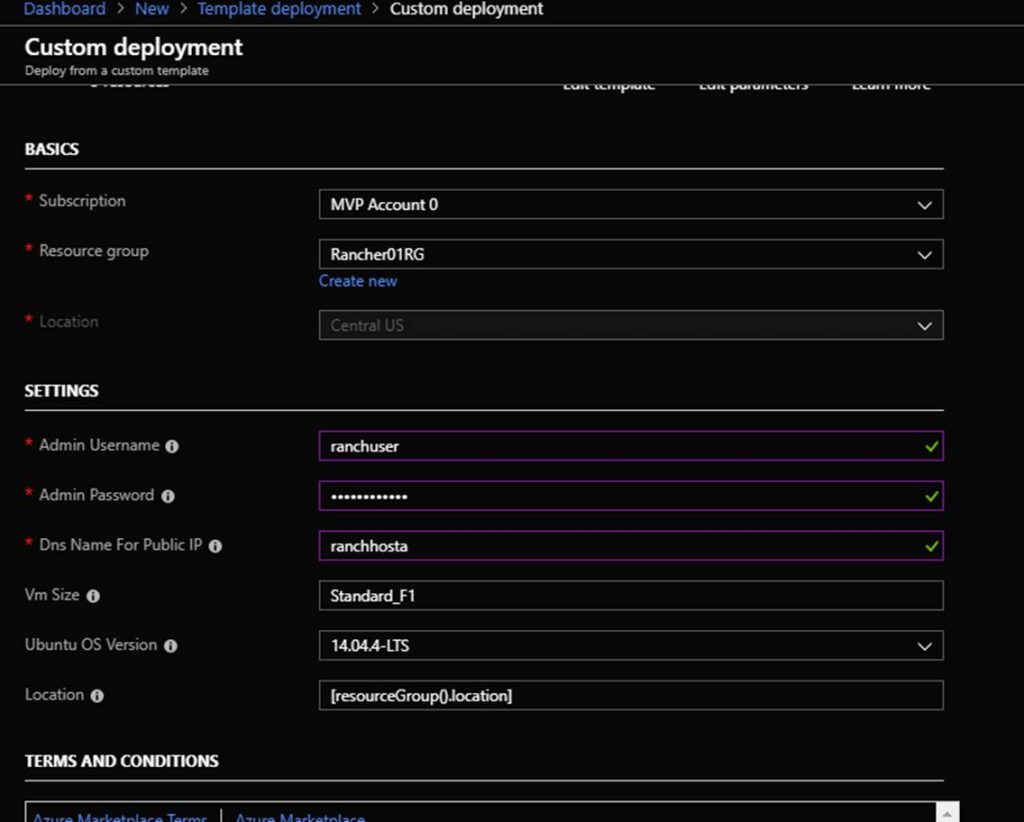
Deploy the RancherHost.JSON ARM template to your Azure subscription through “Template Deployment” or other deployment method. Note that that should deploy this into the same Resource Group that you deployed the Rancher Node ARM template into. You will be prompted for the following info shown in the screenshot:

After the Rancher Node and Rancher Host ARM templates are deployed you should see the following resources in the new Resource Group:

NameType
RancherVNet Virtual network
RancherHost Virtual machine
RancherNode Virtual machine
RancherHostPublicIP Public IP address
RancherNodePublicIP Public IP address
RancherHostNic Network interface
RancherNodeNic Network interface
RancherHost_OSDisk Disk
RancherNode_OSDisk Disk

Next navigate the Rancher portal in the web browser. The URL is the DNS name of the Rancher Node VM. You can find the DNS name by clicking on the Rancher Node VM in the Azure portal on the overview page. Here is an example of the URL:

https://ranchernode.centralus.cloudapp.azure.com

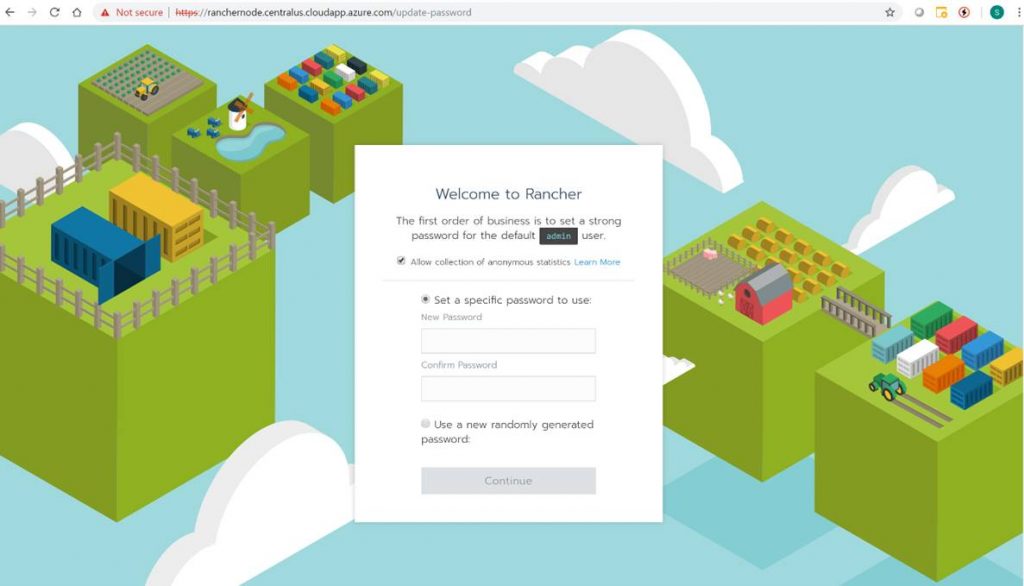
The Rancher portal will prompt you to set a password. This is shown in the following screenshot.

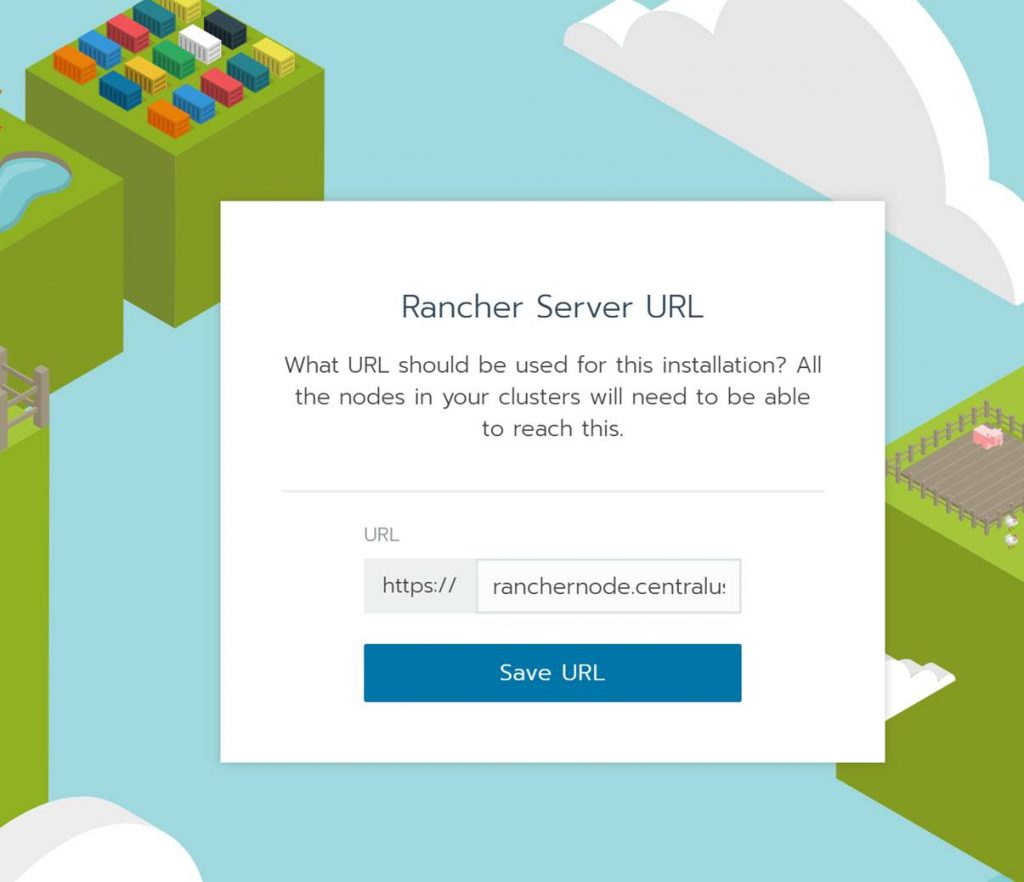
After setting the password the Rancher portal will prompt you for the correct Rancher Server URL. This will automatically be the Rancher Node VM DNS name. Click Save URL.

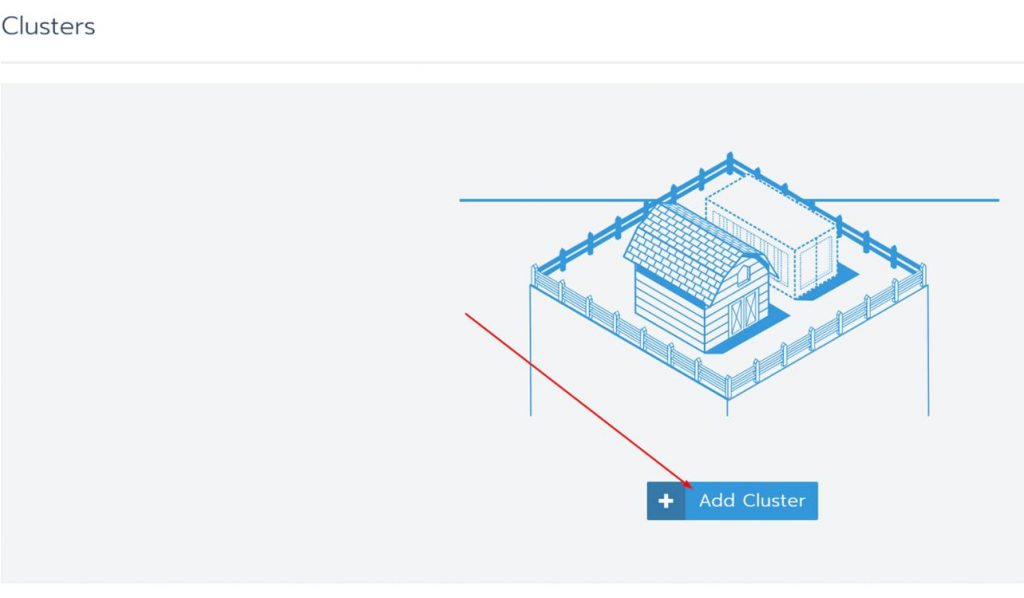
You will then be logged into the Rancher portal. You will see the cluster page. From here you will want to add a cluster. Doing this is how you add a new Kubernetes cluster to Rancher. In this post I will show you how to add a cluster to the Rancher Host VM. When it’s all said and done Rancher will have successfully deployed Kubernetes to the Rancher Host VM. Note that you could add a managed Kubernetes such as AKS but we won’t do that in this blog. I will save that for a future blog post!

Click on Add Cluster

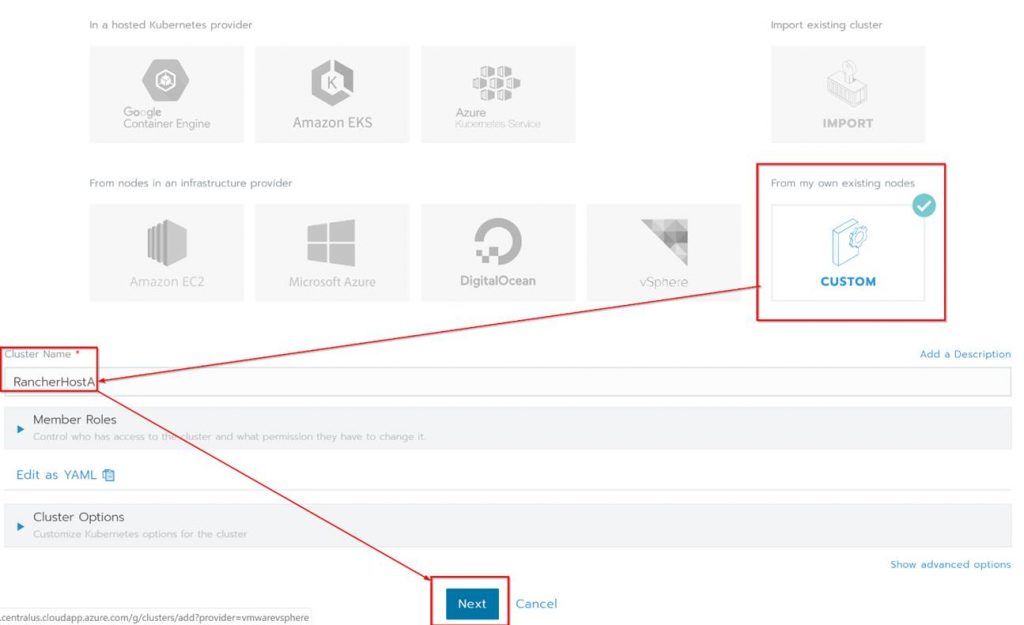
Under “From my own existing nodes” Click on custom, give the cluster a name and click Next.

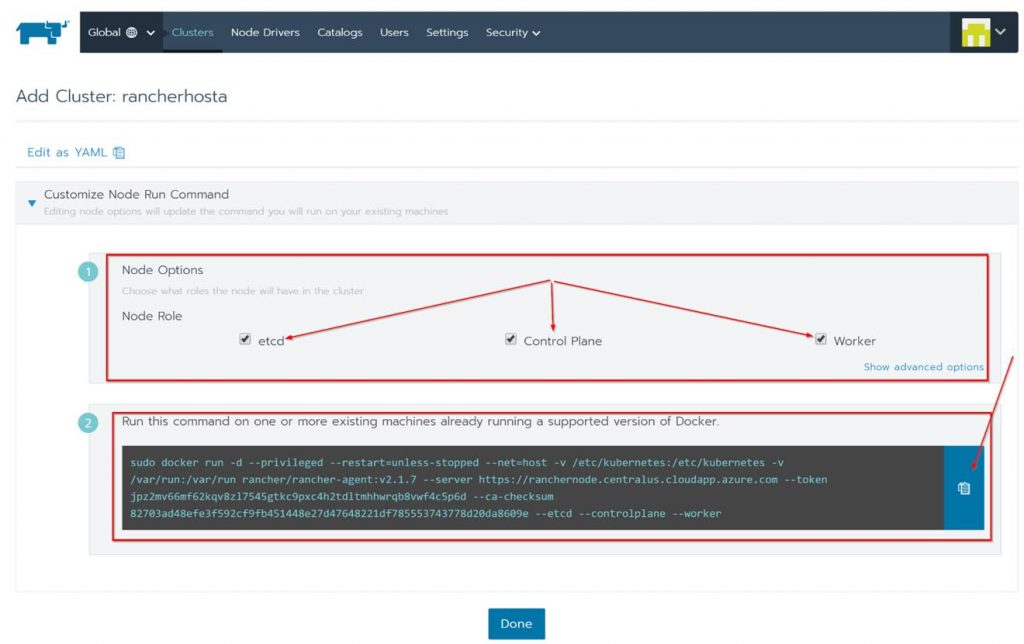
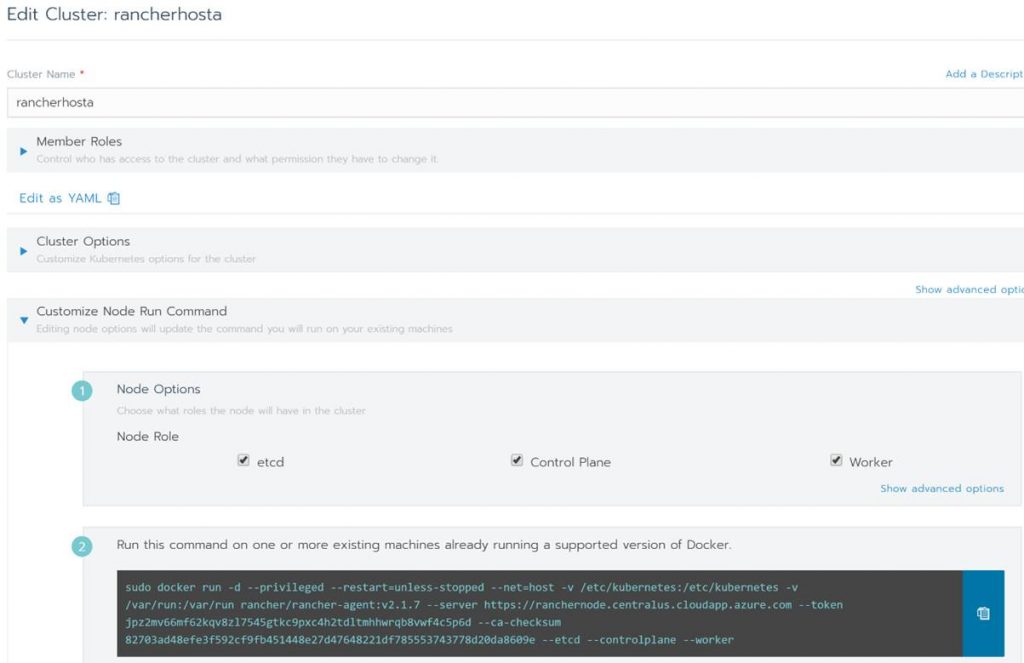
Next check all the boxes for the Node Options since all the roles will be on a single Kubernetes cluster. Copy the code shown at the bottom of the page, click done and run the code on the Rancher Host.

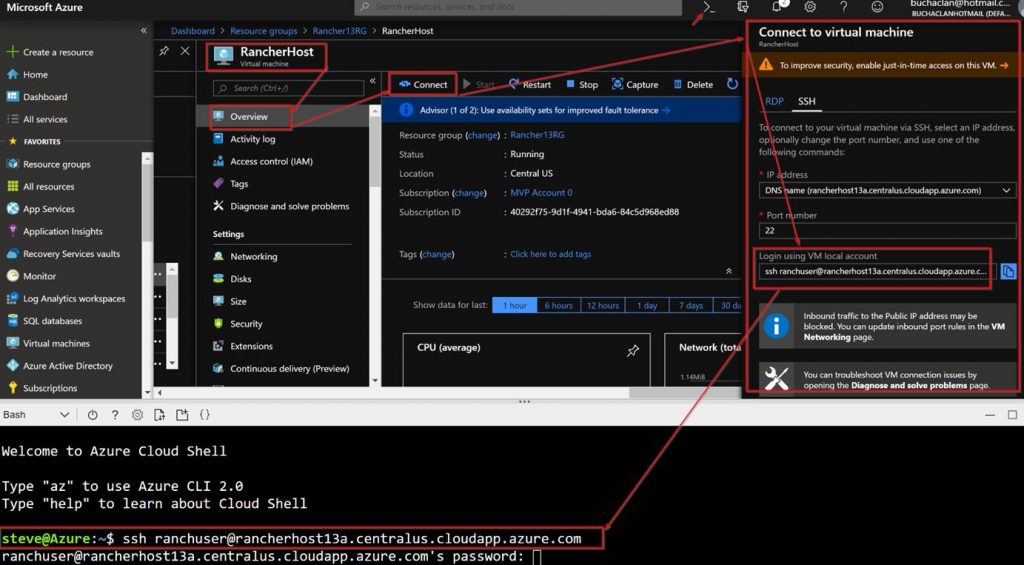
In order to run the code on the Rancher Host you need to SSH in and run it from there. To do this follow these steps:

  1. In the Azure Portal, from within the resource group click on the Rancher Host VM.
  2. On the Overview page click on Connect.
  3. Copy “ssh ranchuser@rancherhost.centralus.cloudapp.azure.com” from the Connect to virtual machine pop up screen.
  4. Open a terminal in either Azure cloud shell or with something like a terminal via VS Code and past the “ssh ranchuser@rancherhost.centralus.cloudapp.azure.com” in.

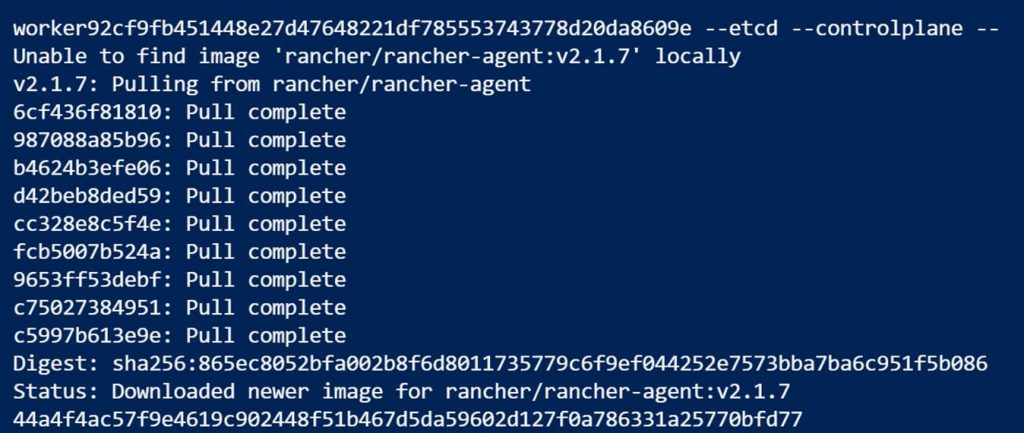
Running the code will look like this:

When done you can run Docker PS to see that the Rancher agent containers are running.

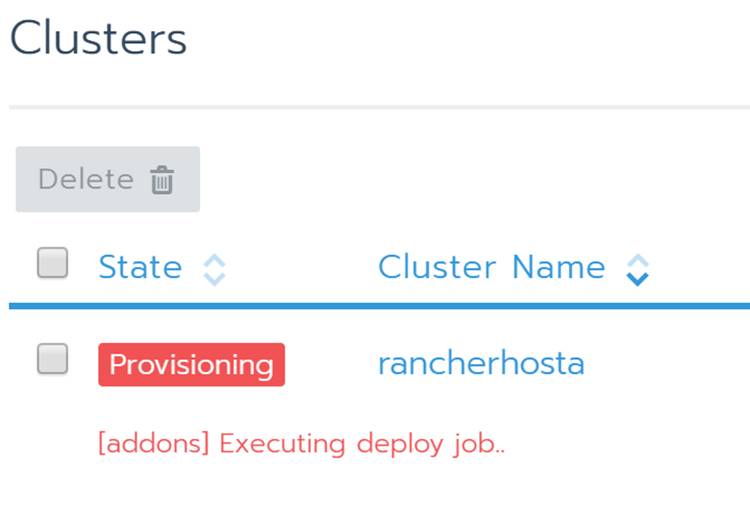
In the Rancher portal under clusters you will see the Rancher host being provisioned

The status will change as Kubernetes is deployed.

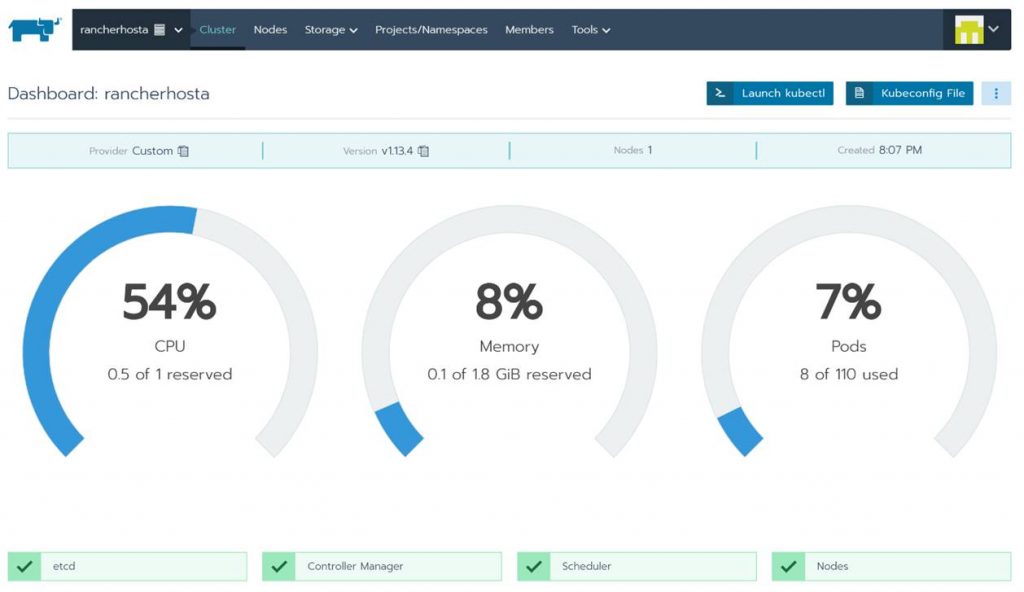
Once it’s done provisioning you will see your Kubernetes cluster as Active.

From here you can see a bunch of info about your new Kubernetes cluster. Also notice that you could even launch Kubectl right from hereand start running commands! Take some time to click around to see all the familiar stuff you are used to working with in Kubernetes. This is pretty cool and simplifies the management experience for Kubernetes. 

If you want to add more nodes or need the configuration code again just click the ellipsis button and edit.

In Edit Cluster you can change the cluster name, get and change settings and copy the code to add more VMs to the cluster.

That’s the end of this post. Thanks for reading. Check back for more Azure, Kubernetes, and Rancher blog posts.

Read more

Require Many Tags on Resource Groups via Azure Policy

Azure Policy can be used to enforce rules and effects on resources in your Azure subscriptions. It is a part of the Azure Governance and management toolbox native to Azure. I actually wrote a blog post all about Azure Policy here as a part of my native cloud management in azure blog series.

In this blog post I want to dig into Requiring Tags on Resource Groups via Azure Policy. There is a sample policy ARM Template to accomplish this here:

https://docs.microsoft.com/en-us/azure/governance/policy/samples/enforce-tag-on-resource-groups . What is not clear with the this policy template is how to add an enforce additional tags within the single ARM Template. This is important as you don’t want to have multiple templates to enforce multiple tags.

Well its actually pretty straight forward. You need to add the additional tags as Rules and Parameters. For example:

{
"not": {
"field": "[concat('tags[',parameters('Environment'), ']')]",
"exists": "true"
}
},

and

"Environment": {
"type": "String",
"metadata": {
"description": "Provides information on what the resource group is used for (useful for maintenance, policy enforcement, chargeback, etc.) Tag value: Dev, QA, Stage, Test, Prod. Example: Prod"
}
},

Be sure you add a parameter for every rule. Also in the example I gave I removed the “equals”: “[parameters(‘tagValue’)]” from the rules because I did not want to populate the tag value. I simply needed to require the tag and leave the value open for the person creating the resource to fill in. Here is the full example Policy ARM Template here:

{
  "mode": "all",
  "policyRule": {
    "if": {
      "allOf": [
        {
          "field": "type",
          "equals": "Microsoft.Resources/subscriptions/resourceGroups"
        },
        {
          "not": {
            "field": "[concat('tags[',parameters('BillTo'), ']')]",
            "exists": "true"
          }
        },
        {
            "not": {
              "field": "[concat('tags[',parameters('Functional Area'), ']')]",
              "exists": "true"
            }
          },
          {
            "not": {
              "field": "[concat('tags[',parameters('Environment'), ']')]",
              "exists": "true"
            }
          },
          {
            "not": {
              "field": "[concat('tags[',parameters('AppOwner'), ']')]",
              "exists": "true"
            }
          }
      ]
    },
    "then": {
      "effect": "deny"
    }
  },
  "parameters": {
    "BillTo": {
      "type": "String",
      "metadata": {
        "description": "Provides a charge code or cost center to attribute the bill for the resources too. Tag value: Cost Center. Example: team@domain.com"
      }
    },
    "Functional Area": {
        "type": "String",
        "metadata": {
          "description": "Provides information on department or team is responsible for administering/supporting the application. Tag value: Team name/email. Example: 1506548"
        }
      },
      "Environment": {
        "type": "String",
        "metadata": {
          "description": "Provides information on what the resource group is used for (useful for maintenance, policy enforcement, chargeback, etc.) Tag value: Dev, QA, Stage, Test, Prod. Example: Prod"
        }
      },
      "AppOwner": {
        "type": "String",
        "metadata": {
          "description": "The Business app owner to contact. Tag value: Business App owners’ email. Example: name@domain.com"
        }
      }
  }
}

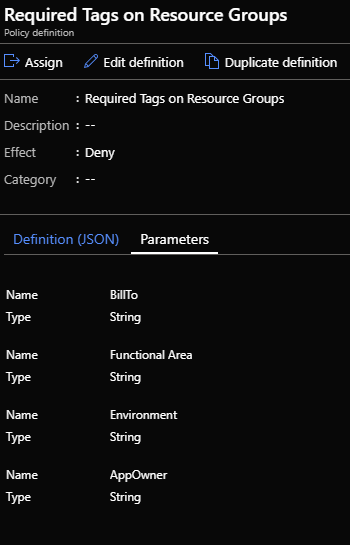
After you create the Policy definition using the ARM template it will look like this:

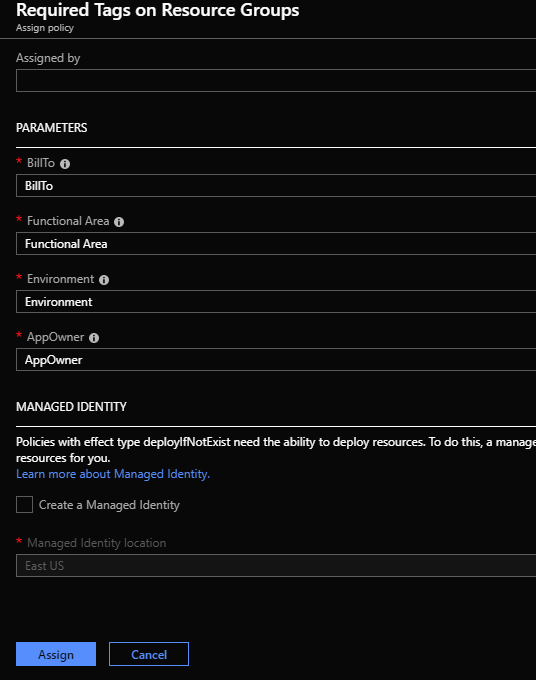
When you assign the policy you will need to complete the parameters:

The next time someone deploys a resource group without the required tags in the subscription this policy is assigned to it will fail.

Thanks for reading!

Read more

Where to host Docker Containers on Azure (AKS, ASE, or ASF)?

Azure Kubernetes Service (AKS) service Azure App Service Environment (ASE) Azure Service Fabric (ASF) Comparison

Scenario:

So, your team recently has been tasked with developing a new application and running it. The team made the decision to take a microservices based approach to the application. Your team also has decided to utilize Docker containers and Azure as a cloud platform. Great, now it’s time to move forward right? Not so fast. There is no question that Docker containers will be used, but what is in question is where you will run the containers. In Azure containers can run on Azure’s managed Kubernetes (AKS) service, an App Service Plan on Azure App Service Environment (ASE), or Azure Service Fabric (ASF). Let’s look at each one of these Azure services including an overview, pro’s, cons, and pricing.

This Azure Kubernetes Service (AKS) Pros and Cons chart is clickable.
This Azure App Service Environment (ASE) Pros and Cons chart is clickable.
This Azure Service Fabric (ASF) Pros and Cons chart is clickable.

Conclusion:

Choose Azure Kubernetes Service if you need more control, want to avoid vendor lock-in (can run on Azure, AWS, GCP, on-prem), need features of a full orchestration system, flexibility of auto scale configurations, need deeper monitoring, flexibility with networking, public IP’s, DNS, SSL, need a rich ecosystem of addons, will have many multi-container deployments, and plan to run a large number of containers. Also, this is a low cost.

Choose Azure App Service Environment if don’t need as much control, want a dedicated SLA, don’t need deep monitoring or control of the underlying server infrastructure, want to leverage features such as deployment slots, green/blue deployments, will have simple and a low number of multi-container deployments via Docker compose, and plan to run a smaller number of containers. Regarding cost, running a containerized application in an App Service Plan in ASE tends to be more expensive compared to running in AKS or Service Fabric. The higher cost of running containers on ASE is because with an App Service Plan on ASE, you are paying costs for a combination of resources and the managed service. With AKS and ASF you are only paying for the resources used.

Choose Service Fabric if you want a full micros services platform, need flexibility now or in the future to run in cloud and or on-premises, will run native code in addition to containers, want automatic load balancing, low cost.

A huge thanks to my colleague Sunny Singh (@sunnys101) for giving his input and reviewing this post. Thanks for reading and check back for more Azure and container contents soon.

Read more

Architect your Cloud with Azure Blueprints

Today as a part of the Azure Governance and management announcements at Microsoft Ignite 2018 Azure Blueprints Public Preview was announced. Azure Blueprints are a core part of the cloud governance and management story. They go hand and hand with Management Groups and will take the enterprise management story of Azure up a level. In this blog post I will take a deep dive into Azure Blueprints explaining what they are and give an example of how they can be used.

NOTE: This is a long blog post so I have also published this content as a whitepaper. The whitepaper PDF can be downloaded here.

BLUEPRINTS OVERVIEW

At a high-level Azure Blueprints help you meet organizational cloud standards, patterns, and requirements through governed subscriptions enabled and enforced by the grouping of artifacts like ARM templates, Azure policies, RBAC role assignments, and resource groups within a Blueprint.

Blueprints can be used to lay a cloud foundation, as cloud patterns, and group cloud governance frameworks. Blueprints are a one-click solution for deploying a cloud foundation, pattern, or governance framework to an Azure subscription. Think of an Azure Blueprint as re-usable design parameters for cloud that can be shared and used across an enterprise.

Azure architects typically map out and plan the many aspects of a cloud foundation for an organization such as access management, networking, storage, policy, security/compliance, naming conventions, tagging, monitoring, backup, locations, and more. Now Azure architects can step this designing a step further build these designs as Azure Blueprints and then apply them to subscriptions. The Blueprints give architects a way to orchestrate the deployment of grouped components to speed up the development and provisioning of new Azure environments ensuring they are meeting organizational compliance.

BLUEPRINTS ARE NOT AZURE POLICY

Azure policy is a service targeted to resource properties that exists or when being deployed with allow or explicit deny policies. It is used to ensure resources in an Azure subscription adhere to requirements and standards of an organization.

Azure policies can exist on their own or be a part of an Azure Blueprint. Blueprints do not replace Policy they are one of the Artifact types that make up a Blueprint.

THE MAKEUP OF A BLUEPRINT

Definition

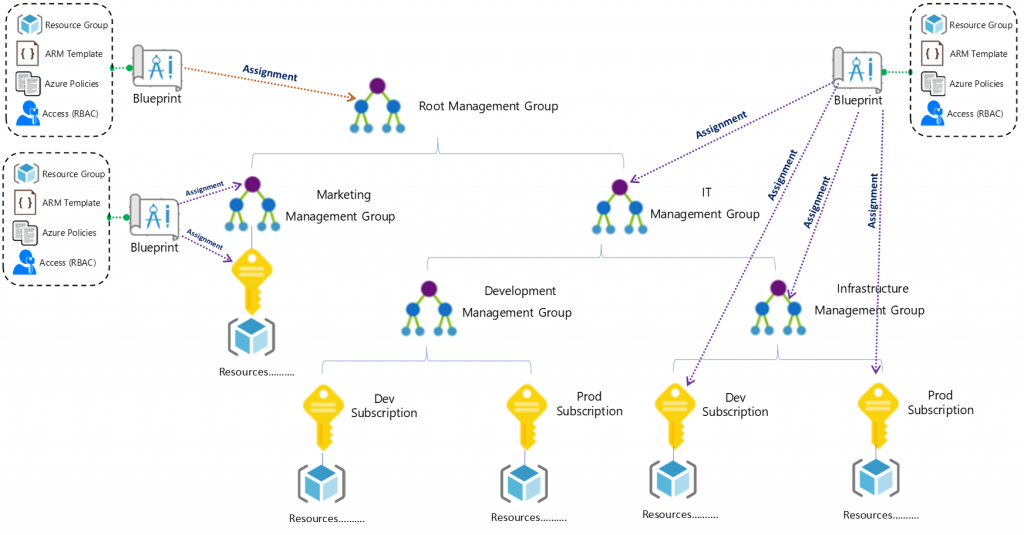
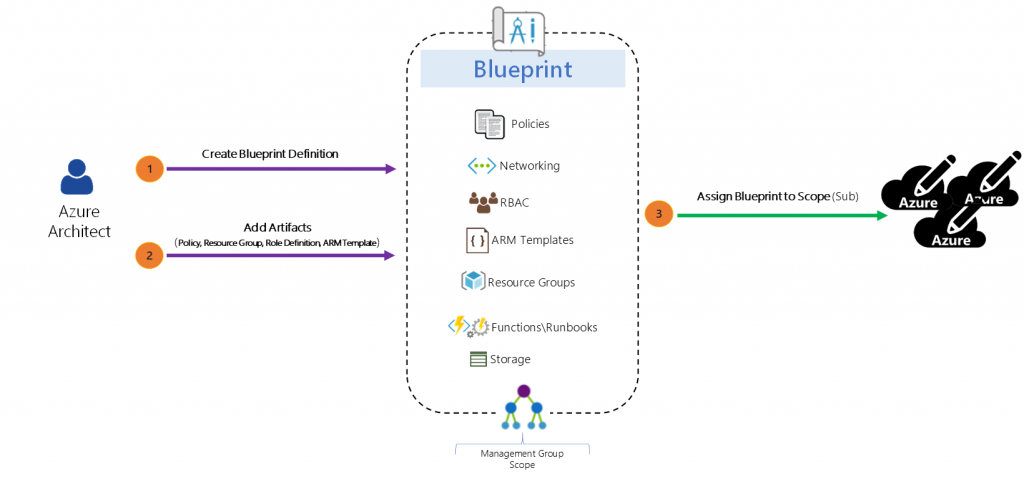
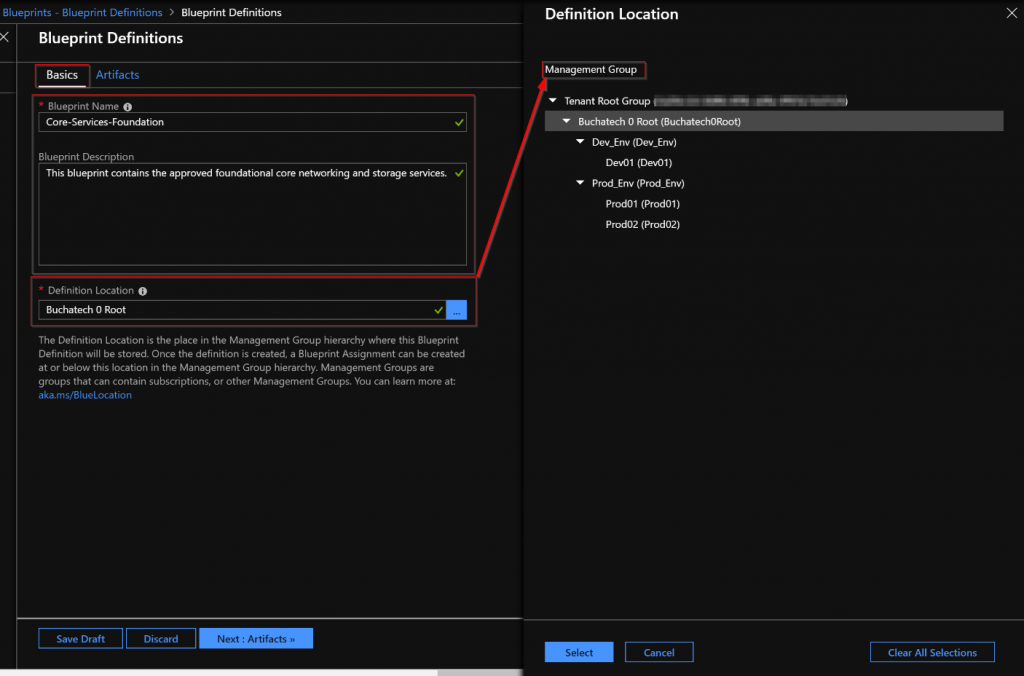
A Blueprint consists of a Definition. The Definition is the design of what should be deployed it consists of the name of the Blueprint, the description and the Definition location. The Definition Location is the place in the Management Group hierarchy where this Blueprint Definition will be stored and determines the level assignment is allowed at. Currently you must have Contributor access to a Management Group to be able to save a Blueprint Definition to it. A Blueprint can be assigned at or below the Management Group it has set in its Definition Location. Here is a diagram to visualize Blueprint Assignment in relation to Management Group hierarchy:

Azure Blueprint Assignment

Artifacts

The Definition is where Blueprint Artifacts are added. As of right now the following is a list of the Artifact types:

  • Policy Assignments – Lets you add an Azure Policy. This can be a built-in or custom policy.
  • Role Assignments – Lets you add a user, app, or group and set the role. Only built-in roles are currently supported.
  • Azure Resource Manager templates – Lets you add an ARM Template. This does not let you import a parameters file. It does let you pre-set the parameters or set the parameters during assignment of the Blueprint.
  • Resource Groups – Lets you add a Resource Group to be created as a part of this Blueprint.

In my opinion the ARM Template artifact is the most impactful of the Blueprint artifact types because you can define such a variety of resources here. It opens the Blueprint to the power of ARM in general. Hopefully in the future we will see more scripting capability or the ability to load PowerShell scripts, runbooks, and or Functions.

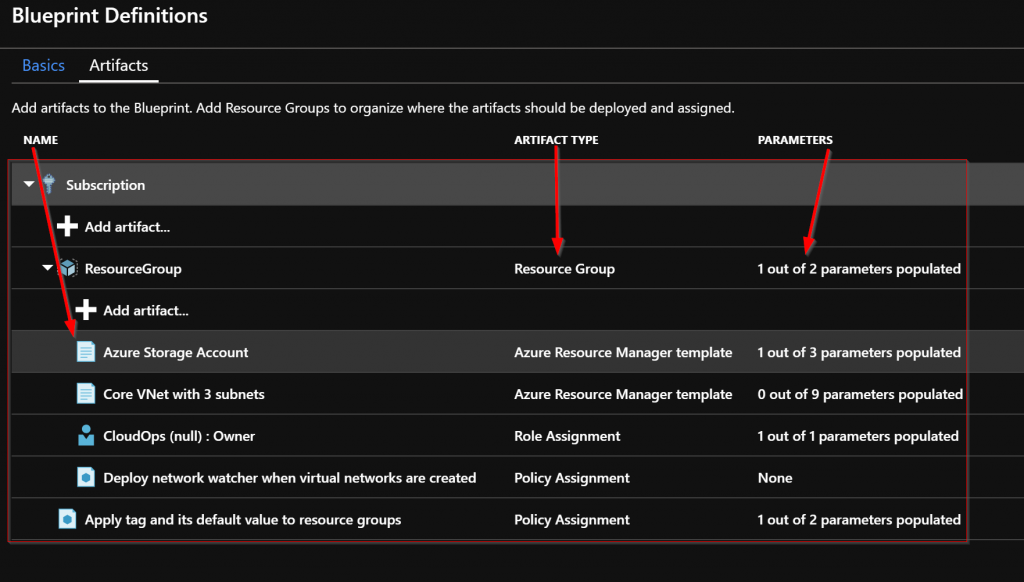
There are two levels in the Artifacts. The first level is Subscription. The second level is Resource Group. Resource Group artifacts cannot be added to a Resource Group artifact. A Resource Group artifact can be created in a Subscription. An ARM Template artifact can only be created in a Resource Group artifact. A Policy Assignments or Role Assignments can be created at either the Subscription or Resource Group level.

Assignment

After a Blueprint has been built it needs to be applied. Applying a Blueprint is known as Blueprint assignment. The assignment is essentially the “what was deployed” for a Blueprint. This is how the artifacts are pushed out to Azure and used to track and audit deployments in Azure.

Sequencing

When the assignment of a Blueprint is processed the default order of resource creation is:

  • Role assignment artifacts at the Subscription level
  • Policy assignment artifacts at the Subscription level
  • Azure Resource Manager template artifacts at the Subscription level
  • Resource group artifacts and its child artifacts (role assignment, policy assignment, ARM Templates) at the Resource Group level

When a blueprint includes multiple Azure Resource Manager templates there may be a need to customize the sequencing order in which the Blueprint will deploy artifacts during assignment. You customize the artifact deployment sequence by deploying a Blueprint from an ARM Template declaring a dependency within it or declaring a dependency within an ARM Template artifact in the Blueprint. You declare a dependency using the dependsOn property in JSON. This essentially is a string array of artifact names.

Resource Locking

In cloud environments consistency is key. Naturally Azure Blueprints can also leverage resource locking in Azure. Blueprints have a Locking Mode. This Locking Mode can be applied to None or All Resources and is determined during the assignment of the Blueprint. The decision on cannot be changed later. If a locking state needs to be removed, then you must first remove the Blueprint assignment.

Some Blueprint artifacts create resources during assignment. These resources can have the following state:

  • Not Locked – Can be changed. Can be deleted.
  • Read Only – Can’t be changed and can’t be deleted.
  • Cannot Edit / Delete – Create, update, and delete within the resource group.

Artifacts that become Resource groups get the state of Cannot Edit / Delete automatically but you can create, update, and delete resources within them.

The high-level stages of an Azure Blueprint are Create it, assign it to a scope, and track it.

Anatomy of a Blueprint:

Azure Blueprint Anatomy


Blueprint does have a REST API. I am not covering the REST API in this blog post as I have not had the opportunity to spend much time working with it yet.

Now let’s look at building and assigning an Azure Blueprint.

BUILD A BLUEPRINT

Now I am going to give an example of building and using an Azure Blueprint in a cloud foundation mock scenario. In my mock scenario I have 3 Azure subscriptions. Each subscription should have a Core services Resource Group consisting of a core VNet with 3 subnets, an NSG for each subnet, and the web subnet should be ready for DMZ traffic. For the core VNet and any additional VNet added to the Core Services Resource Group I need network watcher deployed to it.

Each subscription also should have a core storage account and a blob storage that is ready for general storage needs. I want a tag applied to any Blueprint assignment labeling it with the assignment name, so it is easy to track. The last requirement I have is that I need the CloudOps team to automatically be owner of all core services resources. To accomplish all of this I created the following Blueprint:

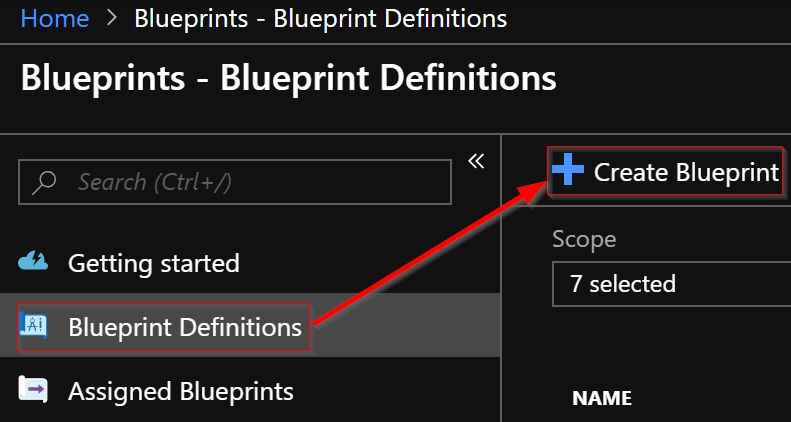
Now let’s walk through the parts of creating and assigning the Blueprint. The first step is to create the Blueprint Definition.

In the basics step I give it a meaningful name and meaningful description. I set the Definition Location to the root of my Management groups. Doing this will allow me to assign this Blueprint to all 3 subscriptions in turn creating the core services RG in each subscription.

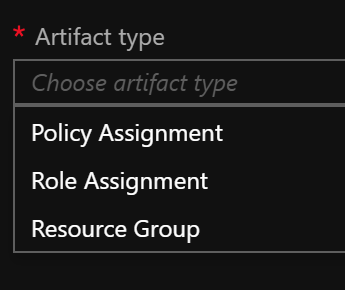
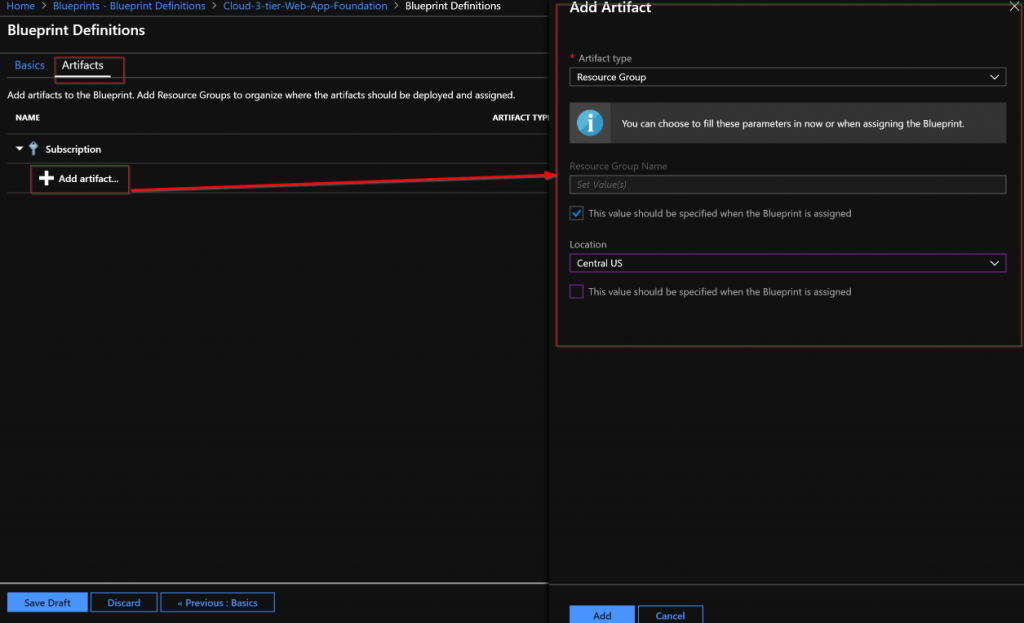
Next the Artifacts need to be added. Note that when adding an Artifact at the Subscription level you have these options as types:

The Resource Group Artifact type is only available at the subscription level and the ARM template Artifact type is only available at the Resource Group level. I added the Resource Group that the core networking and core storage will be deployed into.

Read more

Cloud Security via Security Center

Another critical part of managing any cloud is security. In Azure Microsoft has a service called Security Center. I am going to cover Security Center at a high level here in this post as Security Center itself is a big topic and is frequently changing with new improvements. This provides continuous assessment of your clouds security posture. Security Center gives you a central place to monitor and manage your security. Security Center can even covers Hybrid Cloud with the ability to extend on-premises. With Security Center you can apply security policies to your cloud workloads and respond to attacks that occur.

Security Center has a “free” tier that can be used with any Azure subscription. In fact if you are running Azure you should at a minimum be utilizing the free tier of Security Center. The tiers are:

Not covered = not monitored by Security Center.

Basic Coverage = subscriptions under this “free” tier are under the limited, free level of Security Center.

Standard Coverage =  subscriptions under this “standard” tier have the maximum level coverage by Security Center.

Key features in Security Center are:

– Security policy, assessment, and recommendations / free / Security Center performs continuous assessment and recommendations based on security policies that are set. This is the core feature of Security Center.

– Event collection and search / standard / Security Center can store security events in a Log Analytics (LA) workspace. The events also are available in the LA workspace for searching.

– Threat Protection / standard / visibility into any detected security alerts and their severity level.

– Just in time VM access / standard / Just in time VM access locks down inbound traffic to IaaS VM’s. With this feature users are required to request access to the VM for a specified amount of time. A firewall rule is opened on an NSG allowing the access and then the ports are closed after the allotted window of access time. This can reduce the attack surface on VM’s.

NOTE: (Automate Just In Time VM Access Request With PowerShell – https://github.com/CharbelNemnom/Power-MVP-Elite/tree/master/Request%20JIT%20VM%20Access by Microsoft MVP Charbel Nemnom)

– Adaptive application controls / standard /  This feature allows you to choose what applications are allowed to run on your VMs. This feature uses machine learning to analyze the applications running in the VM and then you whitelist the ones you want to allow to run.

– Custom alerts / standard /  Security Center has a bunch of default alerts. Alerts fire when a threat, or suspicious activity occurs. You can find the list of the default alerts here: security alerts. Security Center also has custom alerts that you can setup. With these you define the conditions upon which an alert is fired.

– Threat intelligence  / standard /  this feature watches for known bad actors using threat intelligence data from Microsoft’s global products and services such as Azure, Office 365, Microsoft CRM online, Microsoft Dynamics AX, outlook.com, MSN.com, and Microsoft’s Digital Crimes Unit (DCU) and Microsoft Security Response Center (MSRC) .

It is important to note that Security Center leverages many other Azure services to power its services. Some of these other Azure services include:

  • Azure Policy
  • Log Analytics
  • Logic Apps
  • Machine Learning

Now that we looked at key features of Security Center let’s take a tour of Security Center. The best way to navigate Security Center is via the navigation on the left hand side and that is the way I will break it down. The menu sections are shown in the following table:

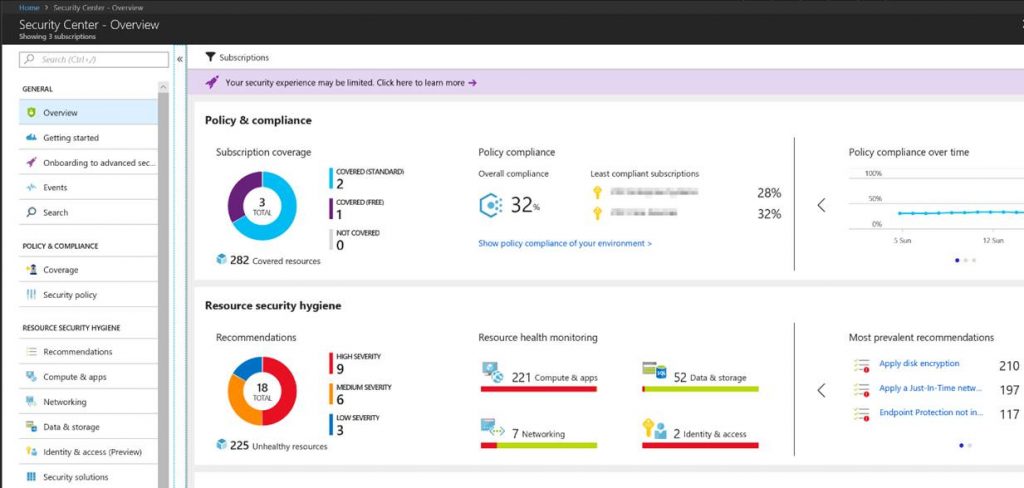
When you first click into Security Center you will see the Overview. Overview is also the first section under “General”. Here is a screenshot of the overview pain.

Essentially the overview pane gives you a summary of your security posture pulling in data from several sections in Security Center. Getting started is where you can launch a 60 day trial on the standard plan. Events brings you to a log analytics workspace dashboard to give you another display and search capabilities on your security data. Search will bring you directly to the log analytics search screen where you can search on your security data.

Read more

Native Cloud Management in Azure

For those that know me know that I have been a System Center expert for some time focused on helping organizations manage their IT along with their ITSM needs. I have been working with Azure since it was released off and on but started to get serious about Azure after Microsoft’s move to resource manager. And even more recently I have re-focused completely to Azure and DevOps along with ITSM in the context of the cloud. I consider this combination CloudOps.

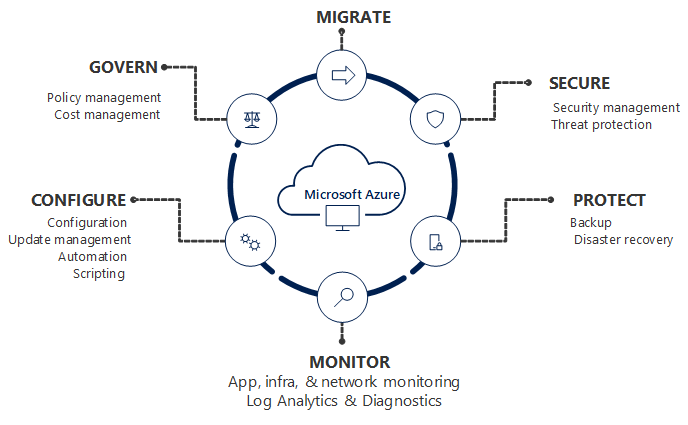
CloudOps is important when it comes to cloud and supporting DevOps. A part of CloudOps is cloud management. More specifically the tooling name for cloud management is often referred to as Cloud Management Platform (CMP).  CMP’s can be a CloudOps architect and engineers best friend or worst nightmare. There are many CMP solutions out there in the market that can be used to manage Azure and other clouds as well. Microsoft has done a nice job building and bringing in native solutions that can be used to manage Azure. The following image depicts the areas of cloud management that are in focus for Microsoft.

I am sure the plan for native cloud management will change and expand over time as Azure and its management needs continue to grow. The native set of cloud management tools in Azure can be viewed as a CMP. I am going to put together a group of blogs that at a high level cover the native solutions that exist for managing and securing Azure. There are so many areas in this topic that it has to be broken out into a blog series. This is the first time I am doing a blog series. It will cover the following:

Check back on this post soon. As I create more blog posts in this series they will be linked on the list above.

Read more

Azure Policy

A key component of cloud governance in Azure is being able to apply policies across cloud resources. In Azure, there is a  service called Azure Policy that can be used to define policies and enforce them across your cloud resources. Azure Policy can be used to create, assign and, manage, and apply policy definitions. Azure Policy can be set to just evaluate when resources are out of compliance or remediate when resources are out of compliance. These two modes are known as audit effect and deny effect.

Azure policies can be applied to Management Groups, subscriptions, or resources.

Azure Policy has been around for a while but recently it has revamped to make it enterprise ready. Azure Policy is in preview but it won’t be long before it will go GA and can be used to help manage your Azure. There is no pricing yet while Policy is in preview.

Azure Policy is not RBAC. RBAC deals with user access and user actions such as what users can access what resources and what they can do with them. Azure Policy deals with existing resources and resource properties during the deployment of them.

In Azure Policy you have something known as definitions. Definitions are essentially compliance rules that can be assigned to Azure resources. These definitions can just check to see if items are compliant or not and can enforce compliance. Definitions can be used to set conventions for resources, for example, all resources in a subscription should have a certain tag when created. Definitions are also used to evaluate something and take an action based on the result of the evaluation. A good example of this is that you could use a policy definition to evaluate if virtual machines are using managed disks or not. Azure Policies are used to help control costs and manage resources across your Azure subscriptions.

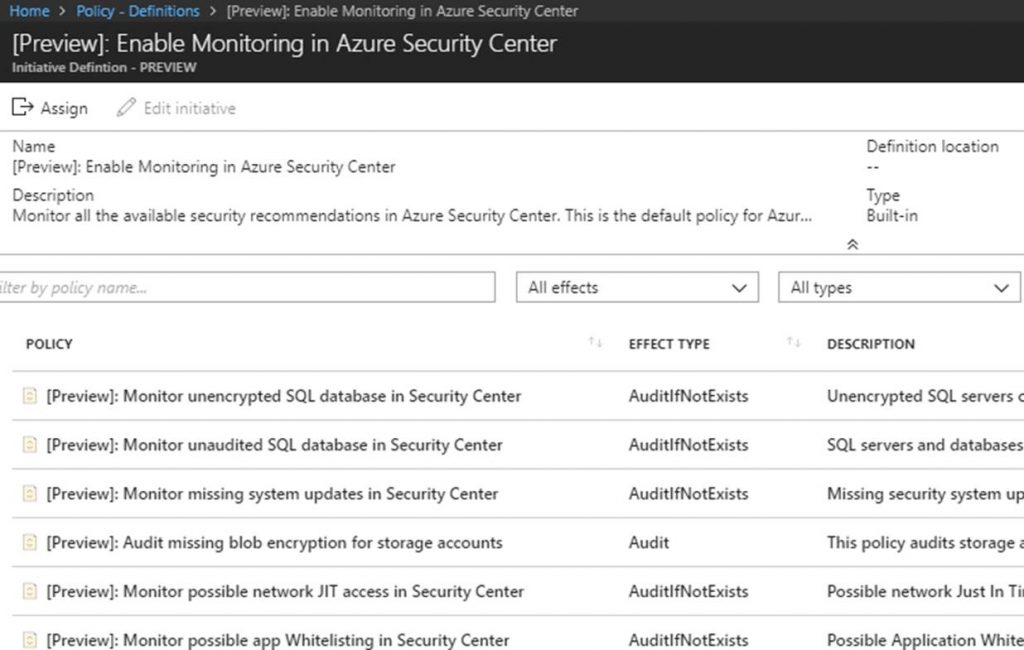
There are two types of definitions called Policy and Initiative. A Policy definition is a single definition. An Initiative definition is a group of Policy definitions. Initiative definitions are used to help achieve larger compliance need. To gain a better understanding of Initiative definitions you can look at Security Center as it leverages Initiative definitions. Security Center has a built-in Initiative definition named [Preview]: Enable Monitoring in Azure Security Center. This built-in Initiative definition for Security Center contains 13 Policy definitions related to security as shown in the following screenshot.

In Azure policy there are built-in and custom definitions. The built-in definitions have been created by Microsoft and are ready to be used to help with common needs in cloud. There are 36 built-in policy definitions today. Custom definitions are built by you. All Azure policies are JSON so writing custom polices is similar to writing ARM templates. Templates for Azure policies can be found in the Repository for Azure Resource Policy samples here: https://github.com/Azure/azure-policy. You can use these samples as a starting point when building your own. Here is an example of an Azure policies JSON:

Read more

Azure Management Groups

If your company is like most organizations that are using the cloud, then you have many subscriptions floating around. This is often due to “shadow IT”. However, sometimes organizations simply use many subscriptions as a way to put boundaries around cloud services for departments, teams or other reasons.

Microsoft has built a new service in Azure to help with the governance of your cloud. This new service is called Management Groups. Management Groups is still in preview but it is something I highly recommend you start trying out or using now as it is going to be as big for cloud as group policy was for on-premises AD based environments.

Management Groups sit above subscriptions. This allows Management Groups to be at the highest level in the chain so they can be used to effectively manage access, policies, and compliance for any subscriptions that belong to your organization. Within Management Groups you can set access controls (RBAC) and Azure policy to be applied to subscriptions. Subscriptions are organized in logical containers and the containers are the “management groups”. Your governance conditions are then applied to the management groups. This is the much-needed enterprise level type of management that has been needed in Azure for a while.

Management Groups will eventually become the starting point of governance when organizations embark on the cloud. Management Groups also can be used for organizations that are already in the cloud. I am going to dive into Management Groups giving you a high-level tour but first I need to give some more background on the components of Management Groups.

Each directory has a “root management group”. This root management group is at the top level of the management group hierarchy. All other management groups and subscriptions fold up to the root management group. Access and policies can be applied at the directory level via this root management group.

A couple of other things to note about management groups are that you can only have up to 10,000 management groups in a single directory, a management group tree can go six levels deep not including the root management group, and each management group can have multiple children management groups but only one parent management group.

Now let’s explore how I have structured my management groups to give some examples of how this works. Note that all the examples I show in this blog post are for my Azure environments but yours will be different based on many factors such as your organizational structure of departments, teams, etc.

You can find management groups under All Services>>Management Groups.

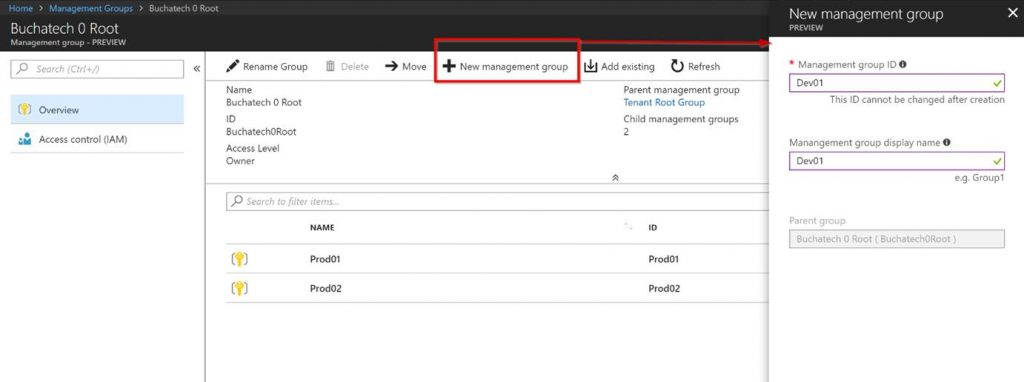
When you first access Management Groups you will need to create a root MG. Note that the root MG cant deleted or moved. You can rename the root MG. In the following screenshot, I am showing the creation of a sub MG in my root MG. Also, notice on the left-hand side you can set Access controls (RBAC) on this MG.

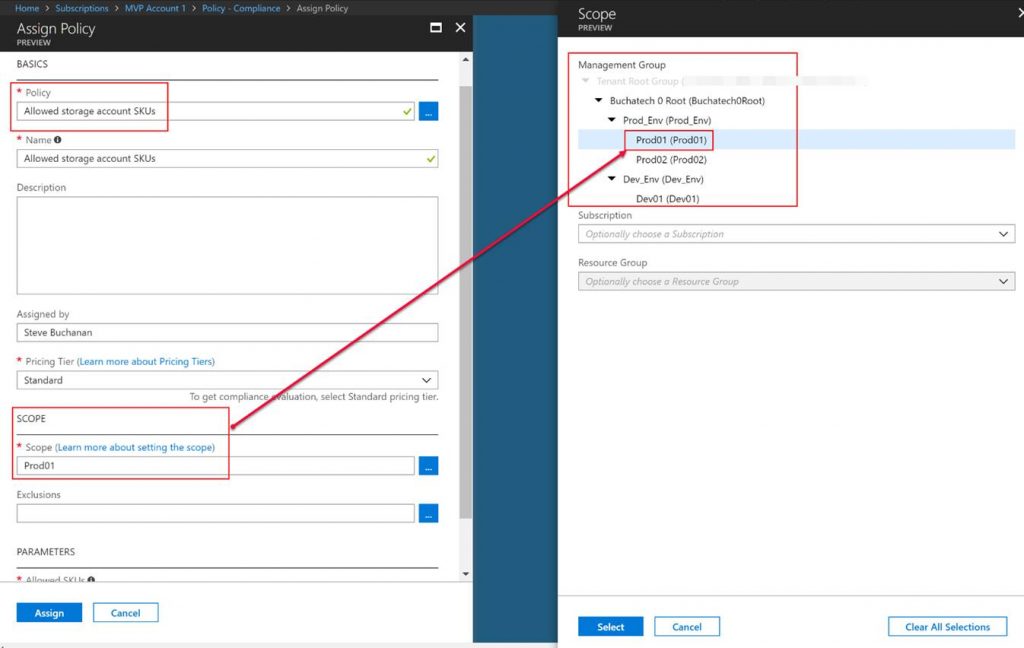
In order to configure Azure Policies and apply it to a management group, you do that within the Azure Policy itself. You can see in the following screenshot that I have an Azure policy and I am scoping it to the Prod01 MG. Whatever subscription/s and resources in those subscriptions will inherit the policy unless an exclusion is set in the policy or I am breaking inheritance at the resource group level.

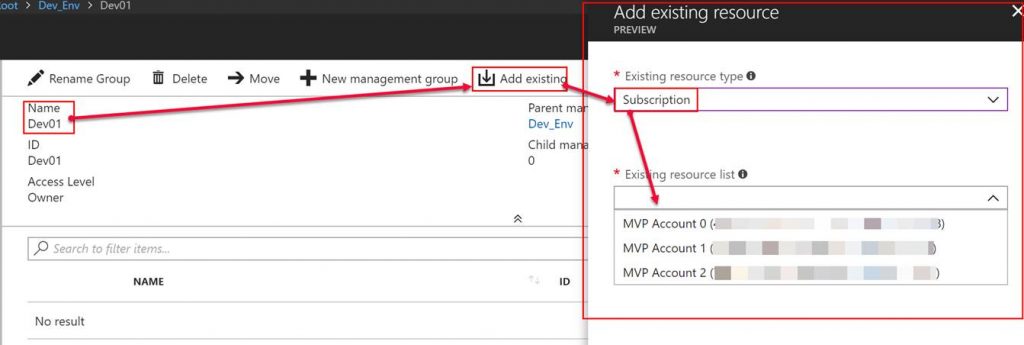
In the following screenshot, I am showing the addition of an existing resource. The resources you can add are other MG’s or subscriptions.

In the following screenshot, you can see that I am going to add one of my subscriptions to my Dev01 management group. After doing this I can configure development related access and development related policies to this subscription. I also can do the same thing with my production environments/subscriptions.

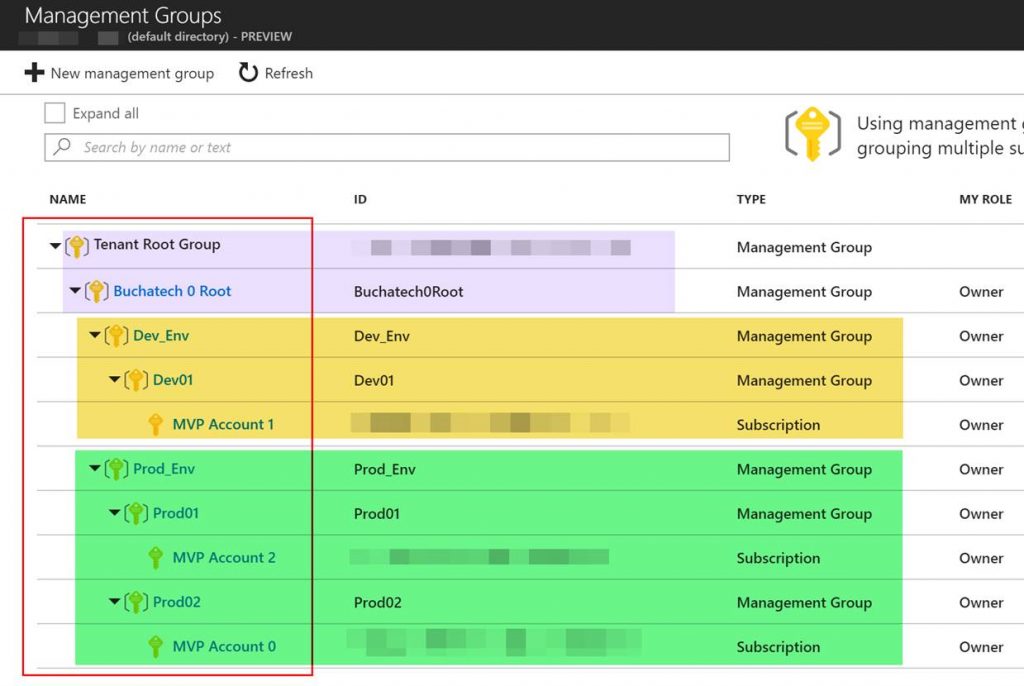
Here is what my Management Groups hierarchy looks like:

In my hierarchy I have 3 subscriptions I split into two for production and 1 for development. I have created a root management group and placed all other management groups in it. I created a parent management group for my prod subscriptions and 1 for my development subscriptions in case I add more in the future. I then created a prod01 and prod02 pulling a subscription into each one. Doing this allows me to have separate access and policies per subscription. One thing you could do is pull multiple subscriptions into a single management group.

Note that I also could apply access and policies at the root level or at one of my environment management groups i.e. Prod_Env/Dev_Env and the sub-management groups would inherit the access and policies that are set at the environment management group level.

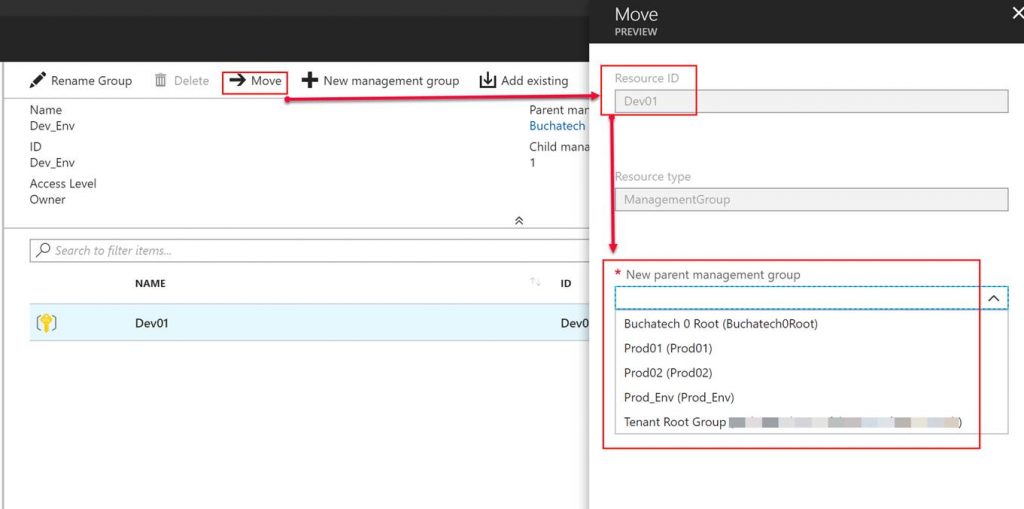
Also if you need to you can move management groups to a new parent management groups.

Thanks for reading this post. As I mentioned at the beginning of this post Azure Management Groups are currently in preview but they are worth checking out and potentially using now as these are going to become a critical part of the Azure governance story.

Read more

Setup CI/CD pipeline with VSTS & Azure Stack

We all know that DevOps brings together people, processes, and technology. In the Microsoft DevOps world A large part of the technology piece is utilizing Visual Studio Team Services (VSTS) for continuous deployment of workloads to Azure.

Microsoft launched their Hybrid Cloud on July 10th 2017. Azure Stack is the secret sauce of Microsoft’s the Hybrid Cloud. Microsoft’s offering is the only one true Hybrid Cloud in the market bringing Azure to on-premises data centers.

As Microsoft continues to move their Hybrid Cloud forward the DevOps integration and capabilities we have for Azure extend to Azure Stack. Again I was fortunate to participate in a preview of the VSTS integration with Azure Stack. I was happy to see Microsoft putting a priority on this functionality because DevOps on Azure Stack is a HUGE need. Cloud is often the catalyst to helping organizations adopt a DevOps culture fostering digital transformation. Some organizations not being able to put all workloads in public cloud Azure Stack is a good way for them to get the same cloud capabilities on-premises DevOps integration being one of them. The setup and integration between VSTS and Azure Stack is working nicely. The team at Microsoft has given me permission to share about this topic via my blog.

In this blog post I am going to cover setting up VSTS to work with Azure and setting up a continuous-integration and-continuous deployment (CI/CD) pipeline to Azure Stack. With Microsoft DevOps you can utilize the pieces of VSTS that make sense for you to use leaving the control up to you. Through VSTS you can use many other DevOps tools such as Jenkins, Octopus deploy, GitHub, Bitbucket etc into your pipeline making Azure Stack just as flexible as Azure is. Let’s Jump in!

Steps to prep Azure Stack for Visual Studio Team Services (VSTS)

#1 Ensure you have installed the Azure Stack PowerShell and Azure PowerShell modules.

Details can be found here:

https://docs.microsoft.com/en-us/azure/azure-stack/azure-stack-powershell-install

#2 Add the Azure Stack environment using the following syntax

# Navigate to the downloaded folder and import the **Connect** PowerShell module

Set-ExecutionPolicy RemoteSigned

Import-Module PATH\AzureStack.Connect.psm1

# Register an AzureRM environment that targets your Azure Stack instance

Add-AzureRMEnvironment `

-Name “AzureStackAdmin” `

-ArmEndpoint “https://adminmanagement.local.azurestack.external

# Set the GraphEndpointResourceId value

Set-AzureRmEnvironment `

-Name “AzureStackAdmin” `

-GraphAudience “https://graph.windows.net/

# Get the Active Directory tenantId that is used to deploy Azure Stack

$TenantID = Get-AzsDirectoryTenantId `

-AADTenantName “YOURDOMAIN.onmicrosoft.com” `

-EnvironmentName “AzureStackAdmin”

# Sign in to your environment

Login-AzureRmAccount `

-EnvironmentName “AzureStackAdmin” `

-TenantId $TenantID

NOTE: You will need the environment name and the tenant ID for the next script.

#3 Create SPN

Original SPN creation script can be found here:

https://github.com/Microsoft/vsts-rm-documentation/blob/master/Azure/SPNCreation.ps1

Documentation on creating an SPN can be found here:

https://www.visualstudio.com/en-us/docs/build/concepts/library/service-endpoints#sep-azure-rm

Below I will display the script I used. Note that you will need the following parameters for the script:

$subscriptionName

“Enter Azure Stack Subscription name. You need to be Subscription Admin to execute the script”)]

$password

“Provide a password for SPN application that you would create”

$environmentName

“Provide Azure Stack environment name for your subscription”

$AzureStackTenantID

“Provide tenant ID from when Azure Stack enviroment was added”

EXAMPLE:

.\CreateSPN.ps1 -subscriptionName “Default Provider Subscription” -password PASSWORDHERE -environmentName AzureStackAdmin -AzureStackTenantID ID HERE

Here is the script I used that you can run:

param

(

[Parameter(Mandatory=$true, HelpMessage=”Enter Azure Stack Subscription name. You need to be Subscription Admin to execute the script”)]

[string] $subscriptionName,

[Parameter(Mandatory=$true, HelpMessage=”Provide a password for SPN application that you would create”)]

[string] $password,

[Parameter(Mandatory=$false, HelpMessage=”Provide a SPN role assignment”)]

[string] $spnRole = “owner”,

[Parameter(Mandatory=$false, HelpMessage=”Provide Azure Stack environment name for your subscription”)]

[string] $environmentName,

[Parameter(Mandatory=$false, HelpMessage=”Provide tenant ID from when Azure Stack enviroment was added”)]

[string] $AzureStackTenantID

)

#Initialize

$ErrorActionPreference = “Stop”

$VerbosePreference = “SilentlyContinue”

$userName = $env:USERNAME

$newguid = [guid]::NewGuid()

$displayName = [String]::Format(“VSO.{0}.{1}”, $userName, $newguid)

$homePage = “http://” + $displayName

$identifierUri = $homePage

#Initialize subscription

$isAzureModulePresent = Get-Module -Name AzureRM* -ListAvailable

if ([String]::IsNullOrEmpty($isAzureModulePresent) -eq $true)

{

Write-Output “Script requires AzureRM modules to be present. Obtain AzureRM from https://github.com/Azure/azure-powershell/releases. Please refer https://github.com/Microsoft/vsts-tasks/blob/master/Tasks/DeployAzureResourceGroup/README.md for recommended AzureRM versions.” -Verbose

return

}

Import-Module -Name AzureRM.Profile

Write-Output “Provide your credentials to access Azure subscription $subscriptionName” -Verbose

Login-AzureRmAccount -SubscriptionName $subscriptionName -EnvironmentName $environmentName -TenantId $AzureStackTenantID

$azureSubscription = Get-AzureRmSubscription -SubscriptionName $subscriptionName

$connectionName = $azureSubscription.SubscriptionName

$tenantId = $azureSubscription.TenantId

$id = $azureSubscription.SubscriptionId

#Create a new AD Application

Write-Output “Creating a new Application in AAD (App URI – $identifierUri)” -Verbose

$azureAdApplication = New-AzureRmADApplication -DisplayName $displayName -HomePage $homePage -IdentifierUris $identifierUri -Password $password -Verbose

$appId = $azureAdApplication.ApplicationId

Write-Output “Azure AAD Application creation completed successfully (Application Id: $appId)” -Verbose

#Create new SPN

Write-Output “Creating a new SPN” -Verbose

$spn = New-AzureRmADServicePrincipal -ApplicationId $appId

$spnName = $spn.ServicePrincipalName

Write-Output “SPN creation completed successfully (SPN Name: $spnName)” -Verbose

#Assign role to SPN

Write-Output “Waiting for SPN creation to reflect in Directory before Role assignment”

Start-Sleep 20

Write-Output “Assigning role ($spnRole) to SPN App ($appId)” -Verbose

New-AzureRmRoleAssignment -RoleDefinitionName $spnRole -ServicePrincipalName $appId

Write-Output “SPN role assignment completed successfully” -Verbose

#Print the values

Write-Output “`nCopy and Paste below values for Service Connection” -Verbose

Write-Output “***************************************************************************”

Write-Output “Connection Name: $connectionName(SPN)”

Write-Output “Subscription Id: $id”

Write-Output “Subscription Name: $connectionName”

Write-Output “Service Principal Id: $appId”

Write-Output “Service Principal key: <Password that you typed in>”

Write-Output “Tenant Id: $tenantId”

Write-Output “***************************************************************************”

Output should be similar to this:
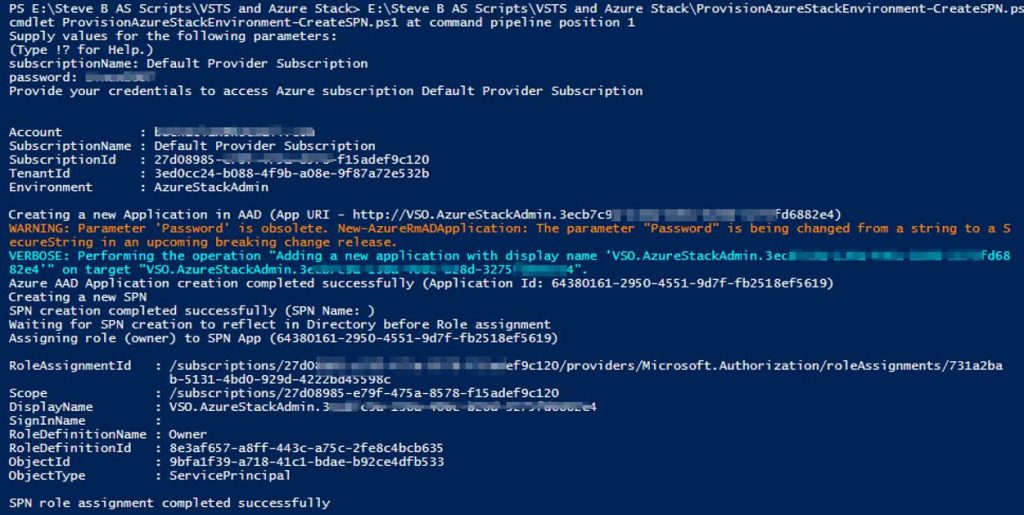
You will use information from the Service Connection output in the next step.

Steps to configure Azure Stack as a Service Endpoint in VSTS

Log into your VSTS account at visalstudio.com

Navigate to one of your projects.

Go into Settings.

Click on Services.

Click on New Service Endpoint
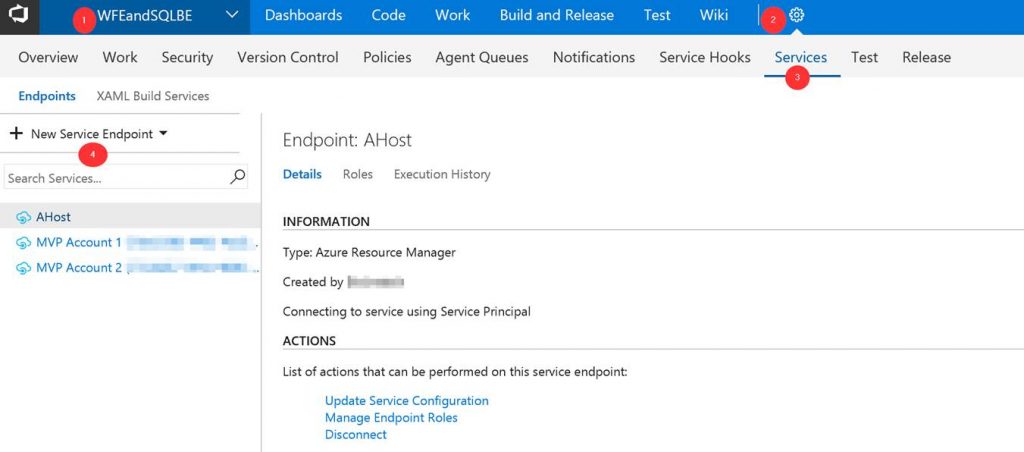
A window will pop up. Click on “use full version of the endpoint dialog.”
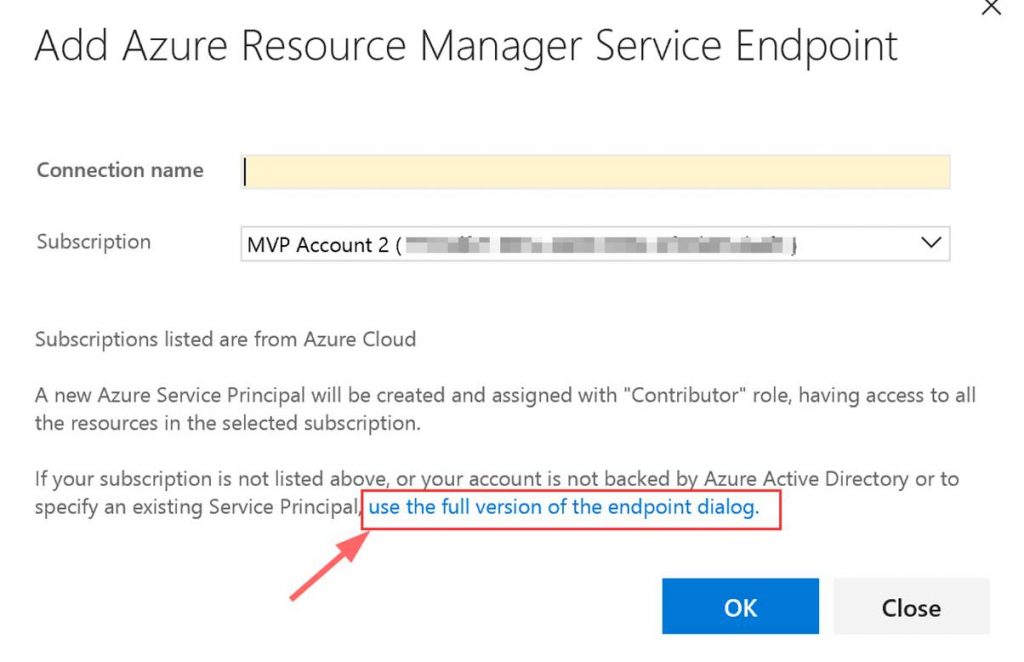
Next input the needed data. This data comes from the Service Connection info that you copied.
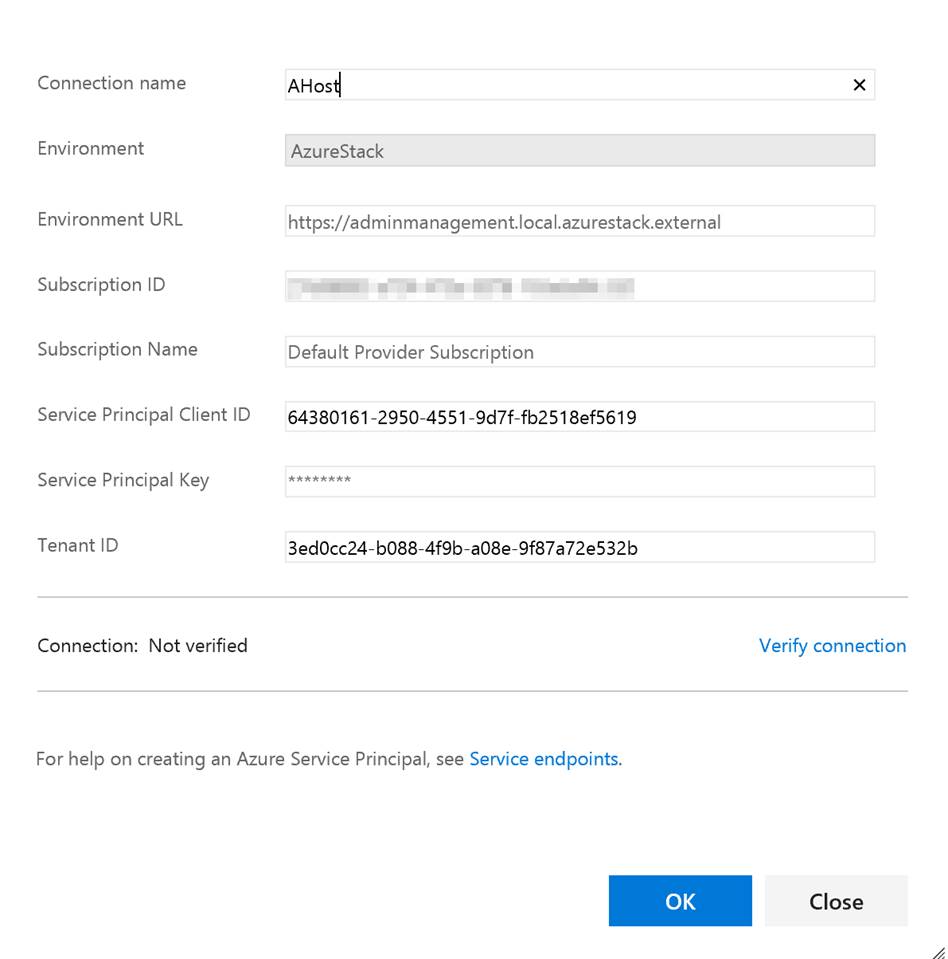
You can put whatever you want in the Connection name and the Subscription Name. Note do not verify the connection. It will not succeed as VSTS cannot access your private Azure Stack yet. Click OK when done.

Setup build agent on Azure Stack host

Next you need to setup the build agent on the Azure Stack host. (Note: In this post I am using the ASDK.) From within VSTS download the Windows agent. Extract the download to a local folder.
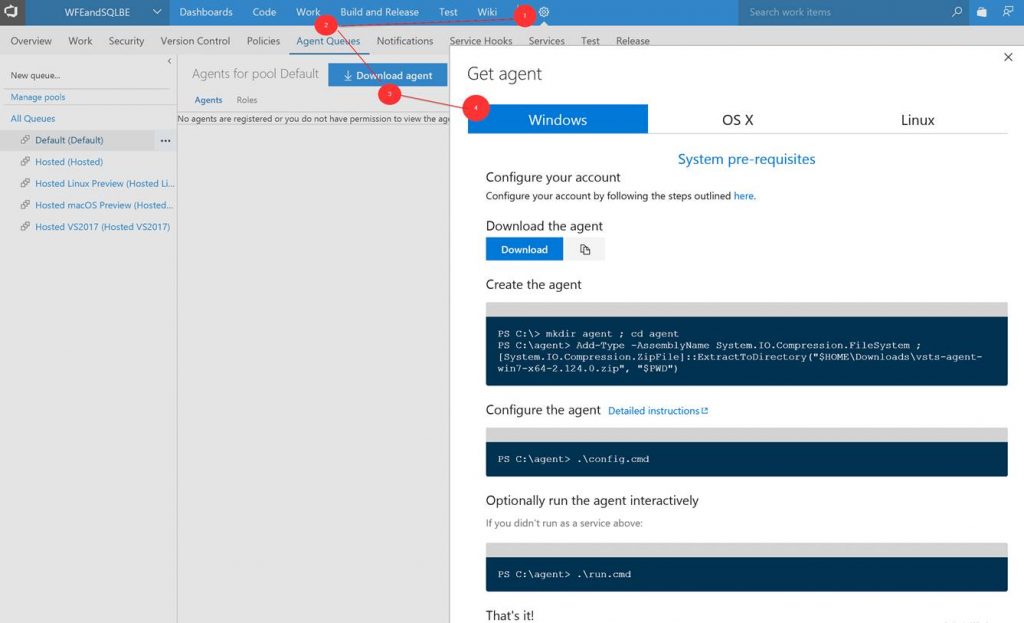
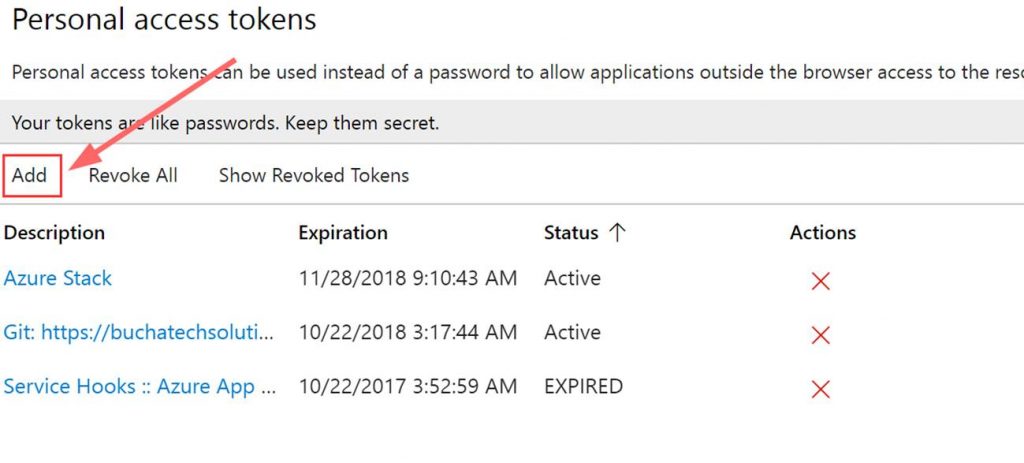
Go to Security under your profile in VSTS.
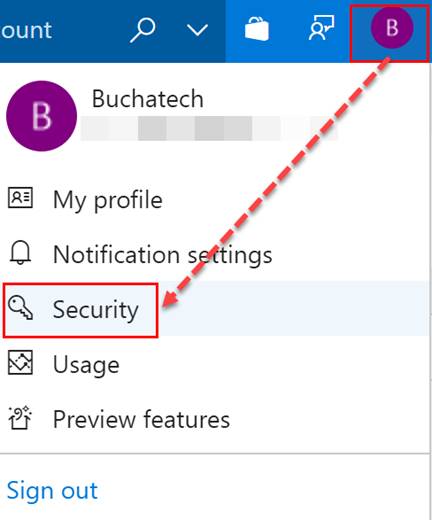
Next add a Personal access token (PAT) for Azure Stack.
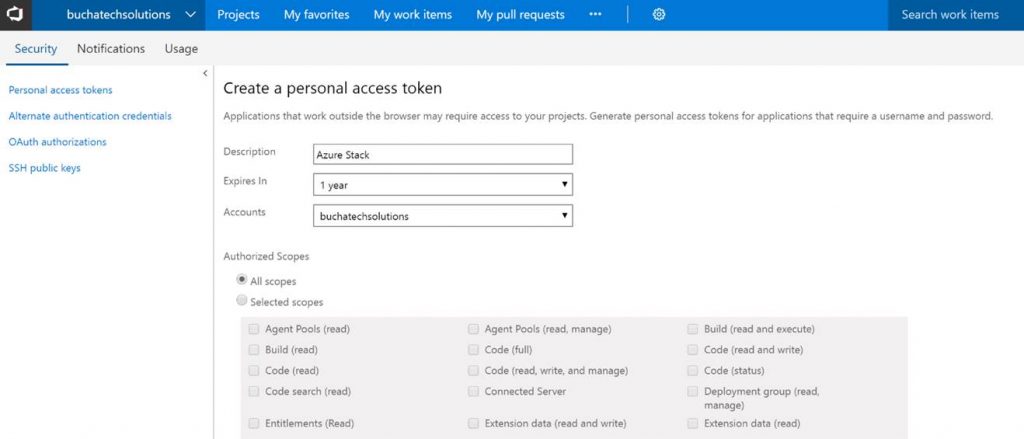
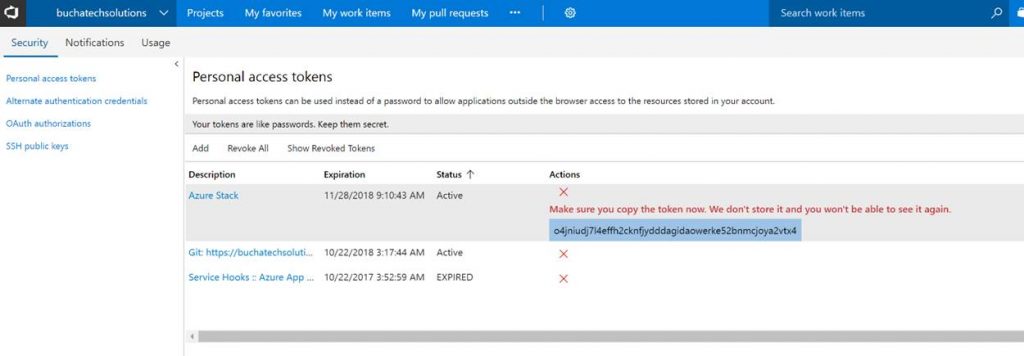
Copy the token. Note it will not be shown again ever after you leave this screen.
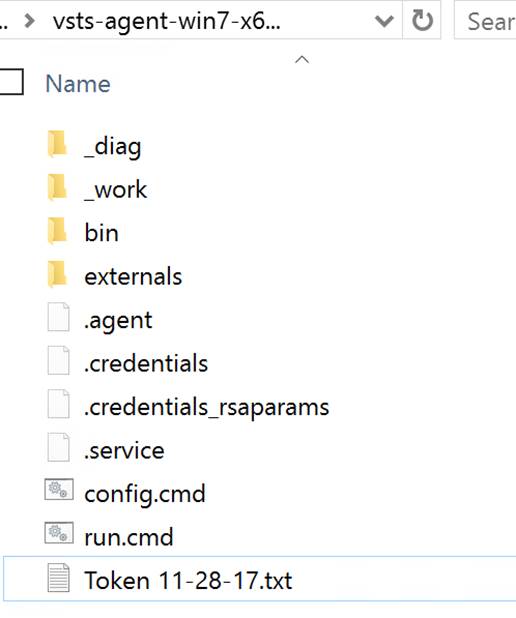
In the folder with the extracted build agent you will see the following. We need to run the run.cmd file from an elevated command prompt.

Here is a screenshot of running the run.cmd. I recommend deploying the build agent as a service. You will use your personal access token (PAT) here and the azure stack admin account.
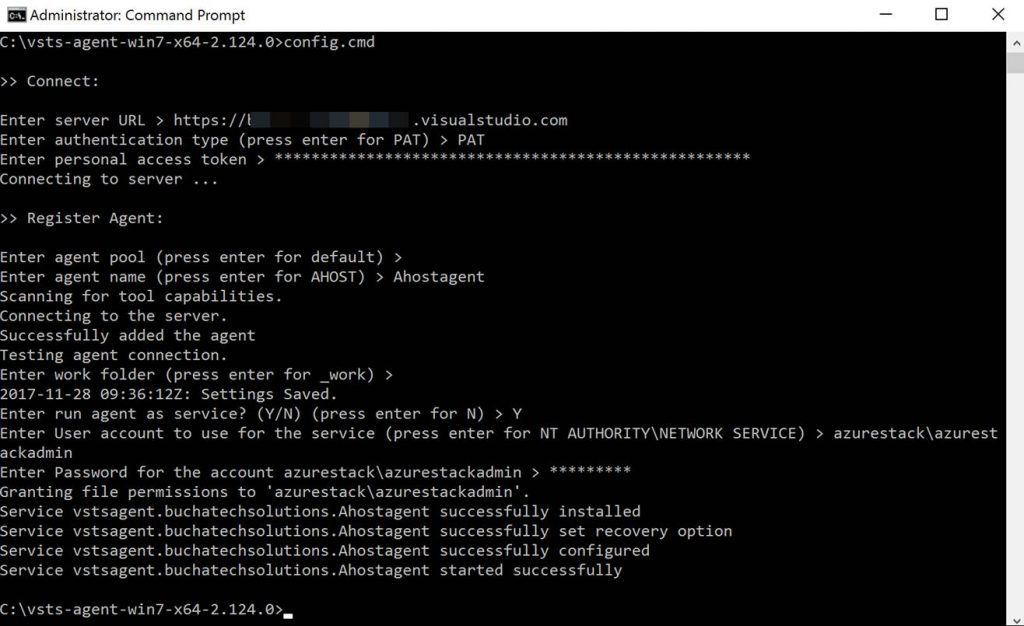
After the run.cmd finished the folder with the extracted contents should look like the following:
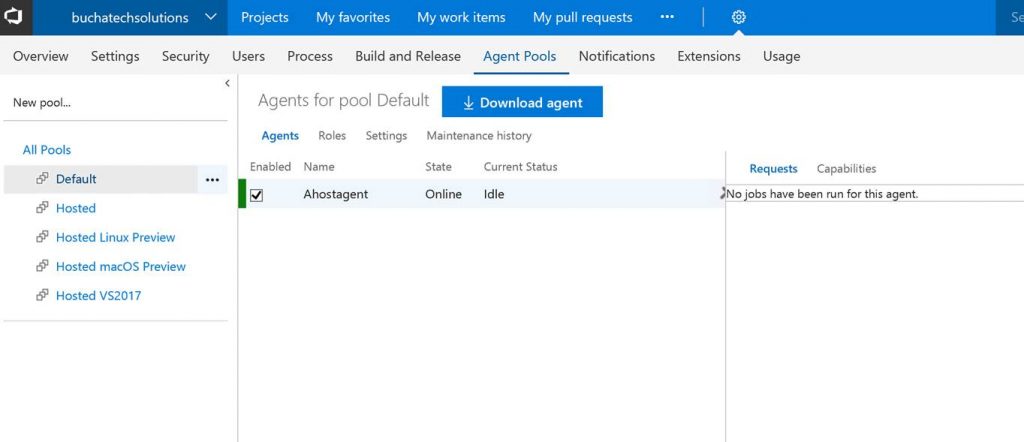
You can now see the agent in VSTS.
That’s it for the setup for connecting VSTS to Azure Stack. Next let’s look at setting up a continuous-integration and-continuous deployment (CI/CD) pipeline for VM-deployment to Azure Stack.


THE BUILD

What I cover here is focused on infrastructure as code (IaC) using ARM templates. If you need to set up CI/CD to Azure Stack for Web Apps, Mobile Apps, Containers, etc the process is the same as it is on Azure with the only difference being that you point to Azure Stack. Also note that in this post I am using the ASDK not multi-node.

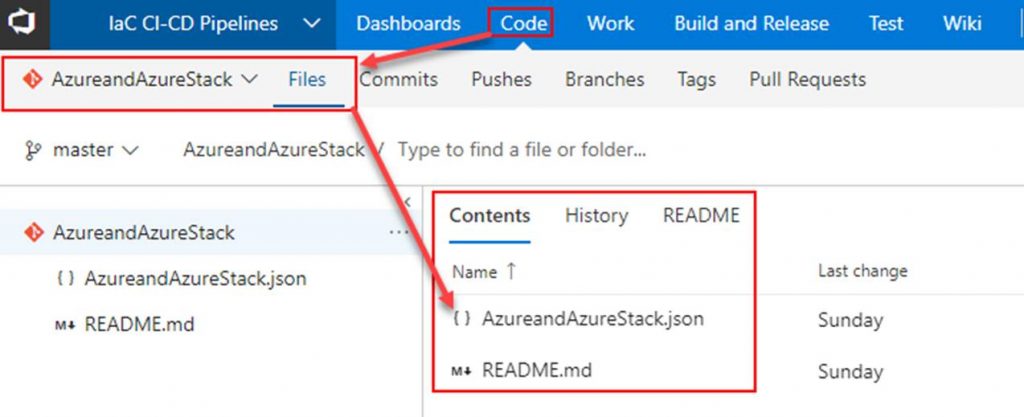
Within VSTS create a new repository and place your ARM template in it.
Next click on Build and Release. Create a new Build Definition.
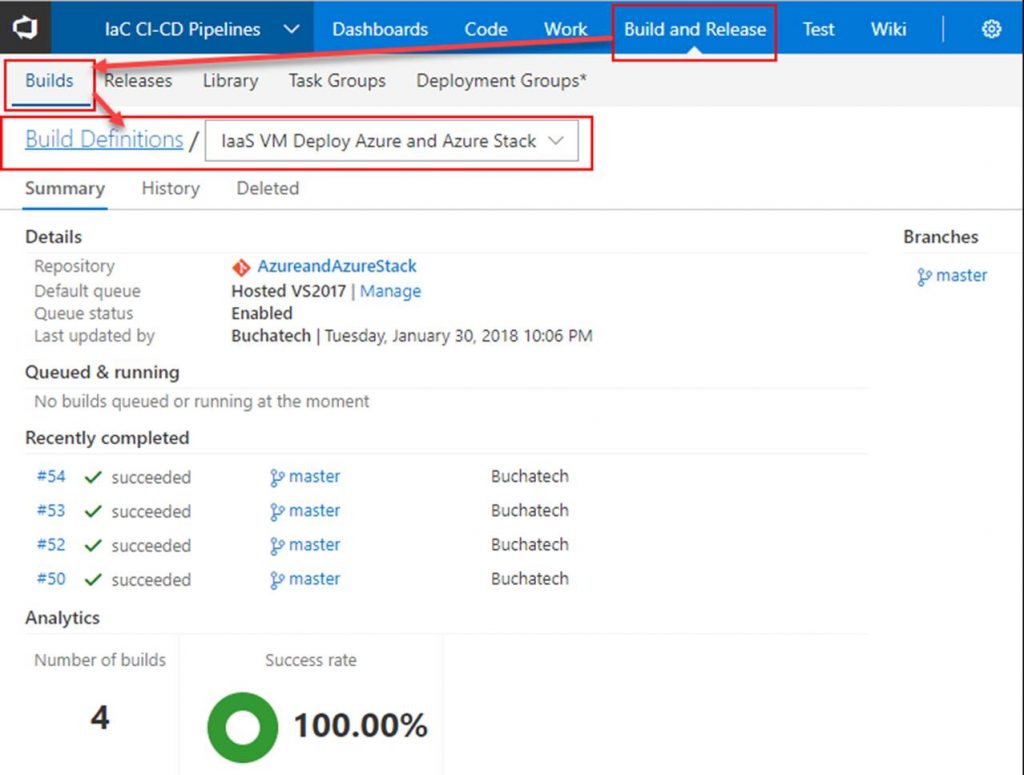
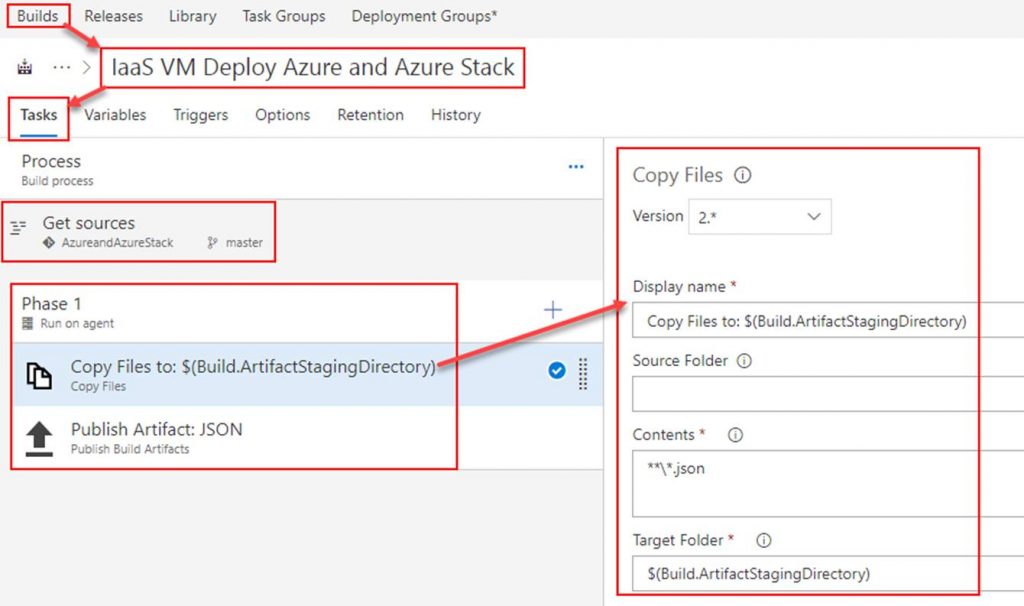
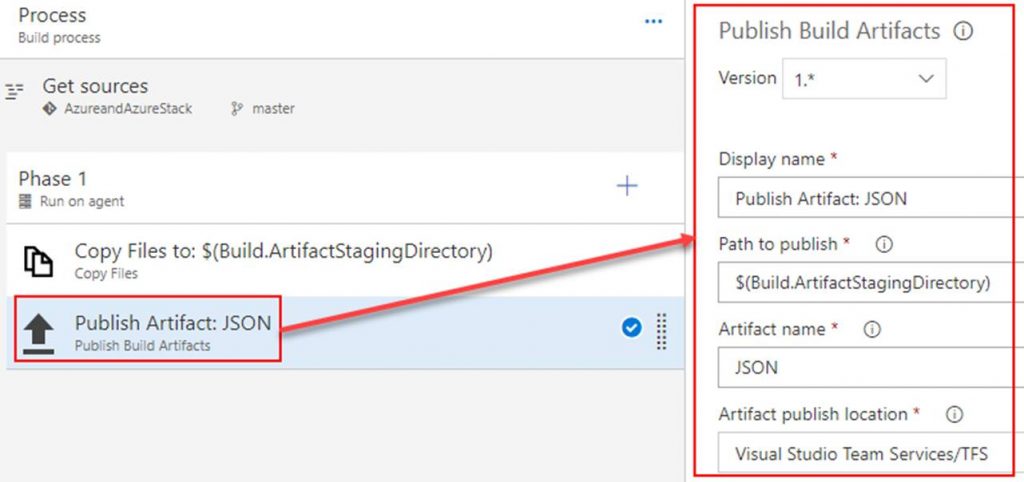
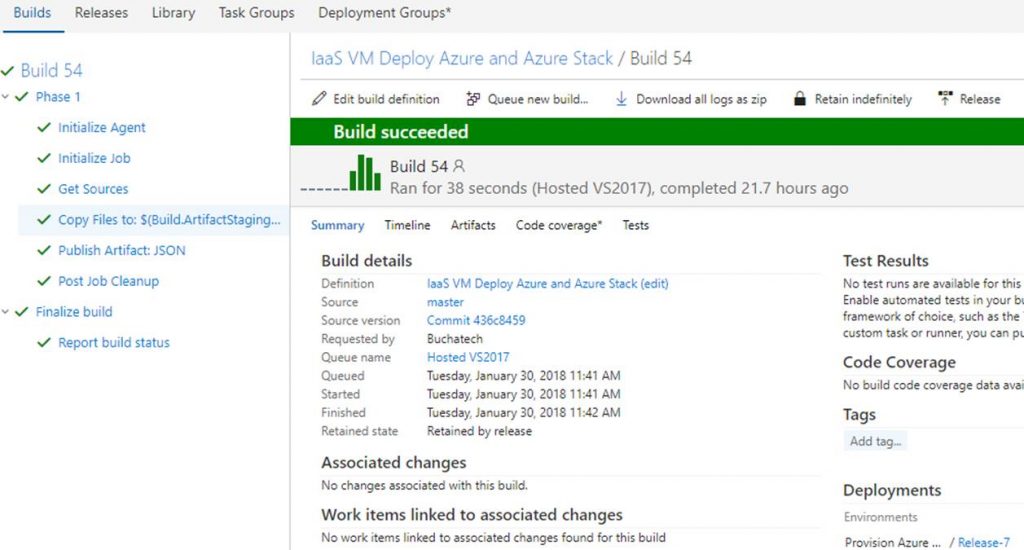
In the build definition. Point the Get sources to the repository you just created. Add 2 tasks under Phase 1. The first task will copy the ARM template to the build staging directory. The second task will publish the ARM template so that a release definition can pick it up. Both tasks are shown in the following screenshots.

Copy Files to task
Publish Artifact task
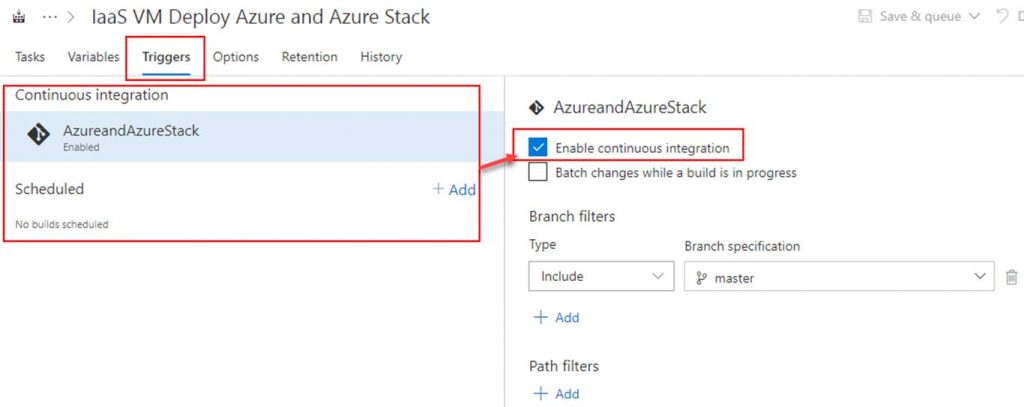
OPTIONAL: To setup continuous integration click on Triggers. Here you can set a schedule to run the builds or you can click on the repository as shown in the screenshot and then check Enable continuous integration. By checking the box next to Enable continuous integration it tells VSTS that anytime content in the repo is changed to run a build.
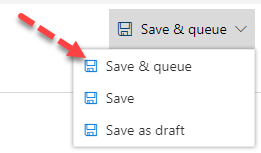
Click on Save & queue. This will start the build.
The build will start. As long as everything is setup properly within your build it will succeed as shown in the following Screenshot.
That’s all for our build. Next up we need to create a release definition (RD) pipeline. The RD will take the build artifacts and deploy to an environment/s you specify.

Read more