Azure Friday: Exploring Automated Deployments for AKS with Steve Buchanan and Scott Hanselman

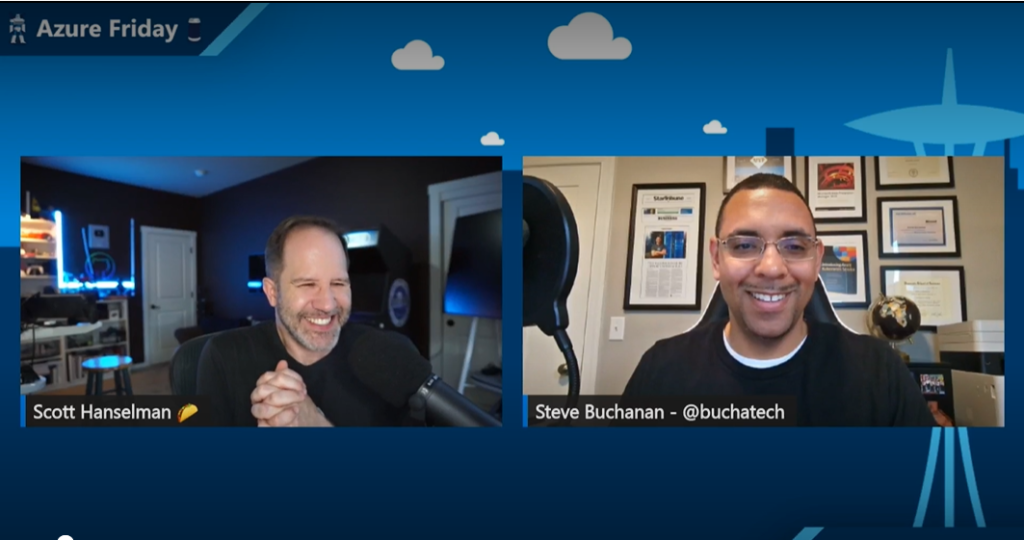
Hey everyone, today I’m super excited to tell you about a recent episode of Azure Friday that I was lucky enough to be a guest on.

Azure Friday is a weekly video series hosted by the legendary Scott Hanselman, where he interviews experts and developers on various Azure-related topics. In this episode, we talked about Automated Deployments for AKS, a new feature that makes it super easy to deploy your apps to Azure Kubernetes Service.

If you’re not familiar with AKS, it’s a managed Kubernetes service that lets you run containerized applications on Azure without having to worry about the complexity of managing the cluster. It’s a great way to scale your apps and take advantage of the benefits of Kubernetes, such as high availability, load balancing, and service discovery.

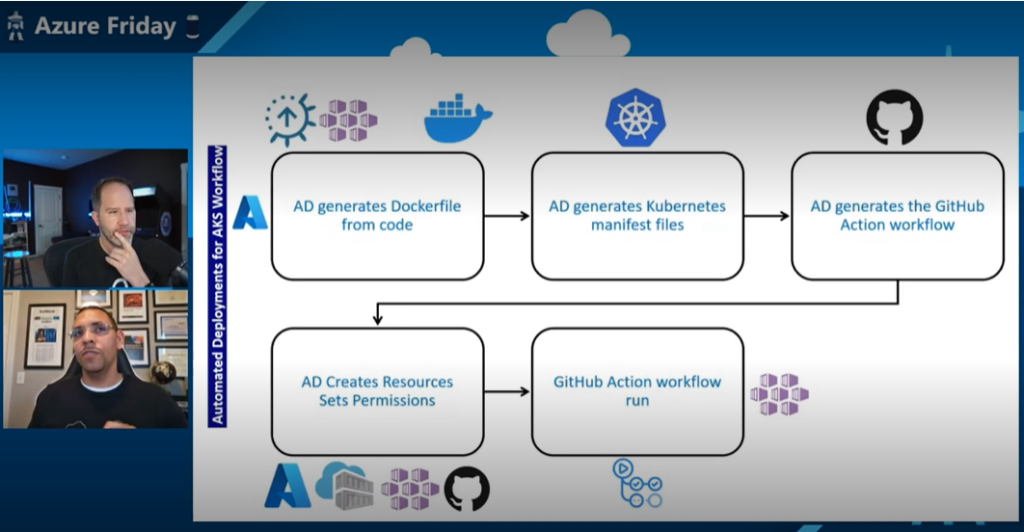
But what if you’re not familiar with containers or Kubernetes? What if you just have some code in a GitHub repo and you want to run it on AKS? That’s where Automated Deployments for AKS come in. It’s a feature that simplifies the Kubernetes development process by taking care of the tedious work of containerization for you. It uses a tool called Draft, which automatically detects the language and framework of your app, creates a Dockerfile and a Helm chart for you, builds and pushes the image to Azure Container Registry, and deploys the app to AKS. All with just a few clicks in the Azure Portal.

Sounds amazing, right? Well, that’s what I wanted to show Scott in this episode. I had an app hosted in a GitHub repo that I wanted to run on AKS. The app was a simple web app that displayed some data from a database. I had already created a few resources in Azure, such as a resource group, an Azure Container Registry, and an AKS cluster. All I needed to do was use Automated Deployments for AKS to get this app from code to running on a cluster.

So how did it go? Well, you’ll have to watch the episode to find out. But spoiler alert: it was super easy and fast. In just a few commands, I went from code to an app running on AKS. Scott was impressed and so was I. We had a great time chatting about how Automated Deployments for AKS works under the hood, some of the benefits and limitations of using it, and how it can help developers get started with containers and Kubernetes.

Check out the episode here:

https://aka.ms/azfr/749

With Automated Deployments, Microsoft is opening up new avenues for developers to embrace the power of containers and AKS, enabling them to effortlessly build scalable and robust applications.

If you’re interested in learning more about Automated Deployments for AKS, you can check out the documentation here: https://learn.microsoft.com/en-us/azure/aks/automated-deployments. It’s available today in public preview, so you can try it out for yourself and see how easy it is to run your apps on AKS.

That’s all for today. I hope you enjoy this episode of Azure Friday as much as I did. It was an honor and a pleasure to be a guest on Scott’s show and talk about one of my favorite topics: Azure Kubernetes Service. If you have any questions or feedback, feel free to leave a comment or reach out to me on Twitter at @Buchatech. Thanks for reading and happy coding!

Read more

Registering an Azure Kubernetes Service Cluster with Argo CD

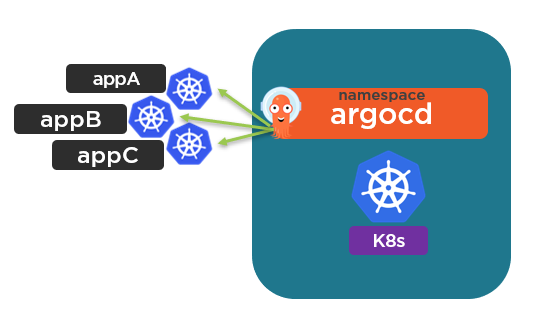
Argo CD is a GitOps operator and the goal of it is to be able to deploy apps to Kubernetes. In the majority of cases, we want to use Argo CD to deploy apps to many clusters.

Argo CD itself is deployed as a set of pods on a Kubernetes cluster. By default with an Argo CD deployment, the cluster it is running on is set as “in-cluster” (https://kubernetes.default.svc). When apps are configured for deployment a Kubernetes Cluster under Destination is required. They can be deployed to either the “in-cluster” K8s cluster or an external K8s cluster.

In order to deploy apps to an external Kubernetes cluster, you will need to register an external K8s cluster with Argo CD.

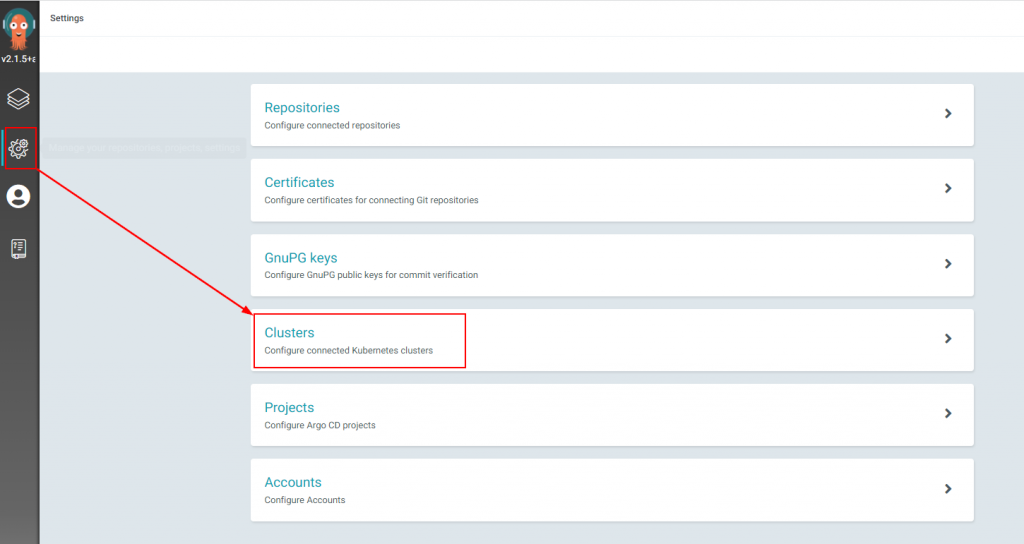
If you want to see the clusters you have registered with your Argo CD one way is through the web UI. Once you log in navigate to Settings and then Clusters to see them.

You can also see the clusters you have in the Argo CD CLI. To use the Argo CD CLI you need to log into the Argo CD API Server as shown in the following screenshot.

To see what clusters are registered from the CLI you can run

argocd cluster list

You will notice that you will only see the In-Cluster K8s cluster until you add an external one. Also, note that you are not able to register a new K8 cluster in the Argo CD web UI. You can only register a new K8s cluster from the Argo CD CLI. Within the Argo CD web UI you can delete the default in-cluster K8s cluster. This is not recommended.

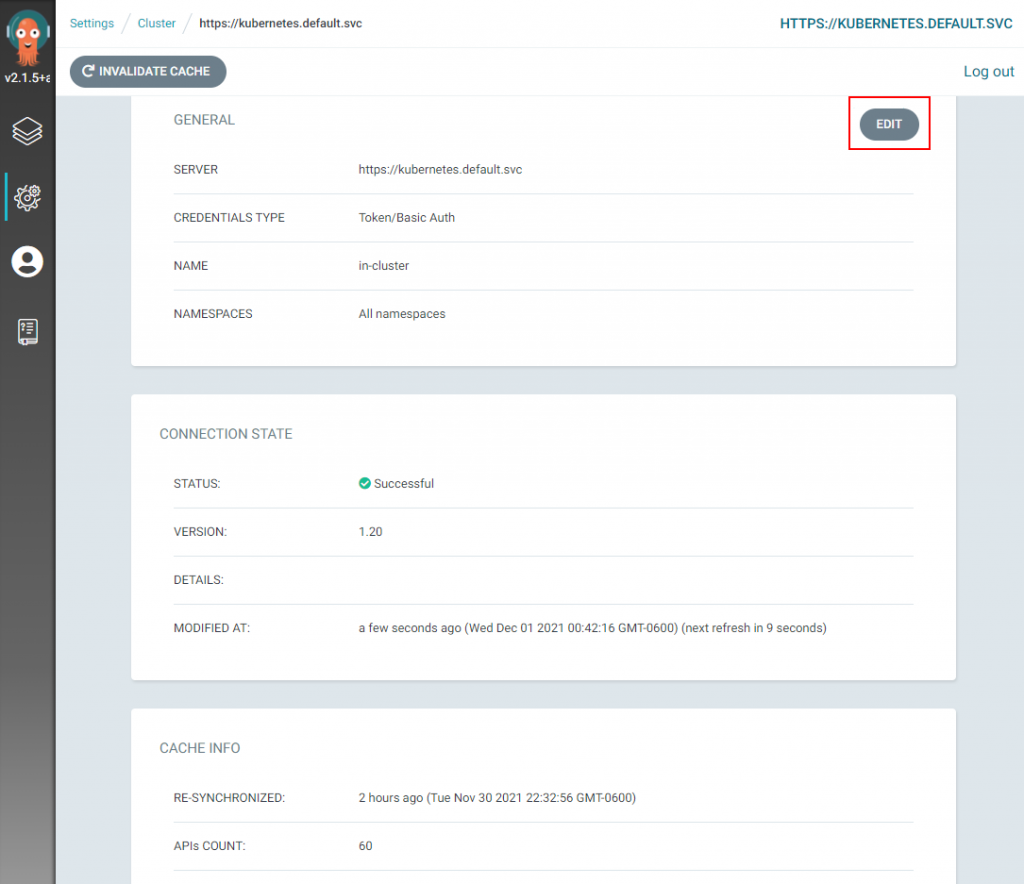
If you click on the In-Cluster K8s cluster you can modify some settings of the in-cluster K8s cluster in the Argo CD web UI such as the name of it and its namespace. Not useful when you want to have more control over the settings around the K8s cluster you will be deploying apps to.

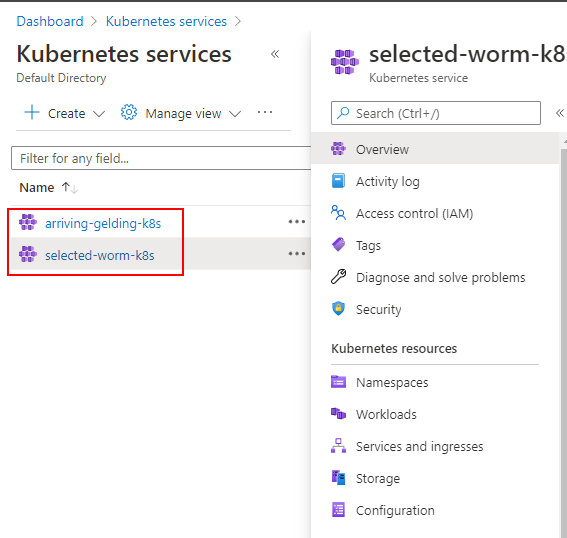
In my example, my Azure subscription has two AKS clusters. You can see this in the following screenshot. The arriving-gelding-k8s cluster is my In-Cluster object in Argo CD. The selected-worm-k8s is not my In-Cluster so I want to add this one to my Argo CD.

To add the new external cluster run use the following steps.

Step 1: Add your target K8s cluster to ArgoCD via the context in your kubectl config.

-For AKS you can simply log into your Azure subscription from VS Code on your computer and then run

 az aks get-credentials –resource-group RGNAME –name AKSCLUSTERNAME

This will add the context for your AKS cluster to your kubeconfig file.

-For the process on your setup refer to the following link as it may differ:  https://kubernetes.io/docs/tasks/access-application-cluster/configure-access-multiple-clusters

Step 2: List the K8 cluster contexts in your current kubeconfig file to ensure your target cluster has been added. Do this by locally running:

kubectl config get-contexts -o name

Step 3: Install a Service Account (argocd-manager), into the kube-system namespace of your kubeconfig file context:

argocd cluster add CONTEXTNAME

It will look like this:

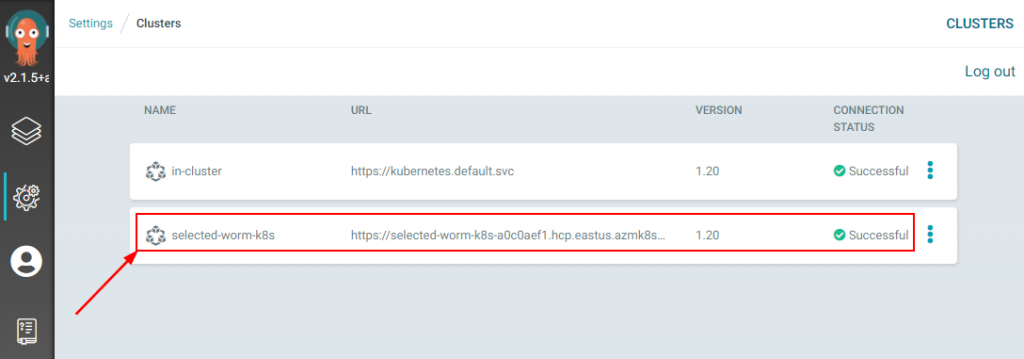
After completing the previous steps you can run argocd cluster list again or go into the portal. You will see your new cluster added.

That wraps up this blog post. Now you should be able to deploy to more than just your In-Cluster Kubernetes cluster. Check back soon for more posts on Argo CD, GitOps, Kubernetes, and Azure topics.

Read more

Deploy App to Azure Kubernetes Service via Argo CD

In my last post on Argo CD with AKS, I mentioned the next post would explore deploying an app via Argo CD. Well, in this post we are going to do just that. I am going to walk through deploying an app from Argo CD to AKS. Note this same process would work for any Kubernetes cluster. This is not going to be a long post as the process is straightforward.

First of all, you can deploy an app from the Argo CD web UI or CLI. Ready your application in a Git-based repository. It does not matter what source control system you use for your repository as long as it is Git-based. You can use Azure DevOps, Gitlab, Bit Bucket etc. In my case I use GitHub. To deploy an app you need to point to a Git repository of either K8s manifest, Helm, or Kustomize. In this blog post I am going to keep it simple and use the Hello K8s app from Paul Bouwer. Ok, now let’s jump in.

Here are the steps for Deploying an App to Argo CD within the Web UI:

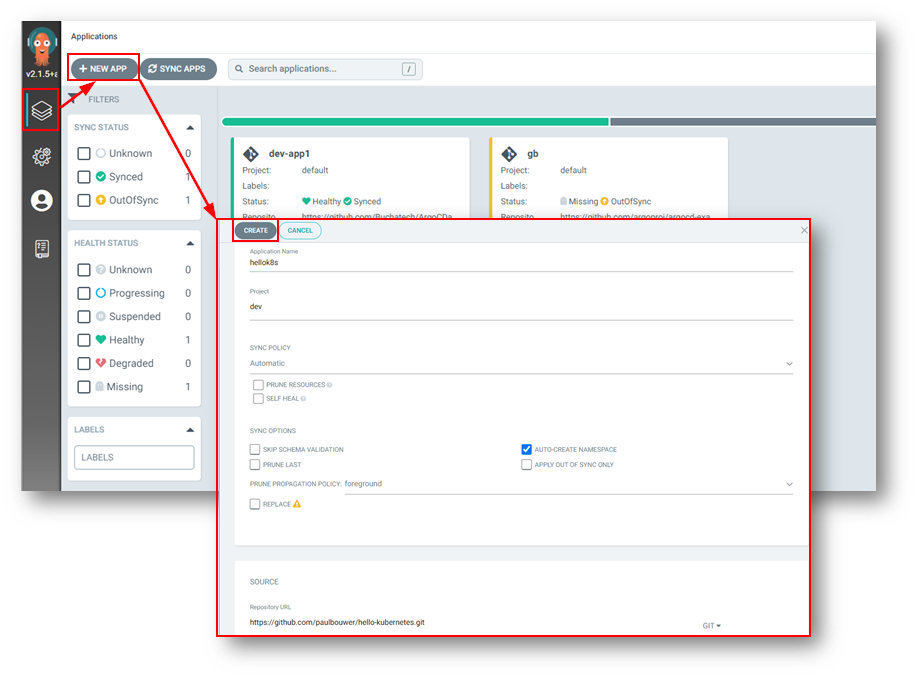
  1. In the Argo CD web UI ensure you are on the Applications page
  2. Click the + NEW APP button
  3. Give the app the name hellok8s, use the project default (I used a dev project in my example), select Automatic for the sync policy, check AUTO-CREATE NAMESPACE
  4. On Source for the Repo URL use https://github.com/paulbouwer/hello-kubernetes.git & select deploy/helm/hello-kubernetes for the path
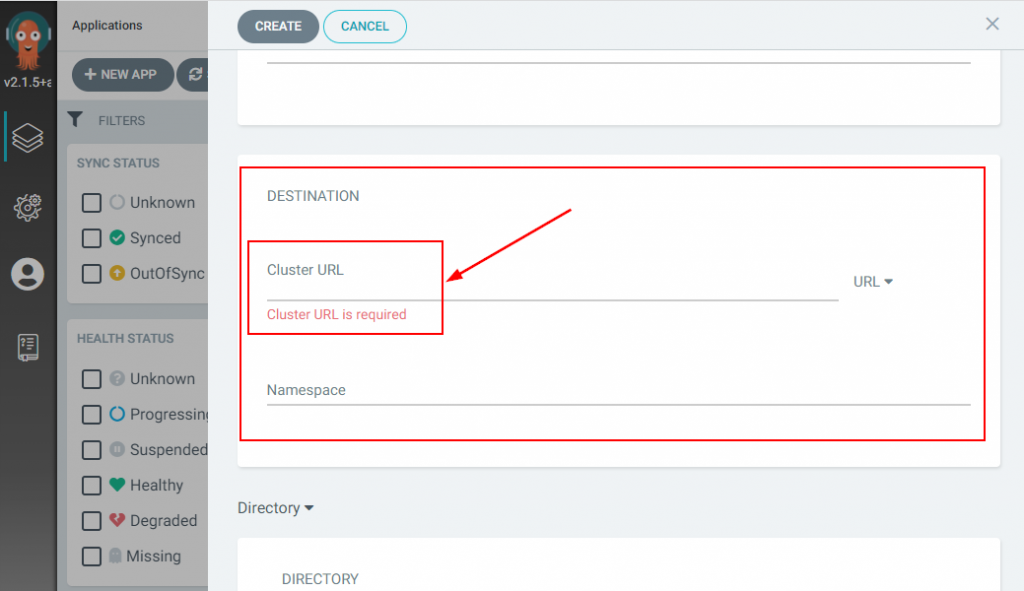
  5. For the DESTINATION select https://kubernetes.default.svc for the Cluster URL and use hellok8s for the namespace
  6. Leave all the defaults under HELM
  7. Click the CREATE button at the top of the UI

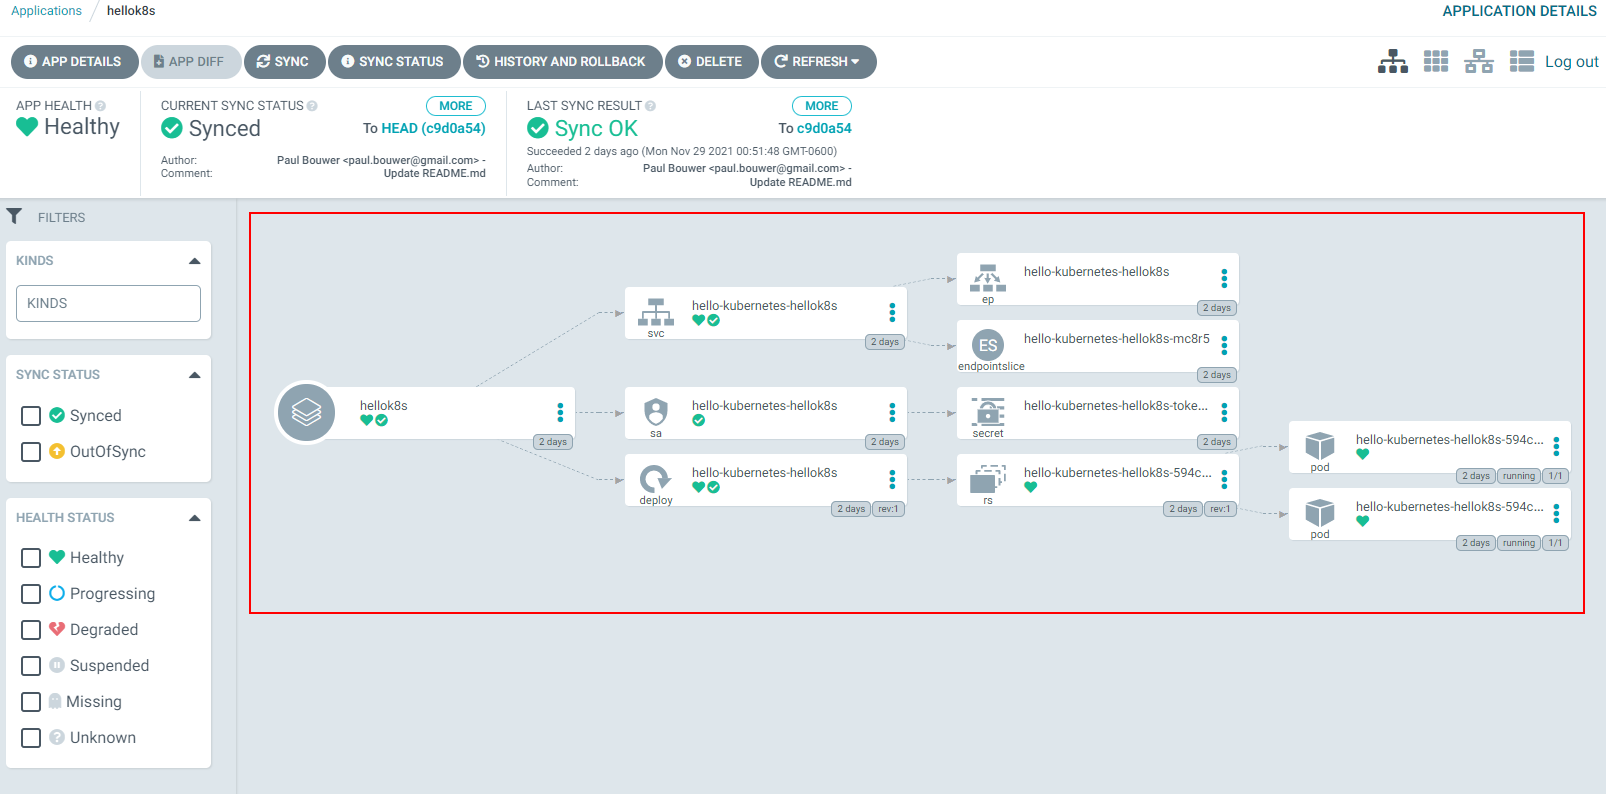
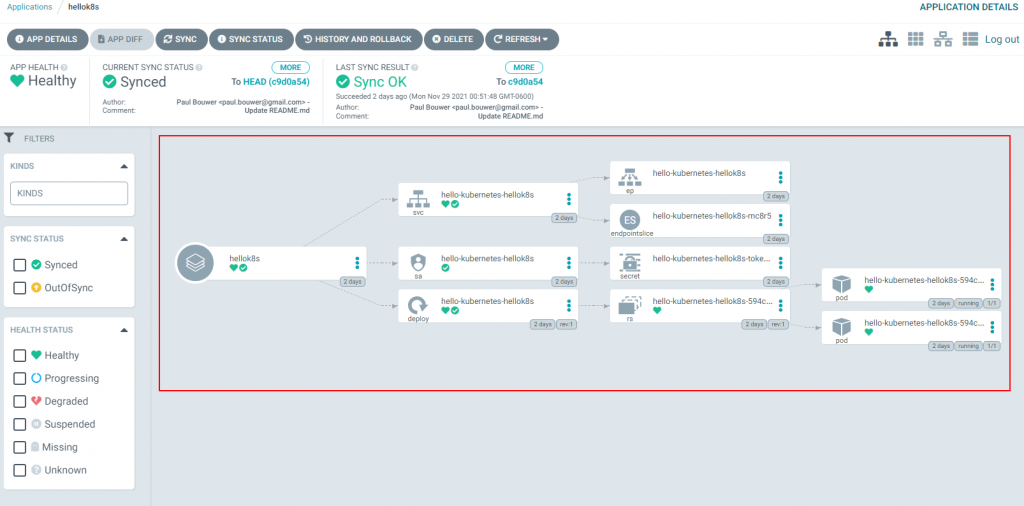
Once the app is deployed it will look like this:

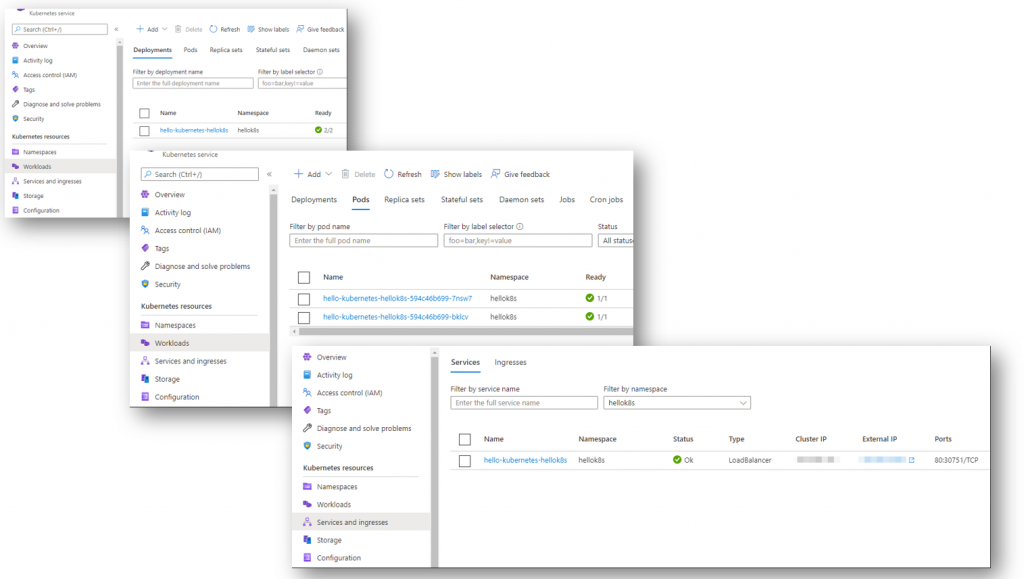
You can view the resources in AKS now. In the following screenshot you can see the deployment, pods, and service of a load balancer type.

You can also speed things up by deploying your app via the Argo CD CLI. This will accomplish the same goal as you would deploying the app via the Argo CD Web UI.

Deploying an App to Argo CD from the Argo CD CLI:

argocd app create hellok8s –repo https://github.com/paulbouwer/hello-kubernetes.git –path deploy/helm/hello-kubernetes –dest-server https://kubernetes.default.svc –dest-namespace default

That wraps things up for this post. Check back soon for more posts on Argo CD, GitOps, Kubernetes, and Azure topics.

Read more

Argo CD Course Published on Pluralsight

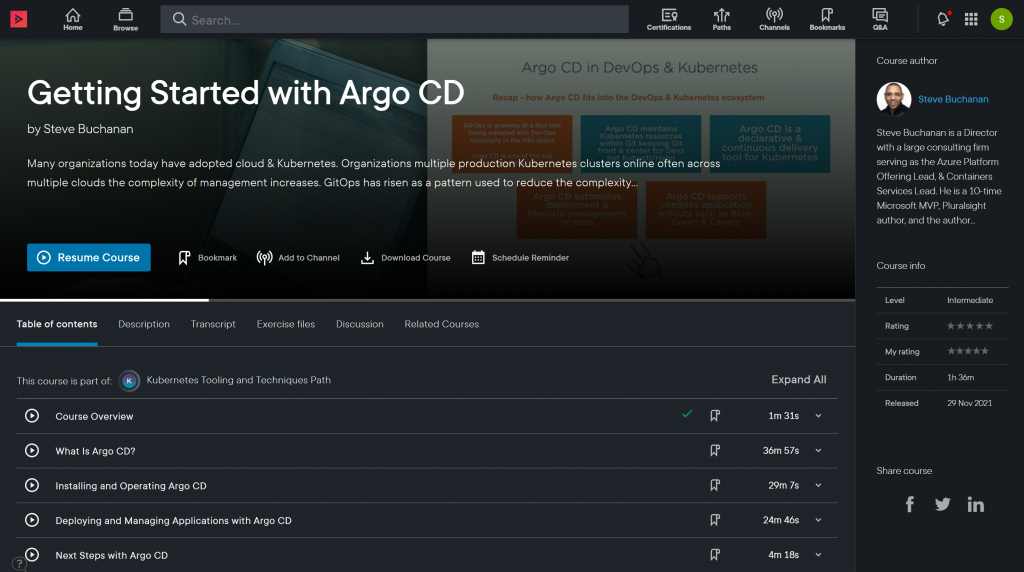
Yesterday my 12th course on Pluralsight was published! This course is “Getting Started with Argo CD“. In this course, you’ll learn the ins and outs of Argo CD a GitOps Operator tool, its core concepts, architecture, and how to use it with Kubernetes clusters so you can get started using it.

I am really excited about this course because it gave me a chance to continue sharing my GitOps and Kubernetes knowledge. You can view this course as a continuation of my “GitOps: The Big Picture” course. My GitOps course educates you on what GitOps is. This Argo CD course shows GitOps and a GitOps Operator in action!

Many organizations today have adopted cloud & Kubernetes. Organizations multiple production Kubernetes clusters online often across multiple clouds the complexity of management increases. GitOps has risen as a pattern used to reduce the complexity of managing Kubernetes clusters and cloud-native applications. Argo CD is a GitOps Operator that can help with the management of Kubernetes and deployment of applications to it. Some of the major topics that I covered in the Argo CD course include:

  1. Argo CD’s core concepts and architecture.
  2. An overview of Containers, Kubernetes, Helm, Kustomize, GitOps, and how these work with Argo CD.
  3. What it takes to deploy and operate Argo CD including areas such as user management, secrets, webhooks, monitoring and more, as well as how to use the Argo CD API server, Web UI, and use its command line interface.
  4. How to deploying and manage Applications with Argo CD.

Check out the course here: https://app.pluralsight.com/library/courses/argo-cd-getting-started

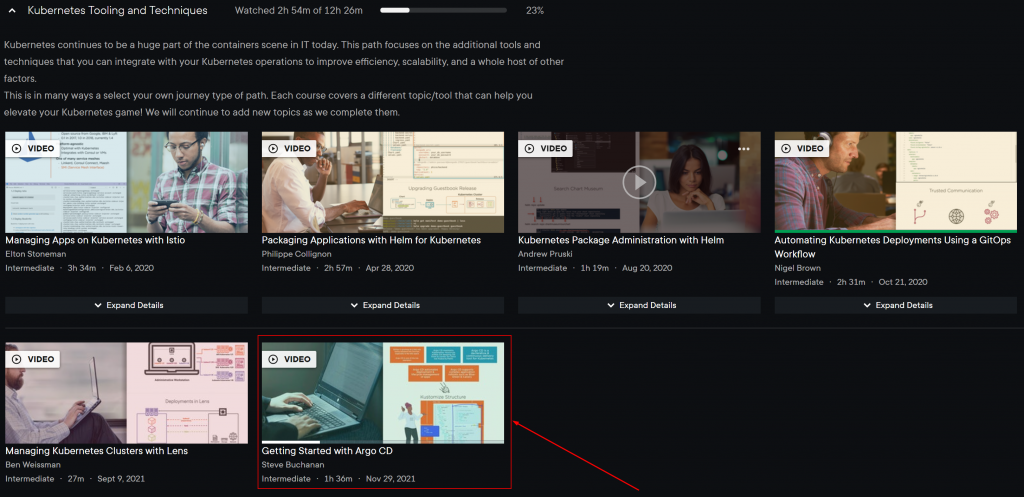
This is my 1st course in the Kubernetes Tooling and Techniques path on Pluralsight. I am working on another course for this path. This path focuses on the additional tools and techniques that you can integrate with your Kubernetes operations to improve efficiency, scalability, and a whole host of other factors. There are some other great courses in the Kubernetes Tooling and Techniques path.

Check the Kubernetes Tooling and Techniques path here: https://app.pluralsight.com/paths/skills/kubernetes-tooling-and-techniques

I hope you find value in this new Getting Started with Argo CD course. Be sure to follow my profile on Pluralsight so you will be notified as I release new courses including more GitOps related courses and a Rancher course in the Kubernetes Tooling and Techniques path! 

Here is the link to my Pluralsight profile to follow mehttps://app.pluralsight.com/profile/author/steve-buchanan

Read more

Get started with Argo CD & Azure Kubernetes Service

As Kubernetes adoption continues to grow so does GitOps. GitOps has been increasing in adoption and popularity among enterprises at a fast rate as well. Here is what GitOps is: “GitOps is an operating model pattern for cloud-native applications & Kubernetes storing application & declarative infrastructure code in Git as the source of truth used for automated continuous delivery.” GitOps puts Git at the center of continuous delivery making git the Source of Truth describing the desired state of your entire system. For a deeper dive into GitOps check out my GitOps course on Pluralsight here: https://app.pluralsight.com/library/courses/gitops-the-big-picture

In the GitOps model, you need GitOps operators. GitOps Operators are software agents that continuously monitor your apps running on your Kubernetes clusters comparing the live state of your app against the desired state you have defined in your Git repository. These GitOps Operators ensure the desired state is in place on your Kubernetes clusters performing create, update, delete activities on your Kubernetes clusters as needed.

This is where Argo CD comes into the picture. Argo CD is one of the top GitOps Operators. It provides declarative, continuous delivery to your Kubernetes clusters. It was created by a team at Intuit in 2018 and later open-sourced. I am going to write a few blogs exploring the use of Argo CD with AKS. This will be the first of the series walking through the deployment of Argo CD to AKS. In the next post, we will deploy an app to Kubernetes using Argo CD and see where the topic goes from there. Now let’s dive into deploying Argo CD to AKS. Here are the steps:

-DEPLOYING ARGO CD ON AKS-

Log onto the Azure portal (https://portal.azure.com)

Launch Azure Cloud Shell

Connect to your AKS cluster from the Azure Cloud Shell by running the following:

# Set your subscription

az account set –subscription YOURSUBSCRIPTIONIDHERE

# Connect to your KS cluster

az aks get-credentials –resource-group YOURRESOURCEGROUPNAME –name CLUSTER NAME

Next let’s create a namespace for Argo CD to deploy all of its components in. To do this run:

kubectl create namespace argocd

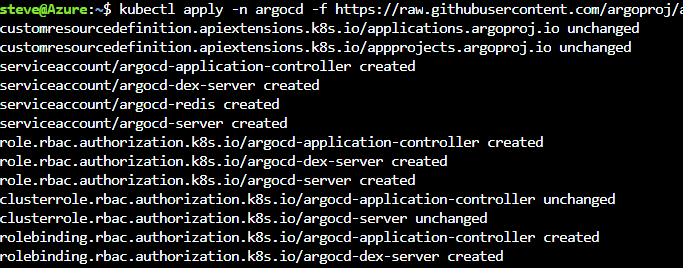
Next we can install Argo CD into the new namespace we created. We will reference Argo CD’s GitHub repository for the latest Argo CD operator. Run the following:

kubectl apply -n argocd -f https://raw.githubusercontent.com/argoproj/argo-cd/stable/manifests/install.yaml

You should see the following:

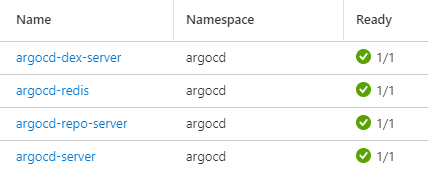
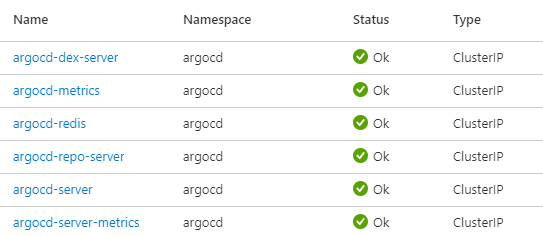
You should end up with many objects in the Argo CD namespace.

By default, the Argo CD is not accessible externally. It is deployed with a service type of ClusterIP.

Leaving it at ClusterIP is fine but for the purposes of this blog/lab and getting started lets change this so we can easily access the ArgoCD Server website. # Change the argocd-server service type to LoadBalancer. To do this run the following:

kubectl patch svc argocd-server -n argocd -p ‘{“spec”: {“type”: “LoadBalancer”}}’

Now you will be able to see that the argocd-server service type has been changed to a LoadBalancer type. This means that it now has a public Azure load balancer attached to it with an external IP.

NOTE: This is not recommended in production environments. Only use in a lab or dev environment. In production environments, it is recommended to use an ingress for the Argo CD API server that is secured.

Argo CD auto generated a password during the deployment. We need to get the Argo CD password so we can log into it. To get the password run the following:

kubectl -n argocd get secret argocd-initial-admin-secret -o jsonpath=”{.data.password}” | base64 -d && echo

You will see the password in readable format so you can copy it such as shown in the screenshot.

Note the default Argo CD username is admin.

To access the Argo CD web portal you need to access the Argo CD API Server. To do this you can either do this from the external IP of the argo-cd object or the via the Argo CD CLI using the following:

 argocd login <ARGOCD_SERVER>

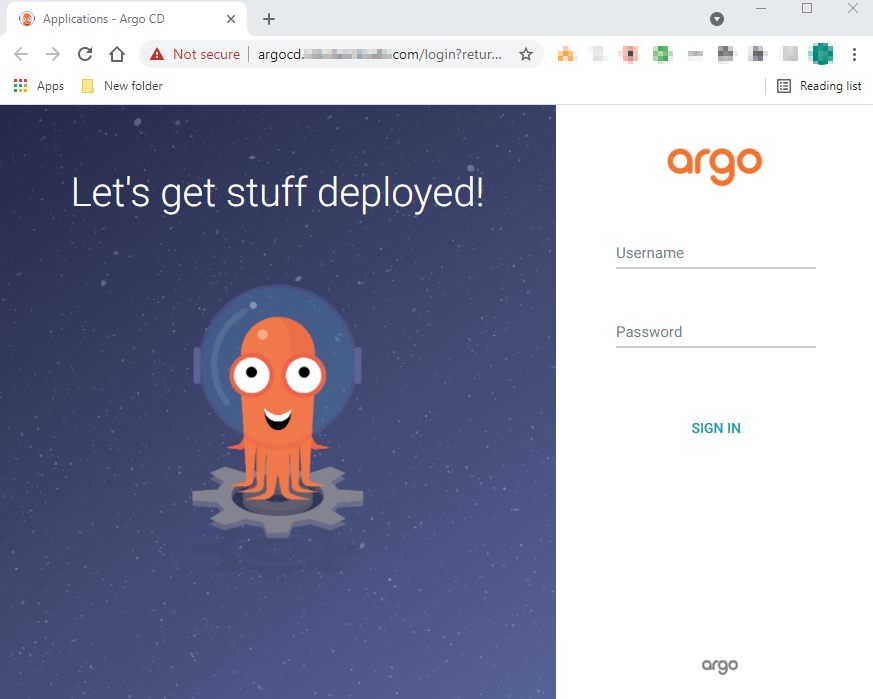
The Argo CD web portal will look like:

That’s it! You have Argo CD deployed on your AKS cluster. In the next post, I will walk through deploying a simple app to your Kubernetes cluster via Argo CD.

Read more

Setup CI/CD pipeline with VSTS & Azure Stack

We all know that DevOps brings together people, processes, and technology. In the Microsoft DevOps world A large part of the technology piece is utilizing Visual Studio Team Services (VSTS) for continuous deployment of workloads to Azure.

Microsoft launched their Hybrid Cloud on July 10th 2017. Azure Stack is the secret sauce of Microsoft’s the Hybrid Cloud. Microsoft’s offering is the only one true Hybrid Cloud in the market bringing Azure to on-premises data centers.

As Microsoft continues to move their Hybrid Cloud forward the DevOps integration and capabilities we have for Azure extend to Azure Stack. Again I was fortunate to participate in a preview of the VSTS integration with Azure Stack. I was happy to see Microsoft putting a priority on this functionality because DevOps on Azure Stack is a HUGE need. Cloud is often the catalyst to helping organizations adopt a DevOps culture fostering digital transformation. Some organizations not being able to put all workloads in public cloud Azure Stack is a good way for them to get the same cloud capabilities on-premises DevOps integration being one of them. The setup and integration between VSTS and Azure Stack is working nicely. The team at Microsoft has given me permission to share about this topic via my blog.

In this blog post I am going to cover setting up VSTS to work with Azure and setting up a continuous-integration and-continuous deployment (CI/CD) pipeline to Azure Stack. With Microsoft DevOps you can utilize the pieces of VSTS that make sense for you to use leaving the control up to you. Through VSTS you can use many other DevOps tools such as Jenkins, Octopus deploy, GitHub, Bitbucket etc into your pipeline making Azure Stack just as flexible as Azure is. Let’s Jump in!

Steps to prep Azure Stack for Visual Studio Team Services (VSTS)

#1 Ensure you have installed the Azure Stack PowerShell and Azure PowerShell modules.

Details can be found here:

https://docs.microsoft.com/en-us/azure/azure-stack/azure-stack-powershell-install

#2 Add the Azure Stack environment using the following syntax

# Navigate to the downloaded folder and import the **Connect** PowerShell module

Set-ExecutionPolicy RemoteSigned

Import-Module PATH\AzureStack.Connect.psm1

# Register an AzureRM environment that targets your Azure Stack instance

Add-AzureRMEnvironment `

-Name “AzureStackAdmin” `

-ArmEndpoint “https://adminmanagement.local.azurestack.external

# Set the GraphEndpointResourceId value

Set-AzureRmEnvironment `

-Name “AzureStackAdmin” `

-GraphAudience “https://graph.windows.net/

# Get the Active Directory tenantId that is used to deploy Azure Stack

$TenantID = Get-AzsDirectoryTenantId `

-AADTenantName “YOURDOMAIN.onmicrosoft.com” `

-EnvironmentName “AzureStackAdmin”

# Sign in to your environment

Login-AzureRmAccount `

-EnvironmentName “AzureStackAdmin” `

-TenantId $TenantID

NOTE: You will need the environment name and the tenant ID for the next script.

#3 Create SPN

Original SPN creation script can be found here:

https://github.com/Microsoft/vsts-rm-documentation/blob/master/Azure/SPNCreation.ps1

Documentation on creating an SPN can be found here:

https://www.visualstudio.com/en-us/docs/build/concepts/library/service-endpoints#sep-azure-rm

Below I will display the script I used. Note that you will need the following parameters for the script:

$subscriptionName

“Enter Azure Stack Subscription name. You need to be Subscription Admin to execute the script”)]

$password

“Provide a password for SPN application that you would create”

$environmentName

“Provide Azure Stack environment name for your subscription”

$AzureStackTenantID

“Provide tenant ID from when Azure Stack enviroment was added”

EXAMPLE:

.\CreateSPN.ps1 -subscriptionName “Default Provider Subscription” -password PASSWORDHERE -environmentName AzureStackAdmin -AzureStackTenantID ID HERE

Here is the script I used that you can run:

param

(

[Parameter(Mandatory=$true, HelpMessage=”Enter Azure Stack Subscription name. You need to be Subscription Admin to execute the script”)]

[string] $subscriptionName,

[Parameter(Mandatory=$true, HelpMessage=”Provide a password for SPN application that you would create”)]

[string] $password,

[Parameter(Mandatory=$false, HelpMessage=”Provide a SPN role assignment”)]

[string] $spnRole = “owner”,

[Parameter(Mandatory=$false, HelpMessage=”Provide Azure Stack environment name for your subscription”)]

[string] $environmentName,

[Parameter(Mandatory=$false, HelpMessage=”Provide tenant ID from when Azure Stack enviroment was added”)]

[string] $AzureStackTenantID

)

#Initialize

$ErrorActionPreference = “Stop”

$VerbosePreference = “SilentlyContinue”

$userName = $env:USERNAME

$newguid = [guid]::NewGuid()

$displayName = [String]::Format(“VSO.{0}.{1}”, $userName, $newguid)

$homePage = “http://” + $displayName

$identifierUri = $homePage

#Initialize subscription

$isAzureModulePresent = Get-Module -Name AzureRM* -ListAvailable

if ([String]::IsNullOrEmpty($isAzureModulePresent) -eq $true)

{

Write-Output “Script requires AzureRM modules to be present. Obtain AzureRM from https://github.com/Azure/azure-powershell/releases. Please refer https://github.com/Microsoft/vsts-tasks/blob/master/Tasks/DeployAzureResourceGroup/README.md for recommended AzureRM versions.” -Verbose

return

}

Import-Module -Name AzureRM.Profile

Write-Output “Provide your credentials to access Azure subscription $subscriptionName” -Verbose

Login-AzureRmAccount -SubscriptionName $subscriptionName -EnvironmentName $environmentName -TenantId $AzureStackTenantID

$azureSubscription = Get-AzureRmSubscription -SubscriptionName $subscriptionName

$connectionName = $azureSubscription.SubscriptionName

$tenantId = $azureSubscription.TenantId

$id = $azureSubscription.SubscriptionId

#Create a new AD Application

Write-Output “Creating a new Application in AAD (App URI – $identifierUri)” -Verbose

$azureAdApplication = New-AzureRmADApplication -DisplayName $displayName -HomePage $homePage -IdentifierUris $identifierUri -Password $password -Verbose

$appId = $azureAdApplication.ApplicationId

Write-Output “Azure AAD Application creation completed successfully (Application Id: $appId)” -Verbose

#Create new SPN

Write-Output “Creating a new SPN” -Verbose

$spn = New-AzureRmADServicePrincipal -ApplicationId $appId

$spnName = $spn.ServicePrincipalName

Write-Output “SPN creation completed successfully (SPN Name: $spnName)” -Verbose

#Assign role to SPN

Write-Output “Waiting for SPN creation to reflect in Directory before Role assignment”

Start-Sleep 20

Write-Output “Assigning role ($spnRole) to SPN App ($appId)” -Verbose

New-AzureRmRoleAssignment -RoleDefinitionName $spnRole -ServicePrincipalName $appId

Write-Output “SPN role assignment completed successfully” -Verbose

#Print the values

Write-Output “`nCopy and Paste below values for Service Connection” -Verbose

Write-Output “***************************************************************************”

Write-Output “Connection Name: $connectionName(SPN)”

Write-Output “Subscription Id: $id”

Write-Output “Subscription Name: $connectionName”

Write-Output “Service Principal Id: $appId”

Write-Output “Service Principal key: <Password that you typed in>”

Write-Output “Tenant Id: $tenantId”

Write-Output “***************************************************************************”

Output should be similar to this:
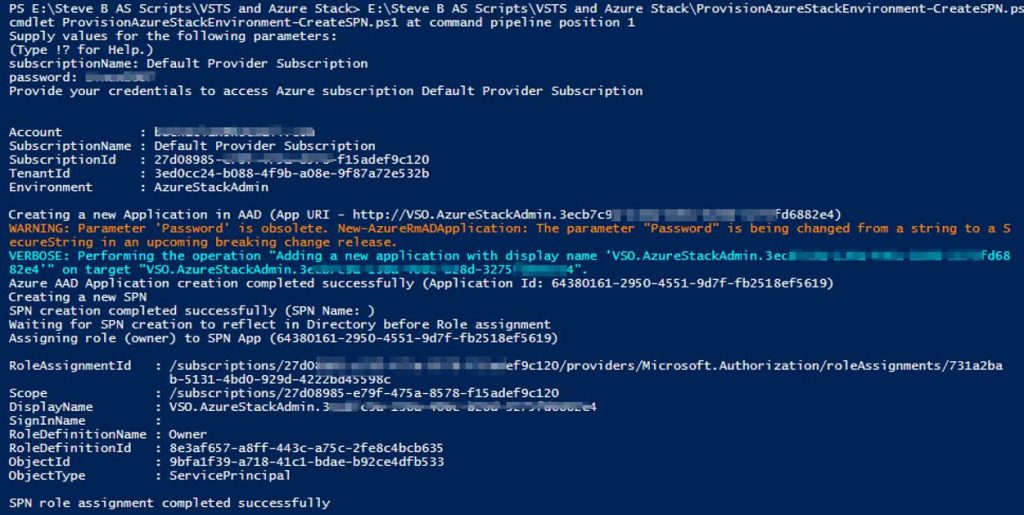
You will use information from the Service Connection output in the next step.

Steps to configure Azure Stack as a Service Endpoint in VSTS

Log into your VSTS account at visalstudio.com

Navigate to one of your projects.

Go into Settings.

Click on Services.

Click on New Service Endpoint
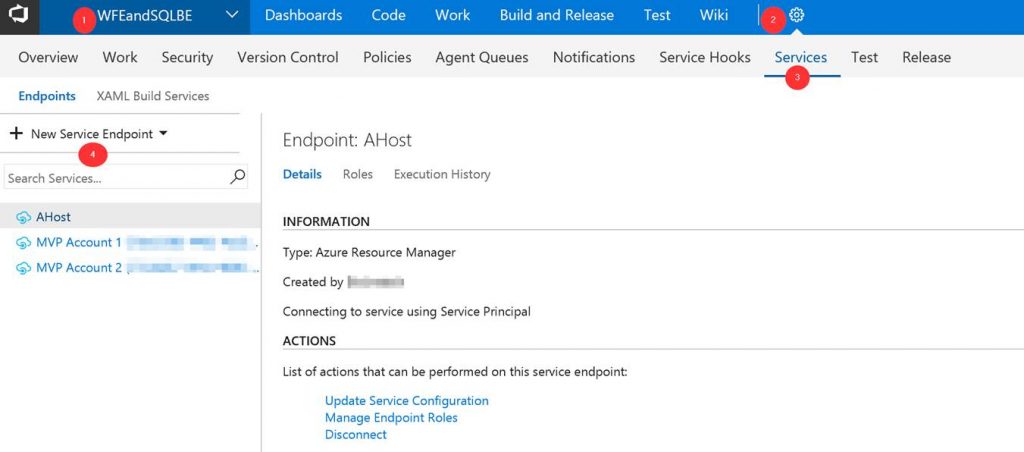
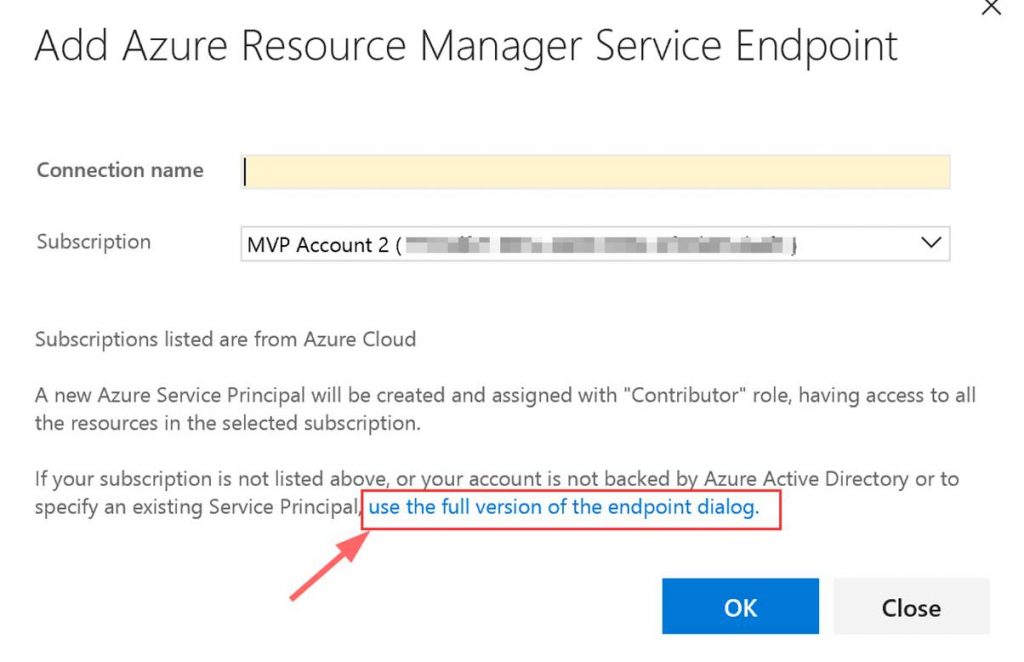
A window will pop up. Click on “use full version of the endpoint dialog.”
Next input the needed data. This data comes from the Service Connection info that you copied.
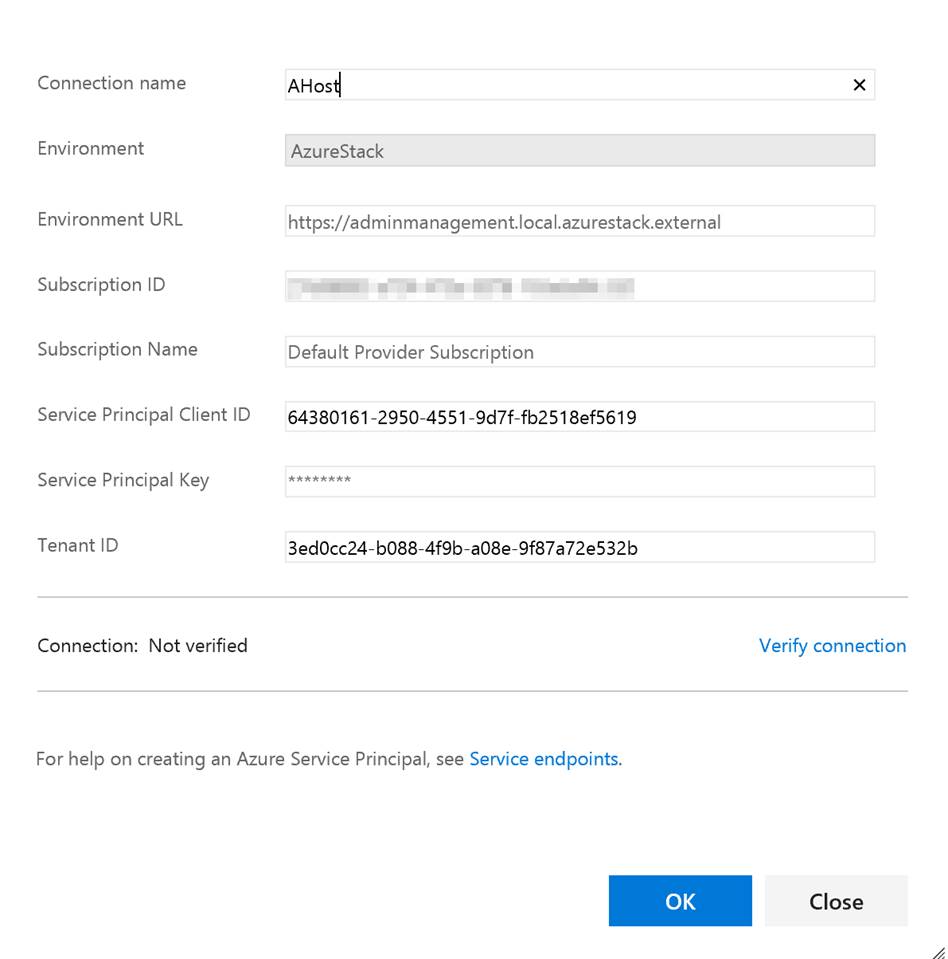
You can put whatever you want in the Connection name and the Subscription Name. Note do not verify the connection. It will not succeed as VSTS cannot access your private Azure Stack yet. Click OK when done.

Setup build agent on Azure Stack host

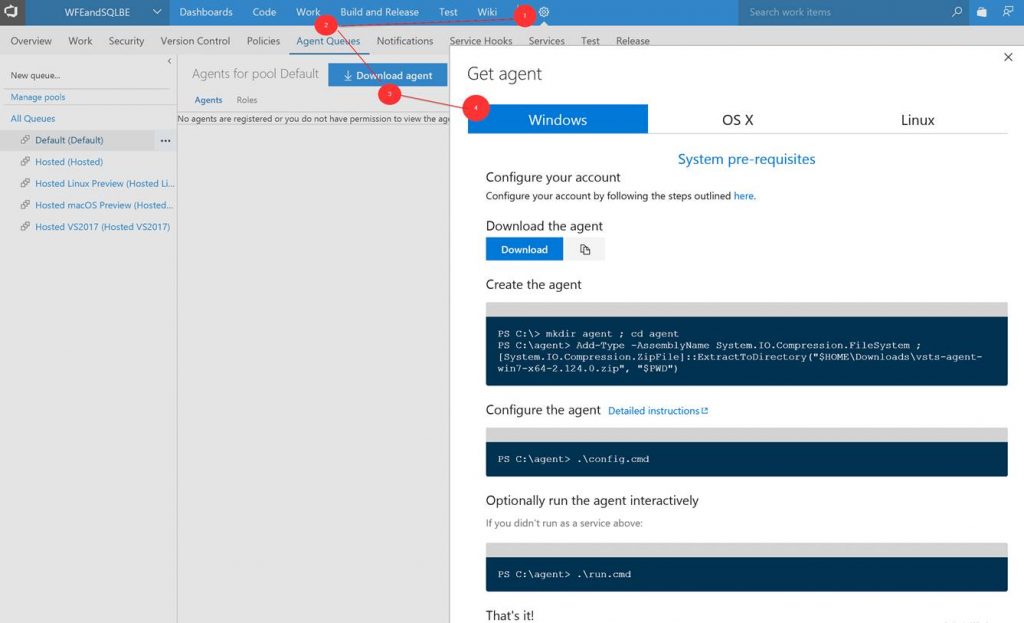
Next you need to setup the build agent on the Azure Stack host. (Note: In this post I am using the ASDK.) From within VSTS download the Windows agent. Extract the download to a local folder.
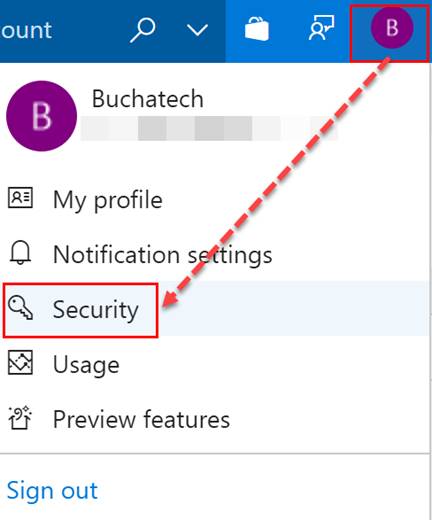
Go to Security under your profile in VSTS.
Next add a Personal access token (PAT) for Azure Stack.
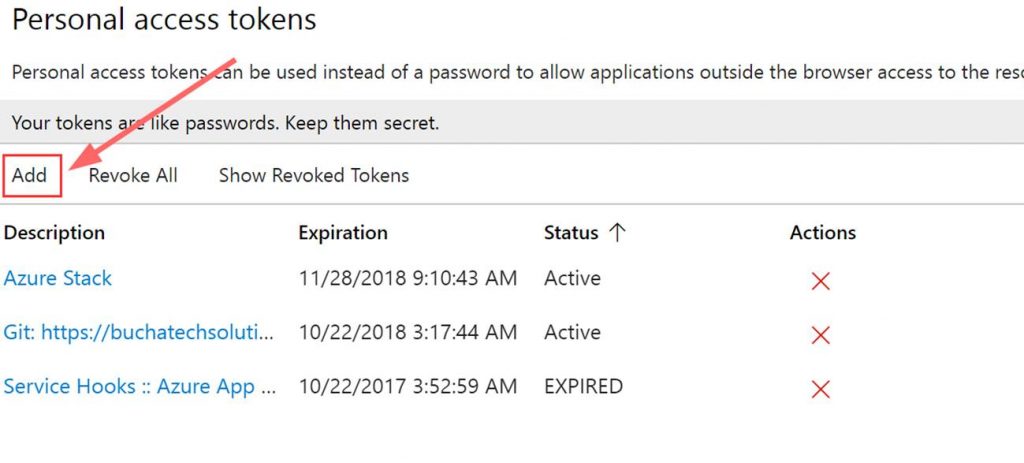
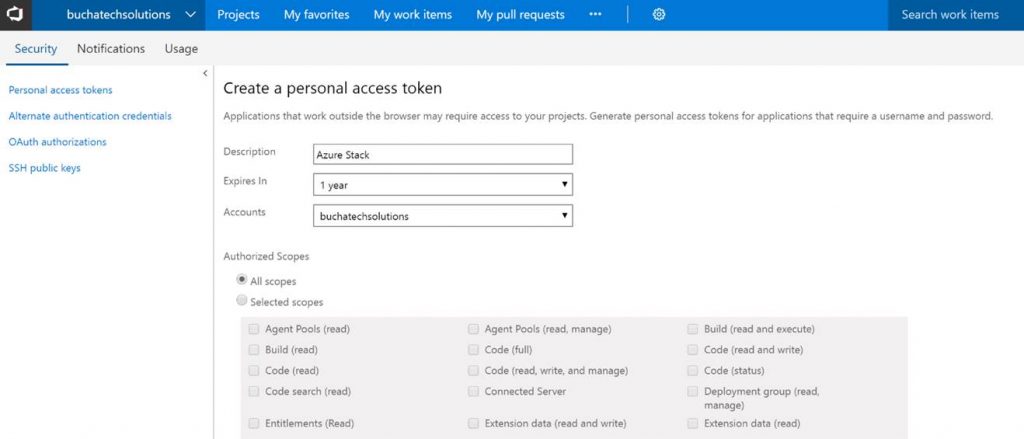
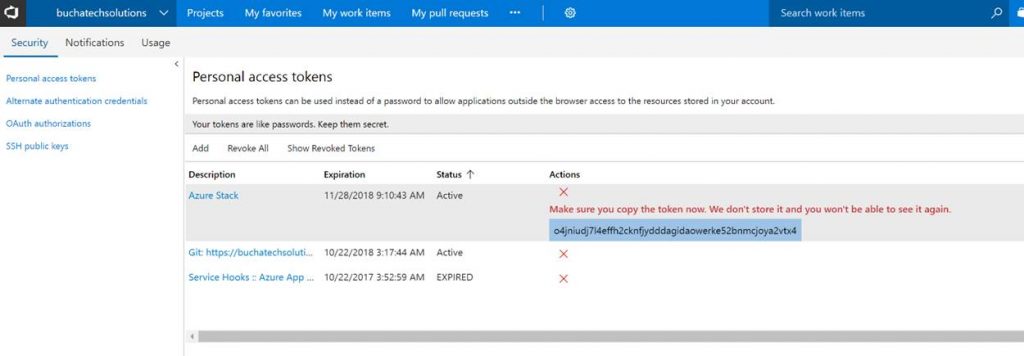
Copy the token. Note it will not be shown again ever after you leave this screen.
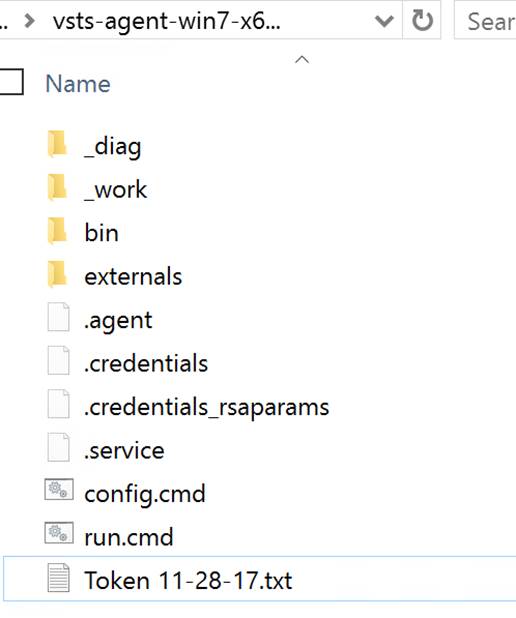
In the folder with the extracted build agent you will see the following. We need to run the run.cmd file from an elevated command prompt.

Here is a screenshot of running the run.cmd. I recommend deploying the build agent as a service. You will use your personal access token (PAT) here and the azure stack admin account.
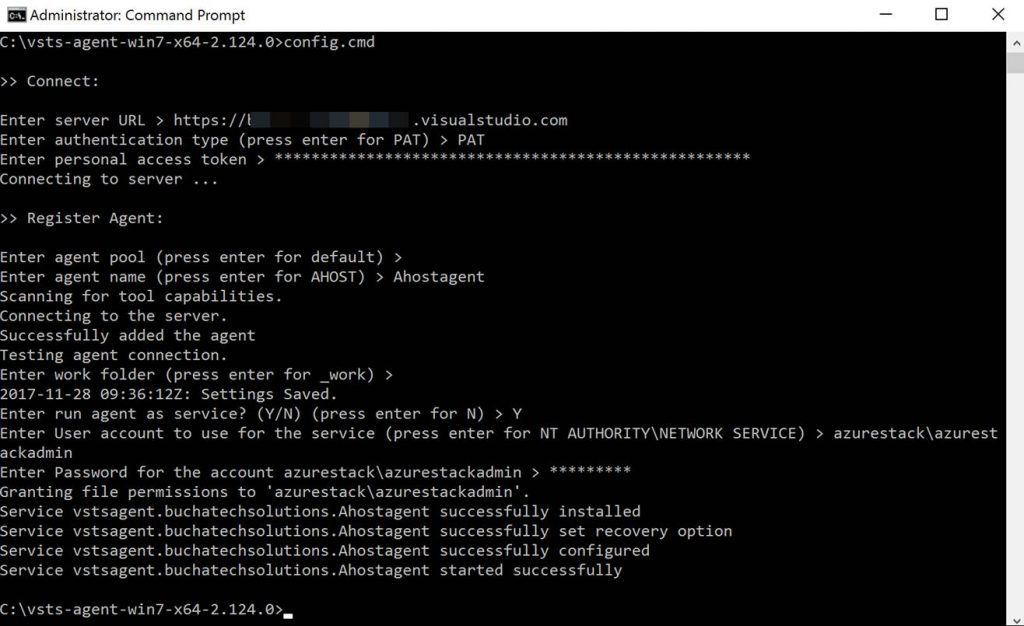
After the run.cmd finished the folder with the extracted contents should look like the following:
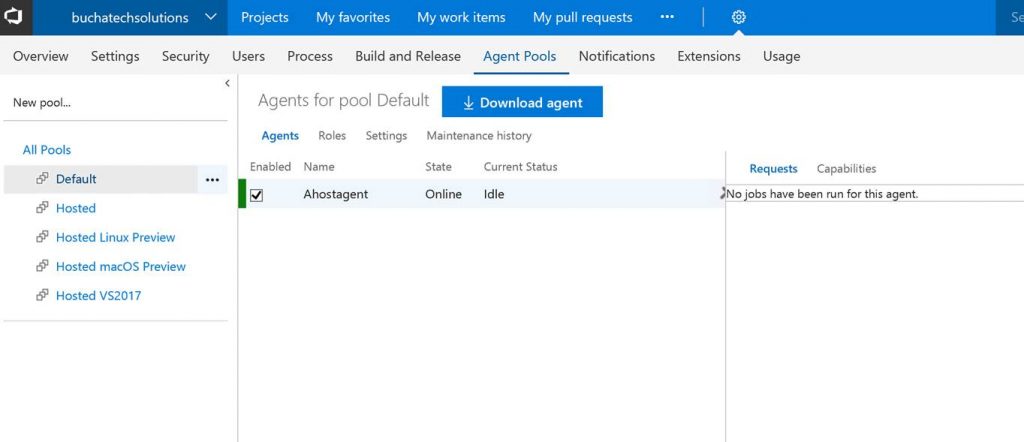
You can now see the agent in VSTS.
That’s it for the setup for connecting VSTS to Azure Stack. Next let’s look at setting up a continuous-integration and-continuous deployment (CI/CD) pipeline for VM-deployment to Azure Stack.


THE BUILD

What I cover here is focused on infrastructure as code (IaC) using ARM templates. If you need to set up CI/CD to Azure Stack for Web Apps, Mobile Apps, Containers, etc the process is the same as it is on Azure with the only difference being that you point to Azure Stack. Also note that in this post I am using the ASDK not multi-node.

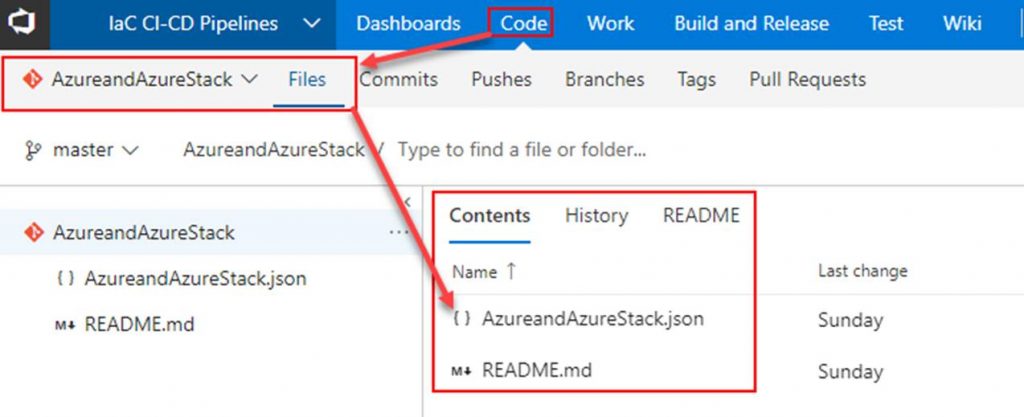
Within VSTS create a new repository and place your ARM template in it.
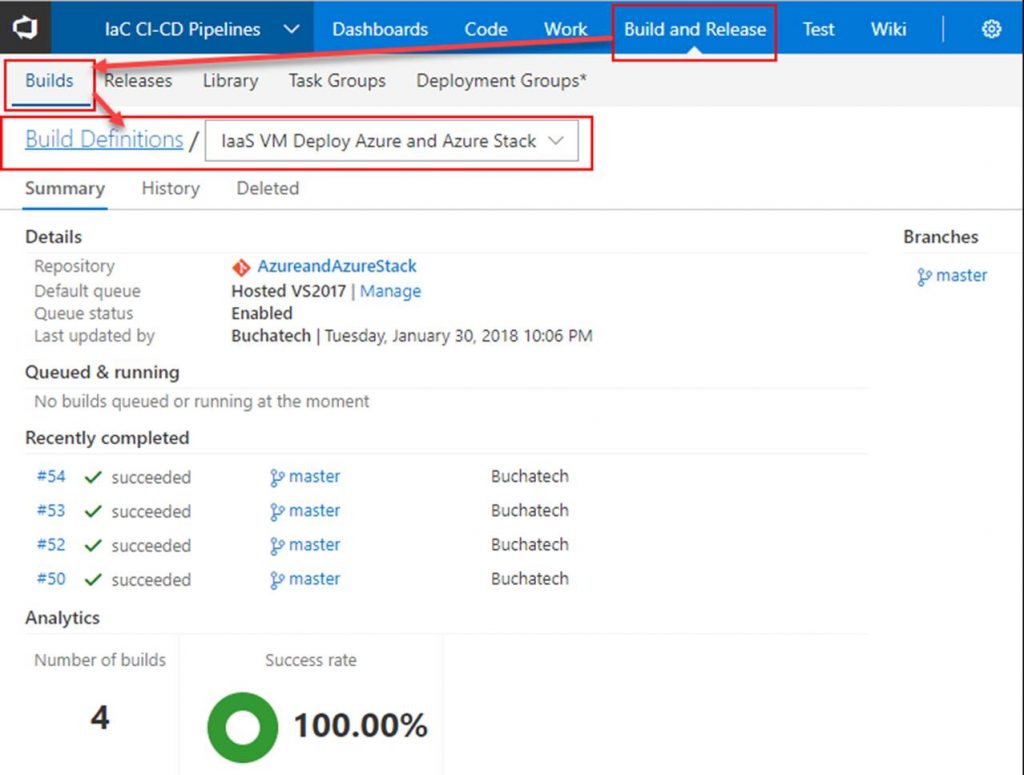
Next click on Build and Release. Create a new Build Definition.
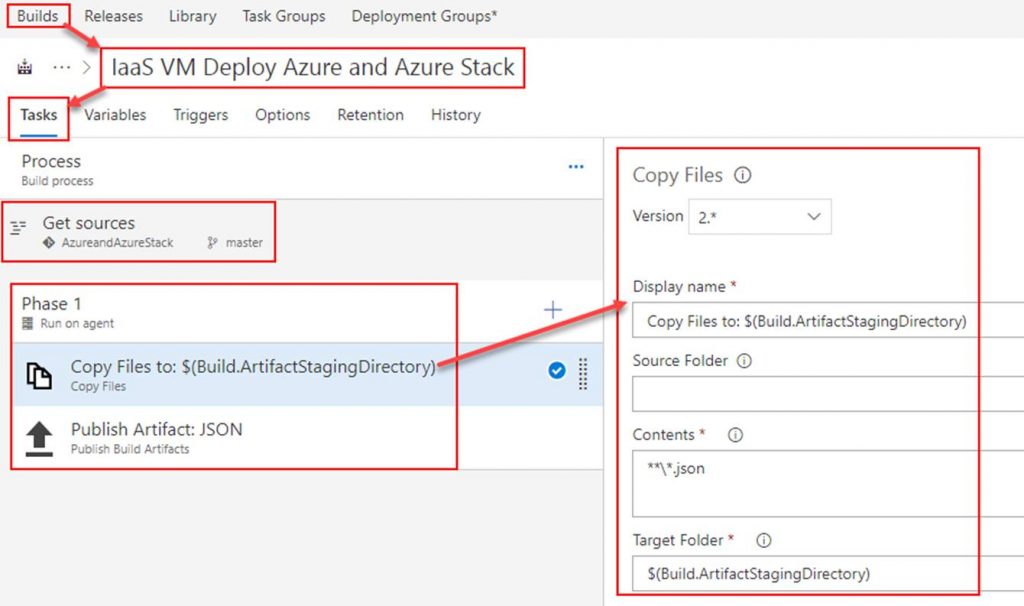
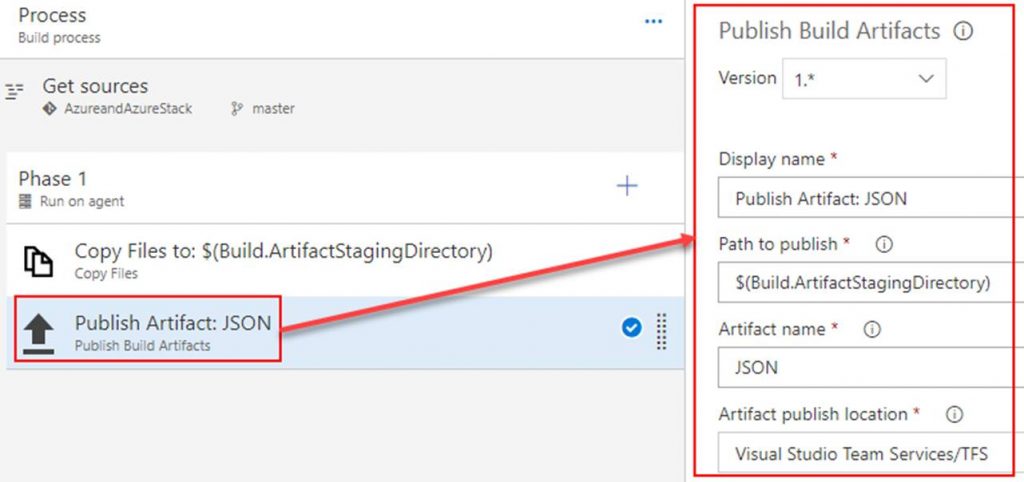
In the build definition. Point the Get sources to the repository you just created. Add 2 tasks under Phase 1. The first task will copy the ARM template to the build staging directory. The second task will publish the ARM template so that a release definition can pick it up. Both tasks are shown in the following screenshots.

Copy Files to task
Publish Artifact task
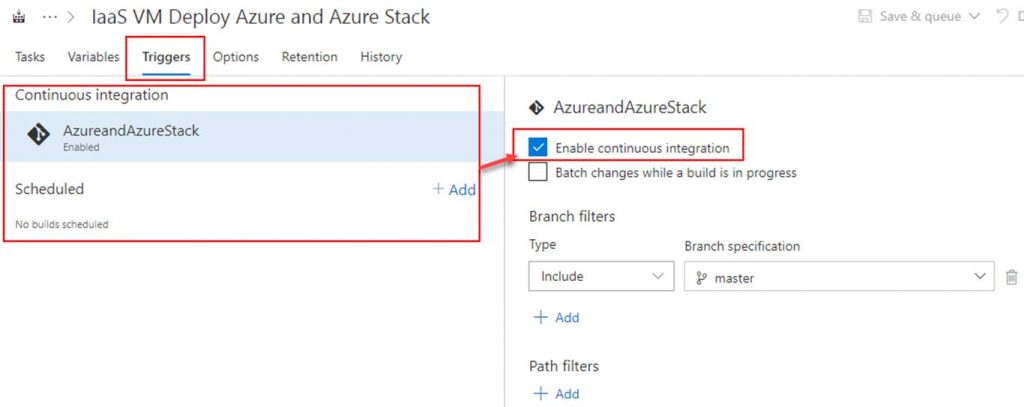
OPTIONAL: To setup continuous integration click on Triggers. Here you can set a schedule to run the builds or you can click on the repository as shown in the screenshot and then check Enable continuous integration. By checking the box next to Enable continuous integration it tells VSTS that anytime content in the repo is changed to run a build.
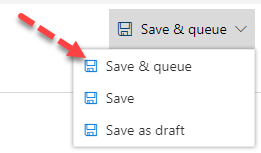
Click on Save & queue. This will start the build.
The build will start. As long as everything is setup properly within your build it will succeed as shown in the following Screenshot.
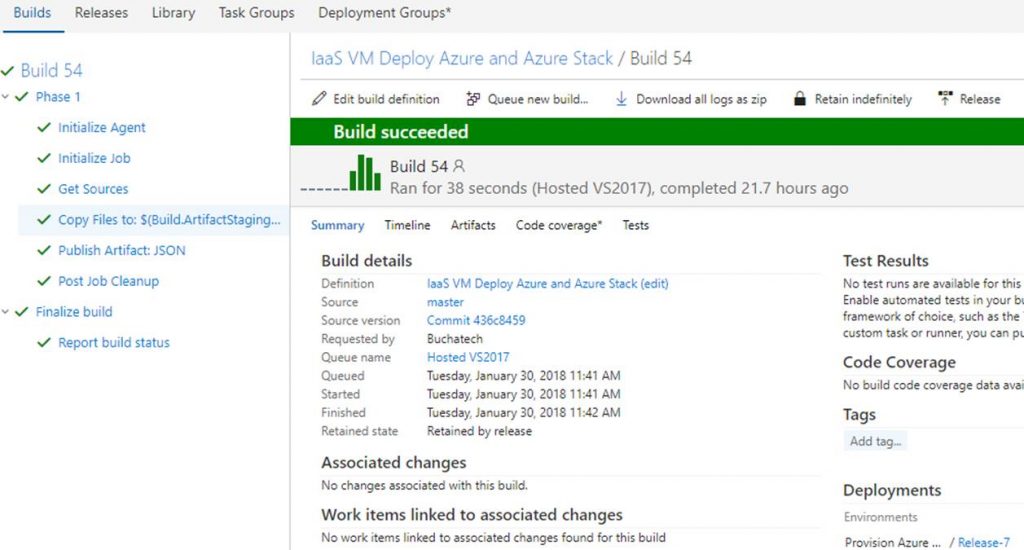
That’s all for our build. Next up we need to create a release definition (RD) pipeline. The RD will take the build artifacts and deploy to an environment/s you specify.

Read more