Deploy Rancher on Azure for Kubernetes Management

Lately I have been hearing a lot about a solution named Rancher in the Kubernetes space. Rancher is an open source Kubernetes Multi-Cluster Operations and Workload Management solution. You can learn more about Rancher here: https://www.rancher.com.

In short you can use Rancher to deploy and manage Kubernetes clusters deployed to Azure, AWS, GCP their managed Kubernetes offerings like GCE, EKS, AKS or even if you rolled your own. Rancher also integrates with a bunch of 3rd party solutions for things like authentication such as Active Directory, Azure Active Directory, Github, and Ping and logging solutions such as Splunk, Elasticsearch, or a Syslog endpoint.

Recently training opened up for some Rancher/Kubernetes/Docker training so I decided to go. The primary focus was on Rancher while also covering some good info on Docker and Kubernetes. This was really good training with a lot of hands on time, however there was one problem with the labs. The labs had instructions and setup scripts ready to go to run Rancher local on your laptop or on AWS via Terraform. There was nothing for Azure.

I ended up getting my Rancher environment running on Azure but it would have been nice to have some scripts or templates ready to go to spin up Rancher on Azure. I did find some ARM templates to spin up Rancher but they deployed an old version and it was not clear in the templates on where they could be updated to deploy the new version of Rancher. I decided to spend some time building out a couple of ARM templates that can be used to quickly deploy Rancher on Azure and add a Kubernetes host to Rancher. In the ARM template I pulled together it pulls the Rancher container from Docker Hub so it will always deploy the latest version. In this blog post I will spell out the steps to get your Rancher up and running in under 15 minutes.

First off you can find the ARM Templates here on my Github here: https://github.com/Buchatech/DeployRanchertoAzure.

The repository consists of ARM templates for deploying Rancher and a host VM for Kubernetes. NOTE: These templates are intended for labs to learn Rancher. They are not intended for use in production.

In the repo ARM Template #1 named RancherNode.JSON will deploy an Ubuntu VM with Docker and the latest version of Rancher (https://hub.docker.com/r/rancher/rancher) from Docker Hub. ARM Template #2 named RancherHost.JSON will deploy an Ubuntu VM with Docker to be used as a Kubernetes host in Rancher.

Node Deployment

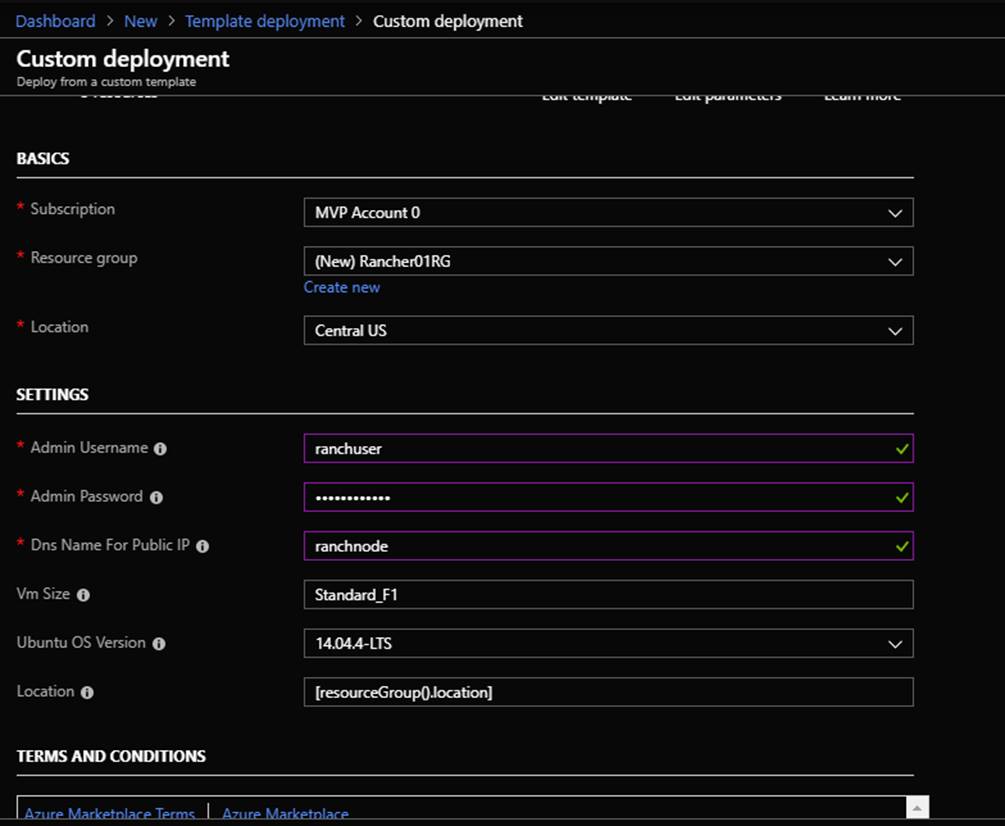
Deploy the RancherNode.JSON ARM template to your Azure subscription through “Template Deployment” or other deployment method. You will be prompted for the following info shown in the screenshot:
Host Deployment

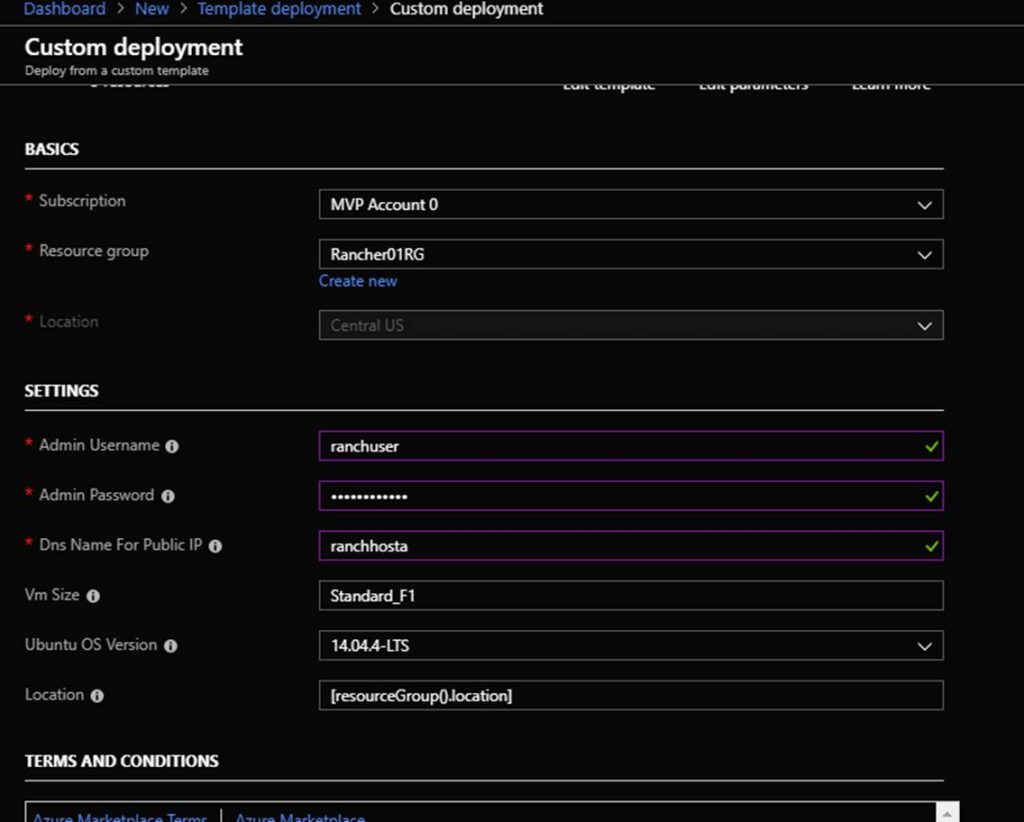
Deploy the RancherHost.JSON ARM template to your Azure subscription through “Template Deployment” or other deployment method. Note that that should deploy this into the same Resource Group that you deployed the Rancher Node ARM template into. You will be prompted for the following info shown in the screenshot:
After the Rancher Node and Rancher Host ARM templates are deployed you should see the following resources in the new Resource Group:

NameType
RancherVNet Virtual network
RancherHost Virtual machine
RancherNode Virtual machine
RancherHostPublicIP Public IP address
RancherNodePublicIP Public IP address
RancherHostNic Network interface
RancherNodeNic Network interface
RancherHost_OSDisk Disk
RancherNode_OSDisk Disk

Next navigate the Rancher portal in the web browser. The URL is the DNS name of the Rancher Node VM. You can find the DNS name by clicking on the Rancher Node VM in the Azure portal on the overview page. Here is an example of the URL:

https://ranchernode.centralus.cloudapp.azure.com

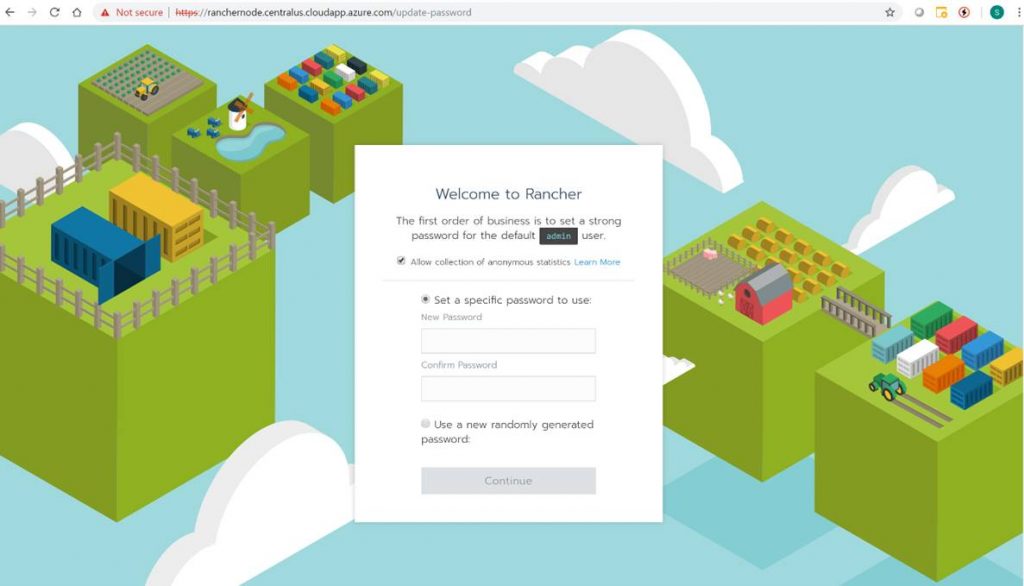
The Rancher portal will prompt you to set a password. This is shown in the following screenshot.
After setting the password the Rancher portal will prompt you for the correct Rancher Server URL. This will automatically be the Rancher Node VM DNS name. Click Save URL.
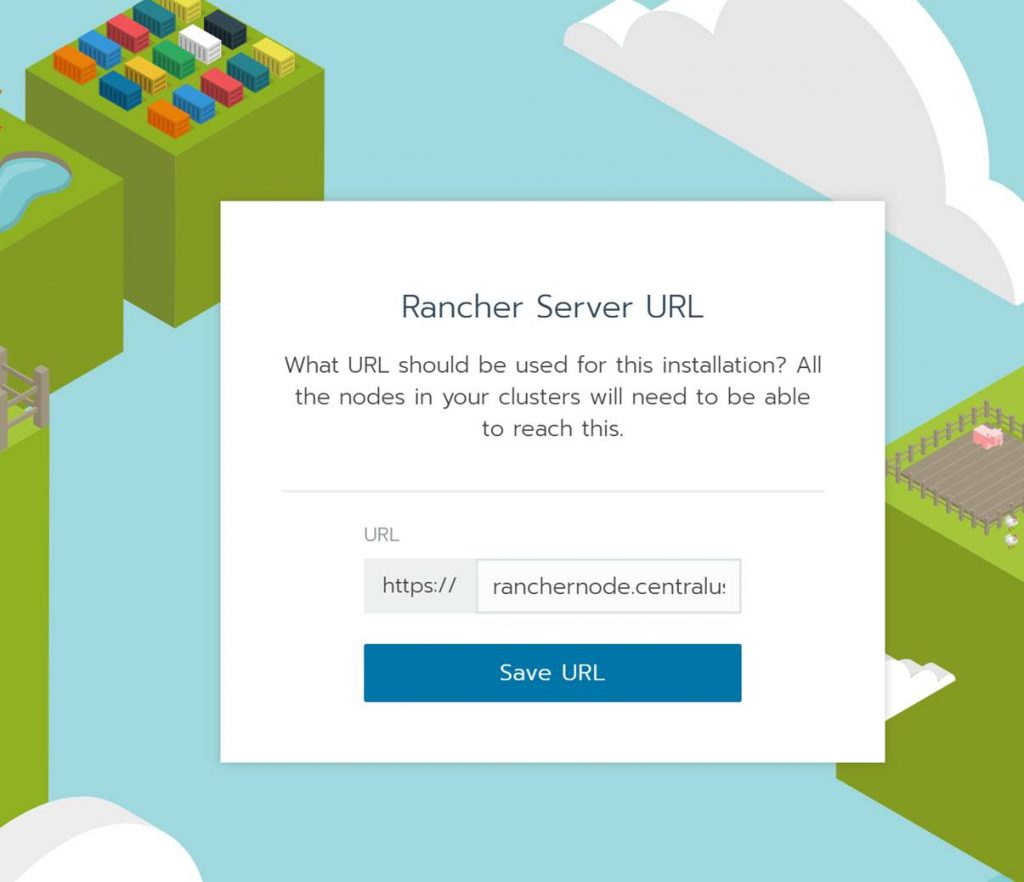
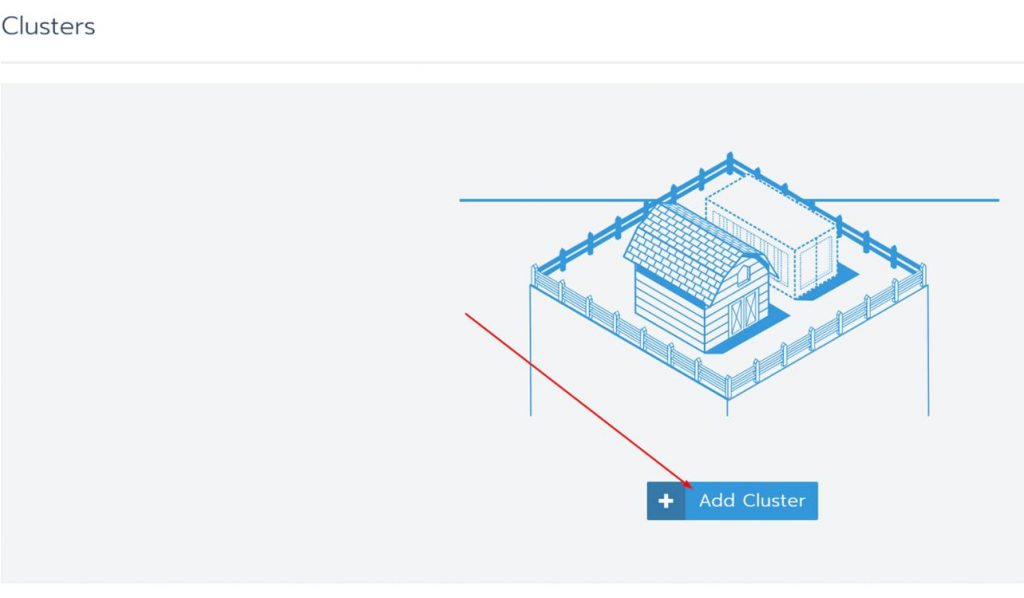
You will then be logged into the Rancher portal. You will see the cluster page. From here you will want to add a cluster. Doing this is how you add a new Kubernetes cluster to Rancher. In this post I will show you how to add a cluster to the Rancher Host VM. When it’s all said and done Rancher will have successfully deployed Kubernetes to the Rancher Host VM. Note that you could add a managed Kubernetes such as AKS but we won’t do that in this blog. I will save that for a future blog post!

Click on Add Cluster
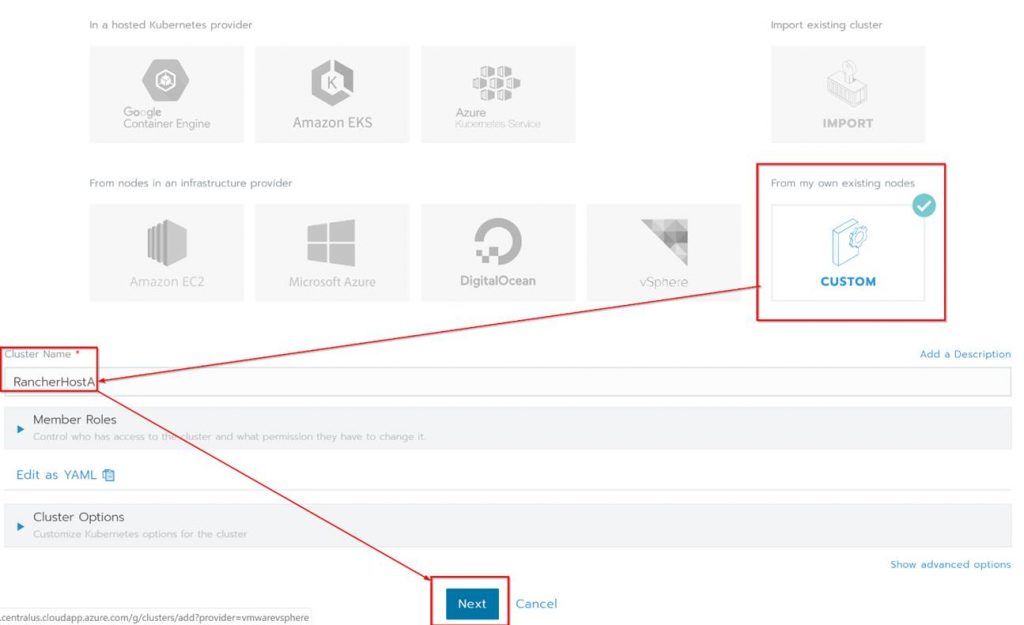
Under “From my own existing nodes” Click on custom, give the cluster a name and click Next.
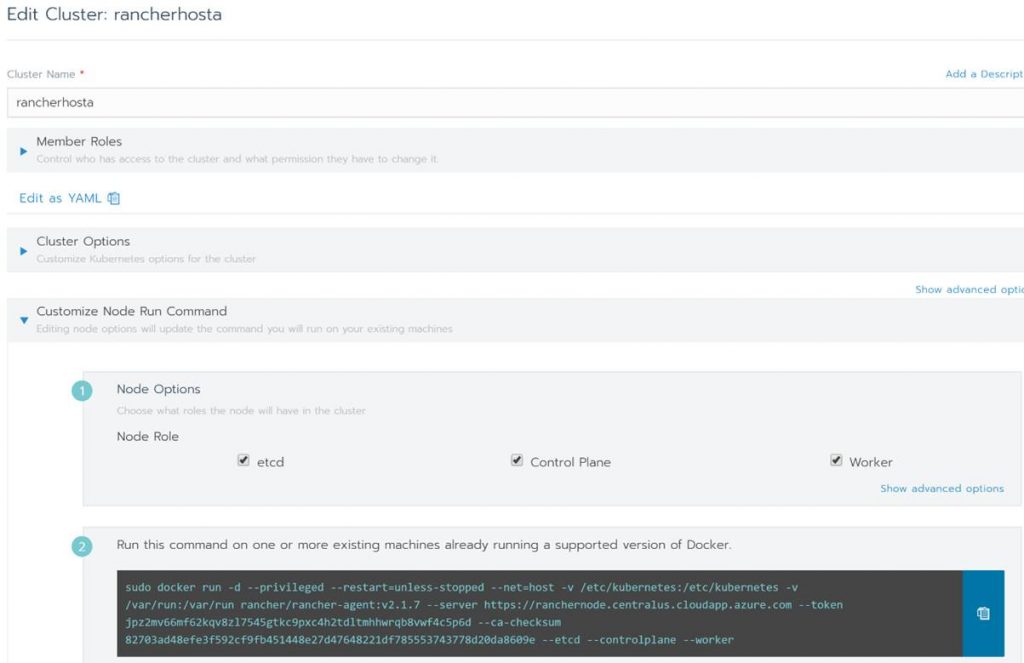
Next check all the boxes for the Node Options since all the roles will be on a single Kubernetes cluster. Copy the code shown at the bottom of the page, click done and run the code on the Rancher Host.
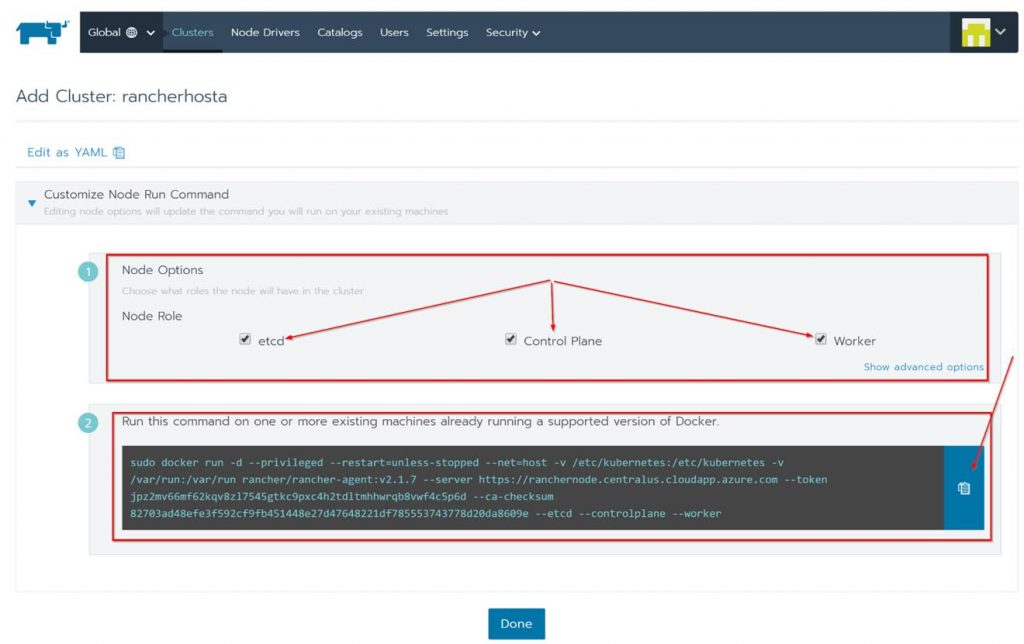
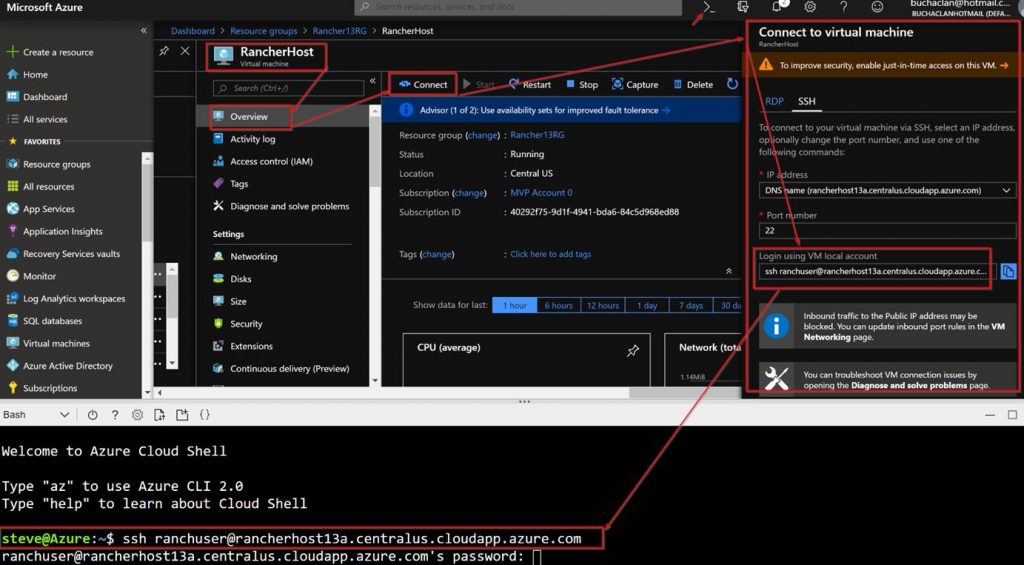
In order to run the code on the Rancher Host you need to SSH in and run it from there. To do this follow these steps:

  1. In the Azure Portal, from within the resource group click on the Rancher Host VM.
  2. On the Overview page click on Connect.
  3. Copy “ssh ranchuser@rancherhost.centralus.cloudapp.azure.com” from the Connect to virtual machine pop up screen.
  4. Open a terminal in either Azure cloud shell or with something like a terminal via VS Code and past the “ssh ranchuser@rancherhost.centralus.cloudapp.azure.com” in.
Running the code will look like this:
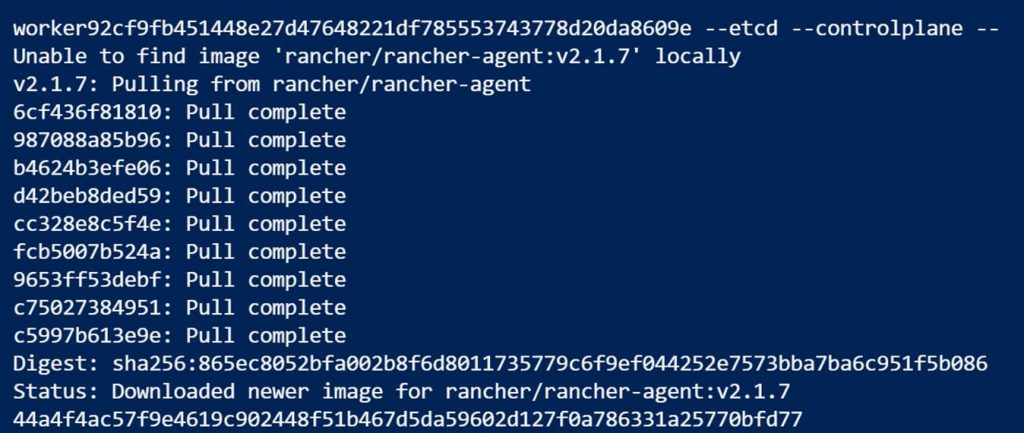
When done you can run Docker PS to see that the Rancher agent containers are running.

In the Rancher portal under clusters you will see the Rancher host being provisioned

The status will change as Kubernetes is deployed.
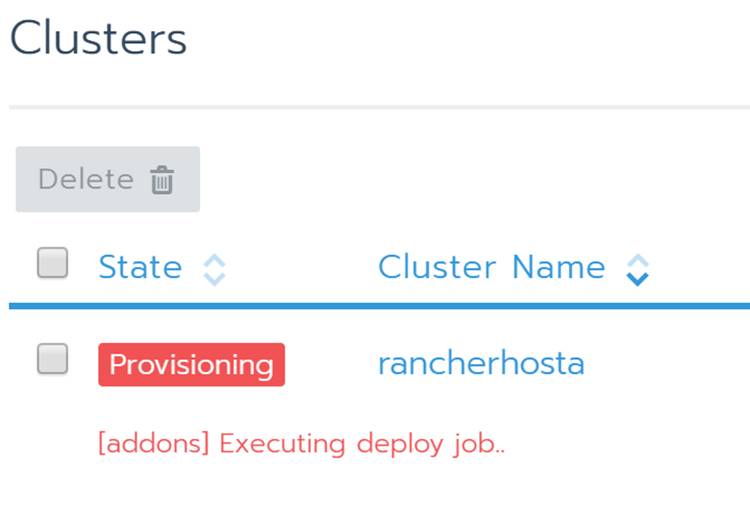
Once it’s done provisioning you will see your Kubernetes cluster as Active.

From here you can see a bunch of info about your new Kubernetes cluster. Also notice that you could even launch Kubectl right from hereand start running commands! Take some time to click around to see all the familiar stuff you are used to working with in Kubernetes. This is pretty cool and simplifies the management experience for Kubernetes. 
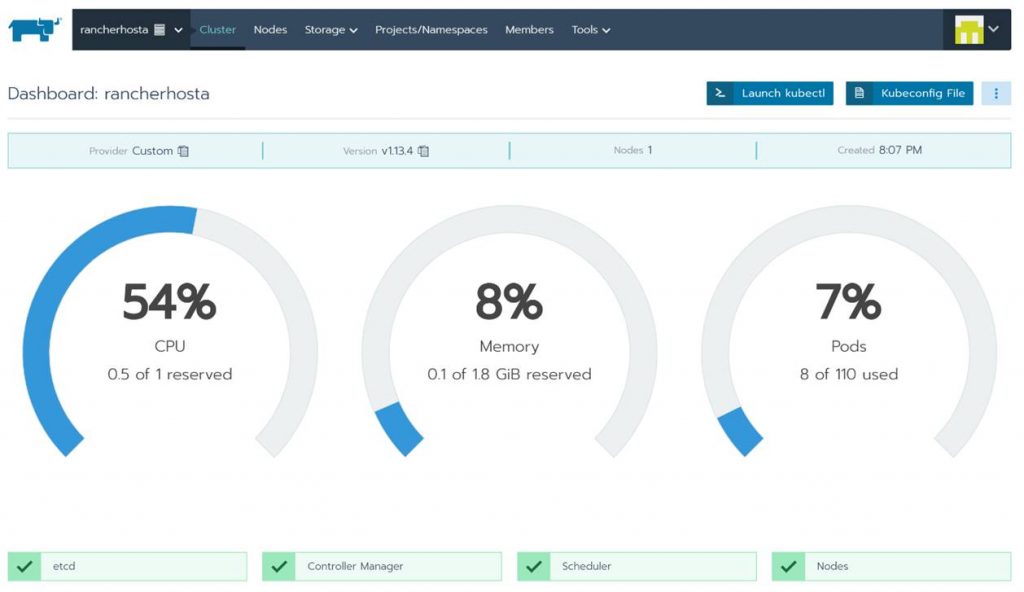
If you want to add more nodes or need the configuration code again just click the ellipsis button and edit.

In Edit Cluster you can change the cluster name, get and change settings and copy the code to add more VMs to the cluster.
That’s the end of this post. Thanks for reading. Check back for more Azure, Kubernetes, and Rancher blog posts.

Read more

Azure Stack SQL RP – Need Azure PowerShell with version 1.2.9 Error

I ran into this error when installing the Azure Stack SQL RP on the Azure Stack Development Kit:

Azure Powershell Module with 1.2.10 version found. Need Azure Powershell with version 1.2.9. Please uninstall the “current version and rerun the RP setup

If you look at the SQL RP doc here:

https://docs.microsoft.com/en-us/azure/azure-stack/azure-stack-sql-resource-provider-deploy

It says “If you have installed any versions of the AzureRm or AzureStack PowerShell modules other than 1.2.9 or 1.2.10, you will be prompted to remove them or the install will not proceed. This includes versions 1.3 or greater.” on step #6 under Deploy the resource provider.


On my ASDK host I had:

and

The funny part is that in the SQL RP deployment script titled has a line where it installs AzureStack 1.2.10 but this is the version that the SQL RP deployment script is complaining about. Here is the syntax from the SQL deployment script.

# Installs and imports the API Version Profile required by Azure Stack into the current PowerShell session.

Use-AzureRmProfile -Profile 2017-03-09-profile

Install-Module -Name AzureStack -RequiredVersion 1.2.10 -Force

So the next thing I tried to do was run:

Get-Module -ListAvailable | where-Object {$_.Name -like “Azure*”} | Uninstall-Module

It kept throwing these warnings and errors:

WARNING: The version ‘1.0.4.4’ of module ‘Azure.Storage’ is currently in use. Retry the operation after closing the applications.

PackageManagement\Uninstall-Package : Module ‘Azure.Storage’ is in currently in use.

At C:\Program Files\WindowsPowerShell\Modules\PowerShellGet\1.0.0.1\PSModule.psm1:2157 char:21

+ …        $null = PackageManagement\Uninstall-Package @PSBoundParameters

+                    ~~~~~~~~~~~~~~~~~~~~~~~~~~~~~~~~~~~~~~~~~~~~~~~~~~~~~~

    + CategoryInfo          : InvalidOperation: (Microsoft.Power…ninstallPackage:UninstallPackage) [Uninstall-Package], Exception

    + FullyQualifiedErrorId : ModuleIsInUse,Uninstall-Package,Microsoft.PowerShell.PackageManagement.Cmdlets.UninstallPackage

So now I was stuck in this endless loop of PowerShell module uninstall and install hell. For a moment I thought I went insane. After recovering from temporary insanity. I ran this:

Get-InstalledModule -Name “AzureStack” -RequiredVersion 1.2.10 | Uninstall-Module

No errors on this. I then ran:

Get-Module  -ListAvailable | where-Object {$_.Name -like “Azure*”}

to see if the module was gone. Boom it was!

I then kicked off the SQL RP deployment script again and this time it worked!

NOTE: If you somehow have AzureRM version 1.2.10 just run Get-InstalledModule -Name “AzureRM” -RequiredVersion 1.2.10 | Uninstall-Module to get rid of that guy.

Read more

Azure Stack POC Hardware

I have been asked several times what I use for my Azure Stack rig and where I got the hardware from. I am going to share in this post what I use to run my single node Azure Stack POC. I bought all parts from newegg.com. Here is a list of the parts:

  • Motherboard: MSI X99A SLI KRAIT EDITION LGA 2011-v3 Intel X99 SATA 6Gb/s USB 3.1 USB 3.0 ATX Intel
  • Video Card: EVGA GeForce 210 DirectX 10.1 512-P3-1310-LR 512MB 32-Bit DDR3 PCI Express 2.0 x16 HDCP Ready Low Profile
  • Power Supply: EVGA 750 BQ 110-BQ-0750-V1 80+ BRONZE 750W Semi Modular Includes Power On Self Tester
  • Processor: Intel Core i7-5820K Haswell-E 6-Core 3.3 GHz LGA 2011-v3 140W BX80648I75820K Desktop
    NOTE: I was not paying attention when I bought this. Azure Stack needs 12 cores. I am able to work around this and have not run into problems yet. When I get a chance and $$$ I will upgrade this.
  • 3 SSD Hard Drives: PNY CS1311 2.5″ 960GB SATA-III (6 Gb/s) TLC Internal Solid State Drive (SSD) SSD7CS1311-960-RB
    NOTE: I bought a couple of more Kingston brand SSD’s. I use these for the OS and general storage.
  • Memory: G.SKILL Ripjaws 4 Series 128GB (8 x 16GB) 288-Pin DDR4 SDRAM DDR4 2800 (PC4 22400) Intel X99 Platform Extreme Performance Memory Model F4-2800C15Q2-128GRKD
  • Case: Corsair Carbide Series Air 540 CC-9011034-WLED Silver Steel ATX Cube Computer Case

As you can see this is generic hardware. The cost of this hardware was just over $2k USD. I have been running Azure Stack since TP1 on this hardware and I am currently running TP3. This is a personal lab for just me and Azure Stack runs well on my hardware. Don’t let a lack of hardware stop you from diving into Azure Stack. As you can see from this post it does not take much to pick up some parts and get going.

I do also run another Azure Stack POC on much better hardware at work. I can’t wait to get a multi-node environment on one of the hardware providers (Cisco, Dell, Lenovo, or HP) platform.

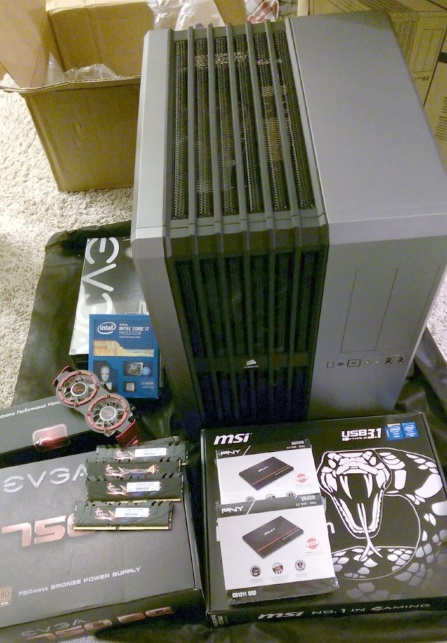
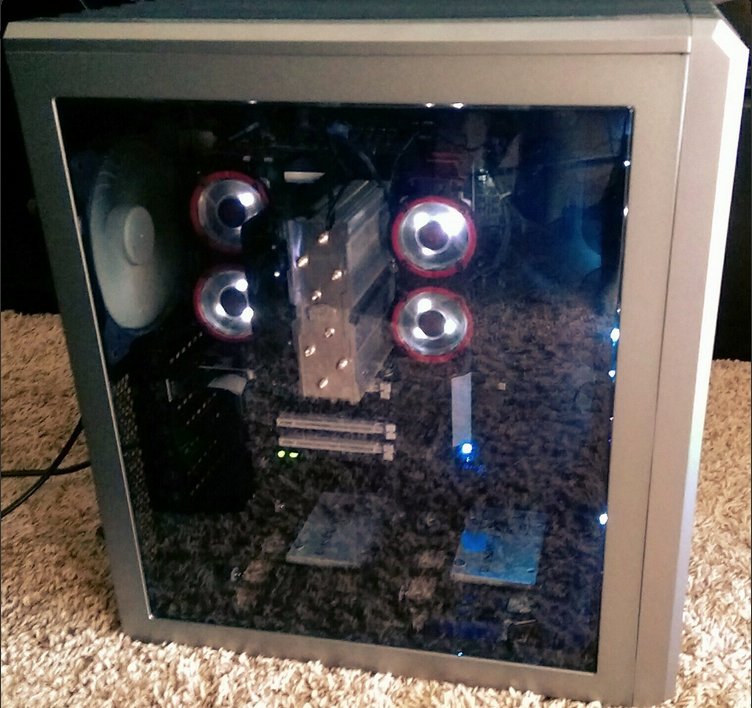
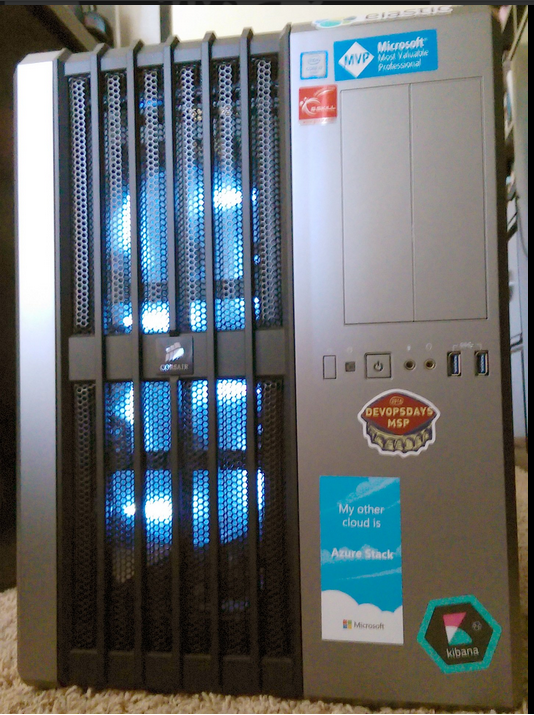
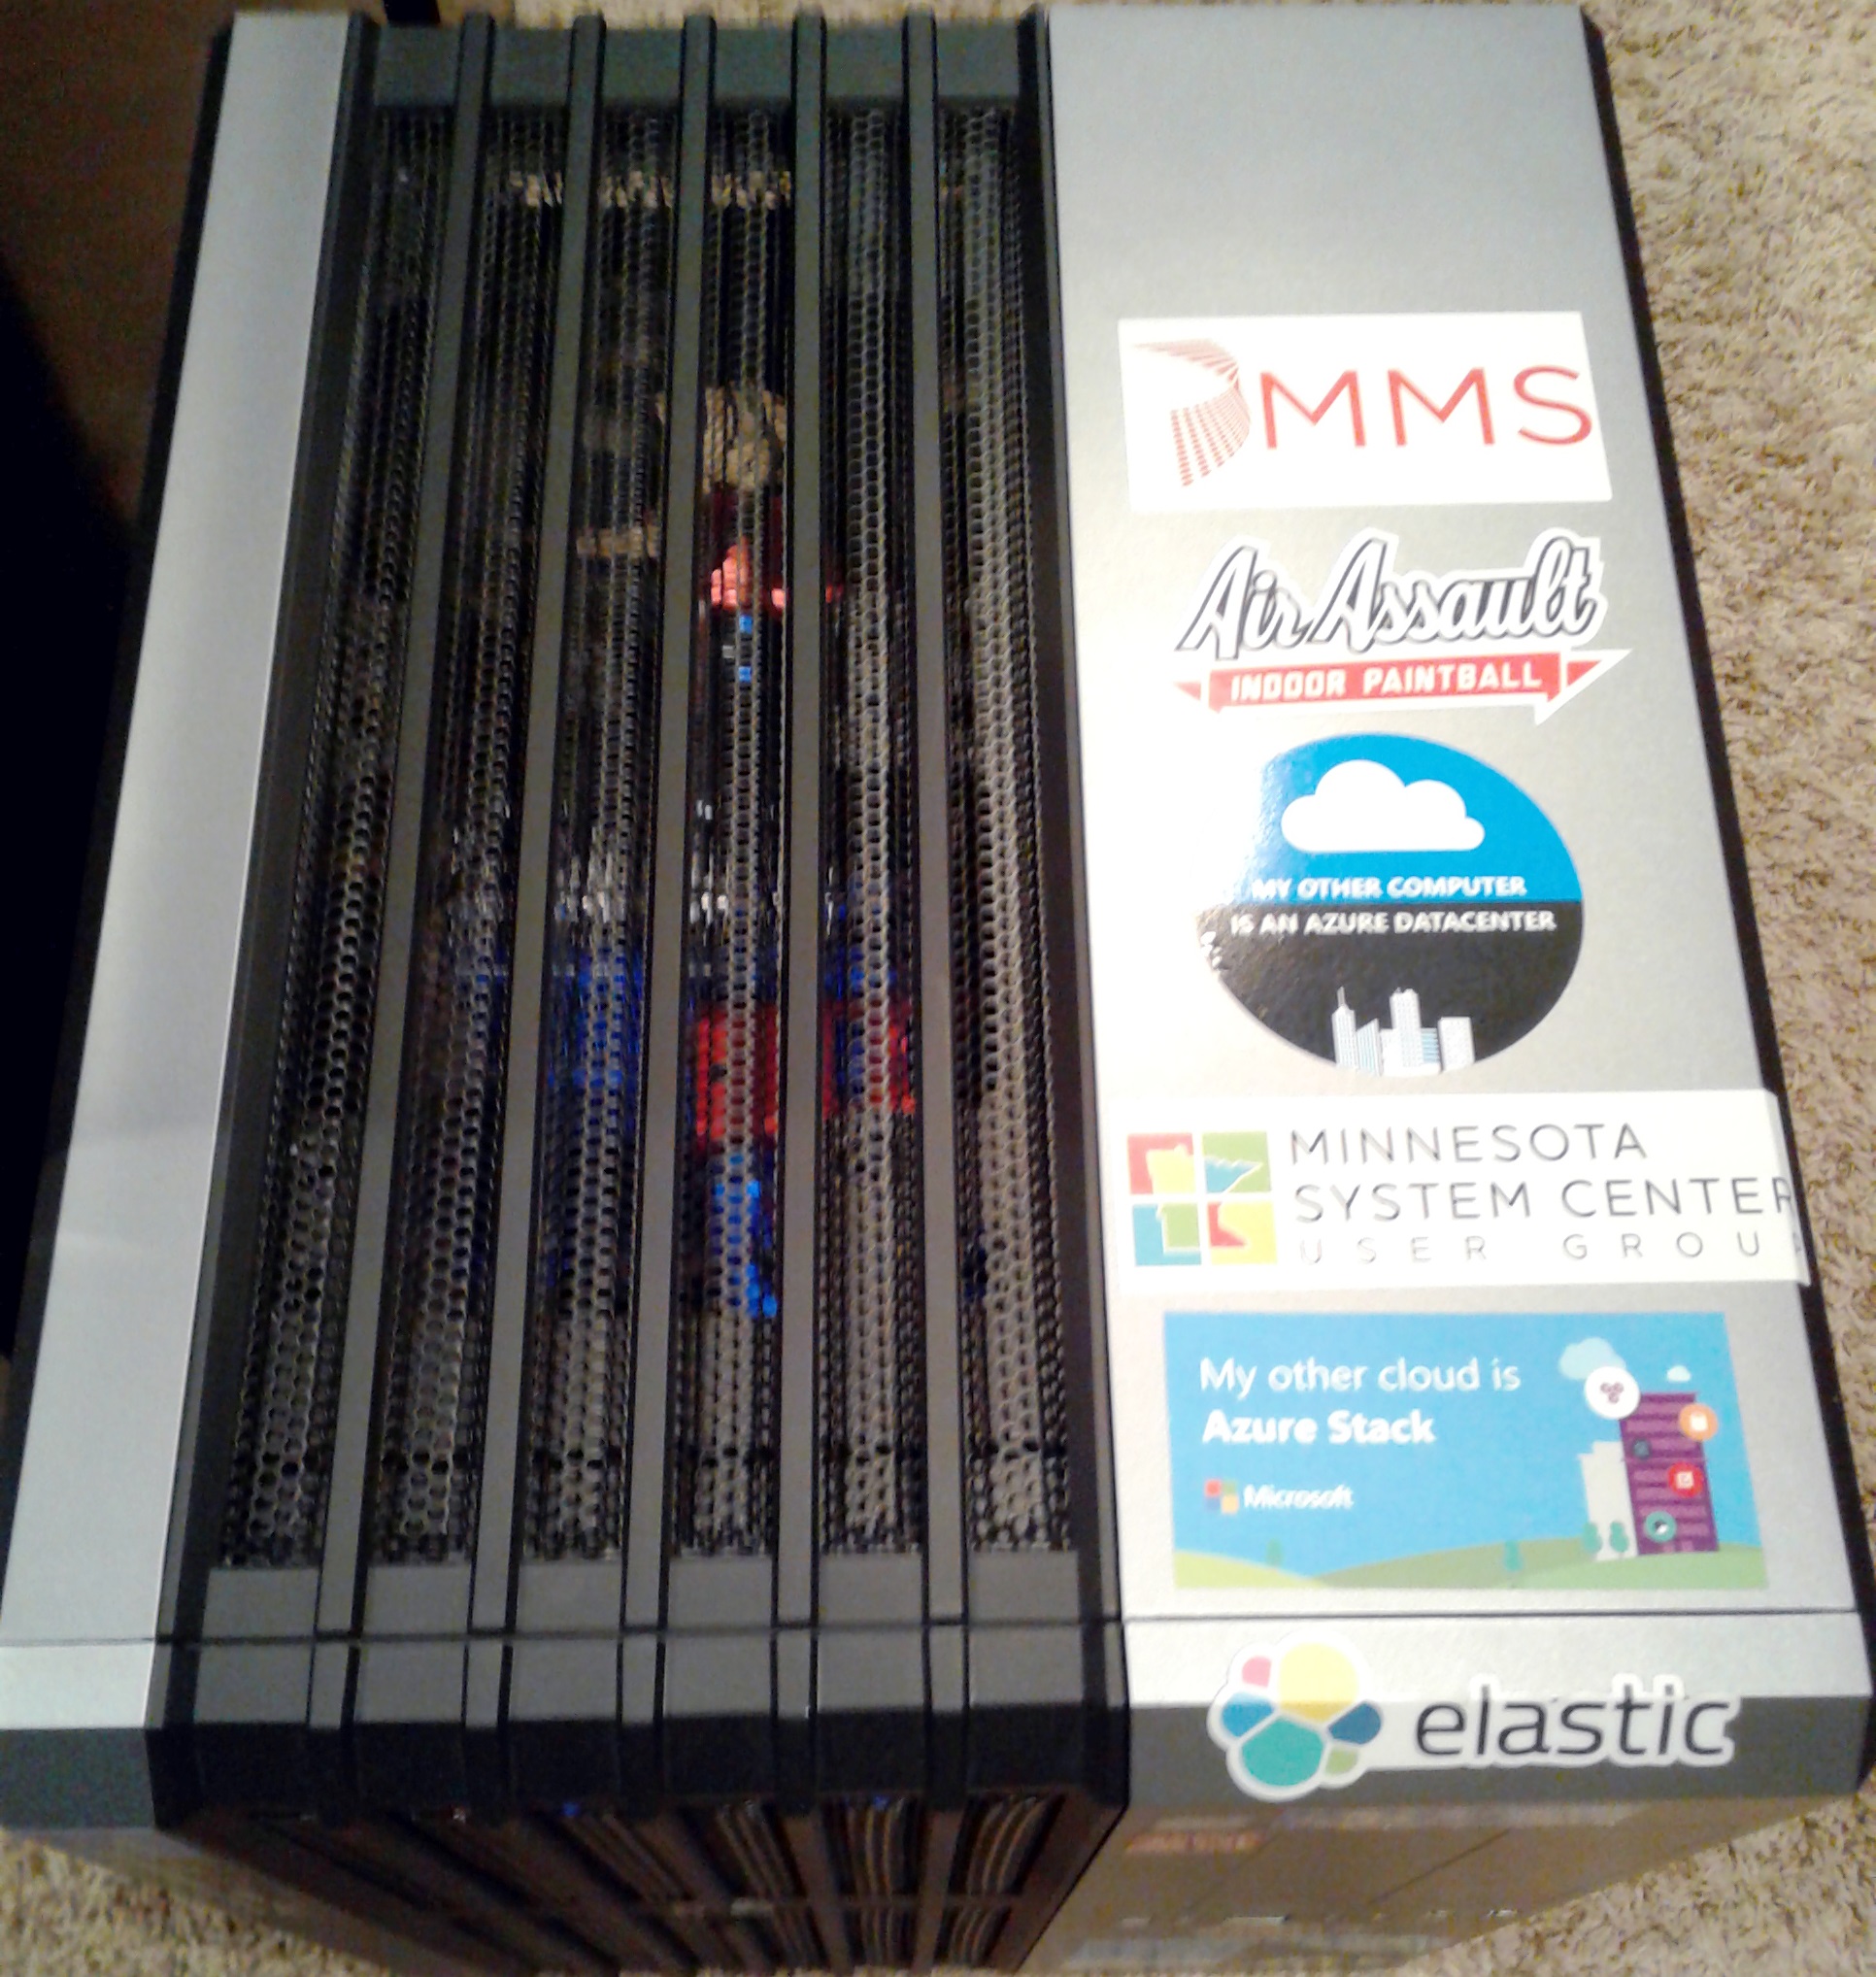
Here is what my rig looks like complete with Azure Stack and other stickers :-).

Before it was built:

After it was built and running:

Read more

Detailed SQL RP Azure Stack TP2 Deploy & Config

Microsoft has made a new version of the SQL resource provider (RP) for Azure Stack TP2 available. It can be found here in the documentation: https://docs.microsoft.com/en-us/azure/azure-stack/azure-stack-sql-resource-provider-deploy. This RP is an add-on for Azure Stack and allows you to offer SQL as PaaS.

This is a great SQL self-service scenario for Hybrid Cloud. The aforementioned link contains documentation on how to deploy the SQL RP. There are some “Gotchas” with the RP and some other information that is important when deploying and configuring this RP.

I am going to walk through my deployment and configuring experience covering the “Gotchas” and other important information in this blog post. This post will be broken out into the following sections:

  • Deployment
  • RP Configuration
  • Offer/Plan Setup
  • Tenant provisioning of SQL PaaS

Ok. Now let’s dive into it.

– DEPLOYMENT –

Before you begin go to the document link and review the RP documentation. You can download the RP on this page from the Download the SQL Server RP installer executable file link.

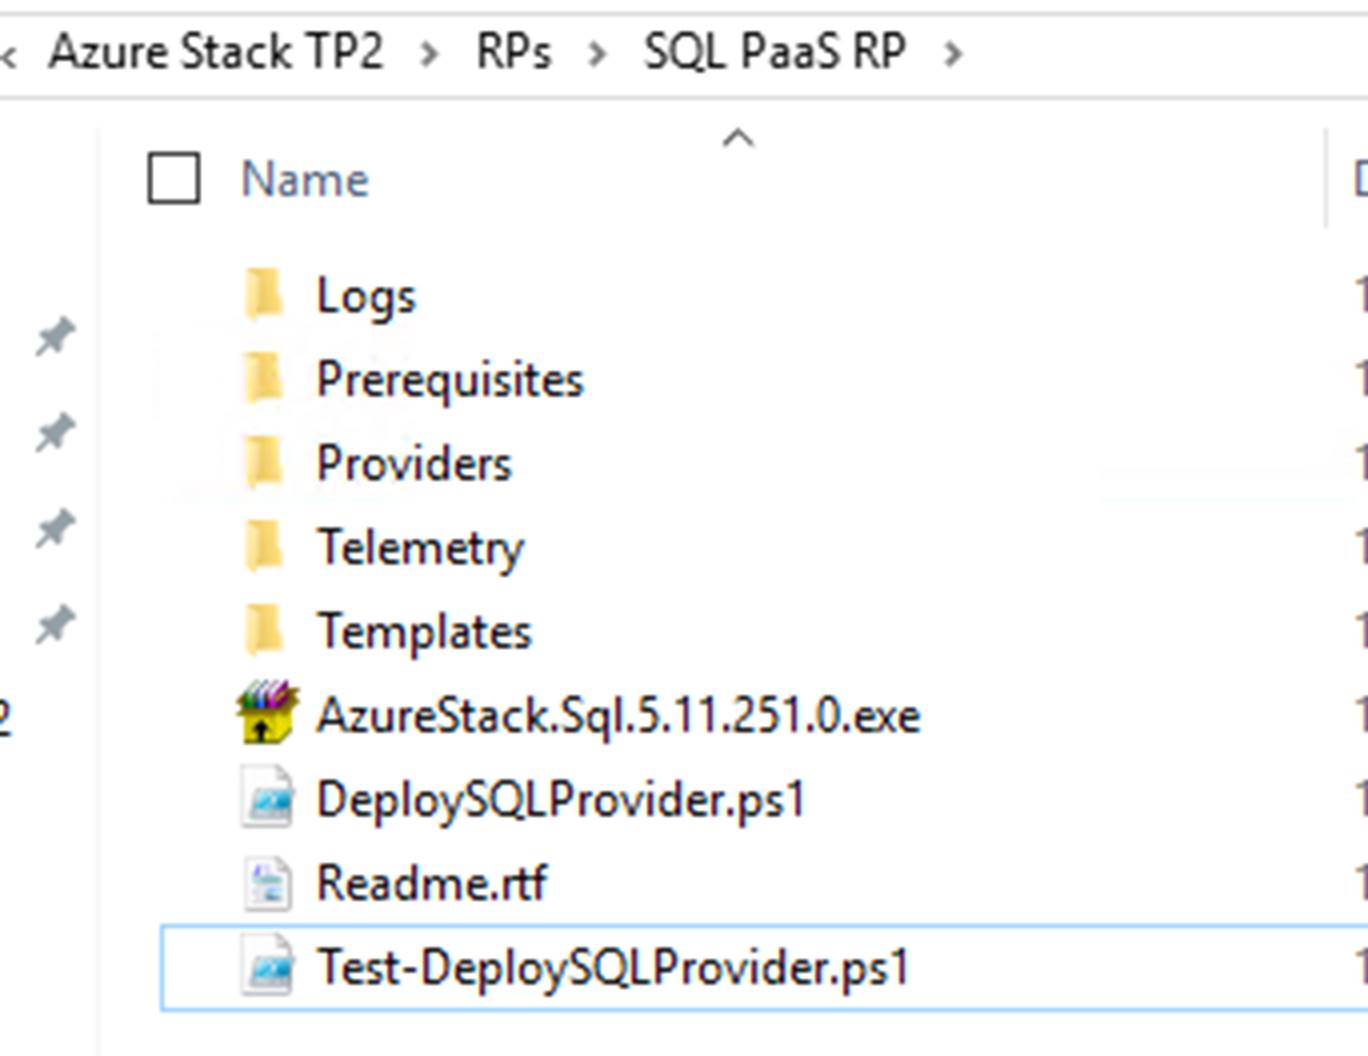
Once the RP is downloaded extract the files and scripts by running AzureStack.Sql.5.11.251.0.exe. You should have the following:

mastp2-sql-rp-1

Now from an elevated PowerShell window run DeploySQLProvider.ps1.

NOTE: Important this should not be run from PowerShell ISE. It fails when it is run from ISE and you may end up with a partial deployment that requires cleanup.

NOTE: Also you can specify a local location for the SQL 2014 SP1 Enterprise Evaluation ISO if you have it downloaded already. To do this run the script with a parameter of -DependencyFilesLocalPath. If not specified the ISO will be downloaded during deployment. I prefer to let the script download it as a part of the deployment.

This script will do the following:

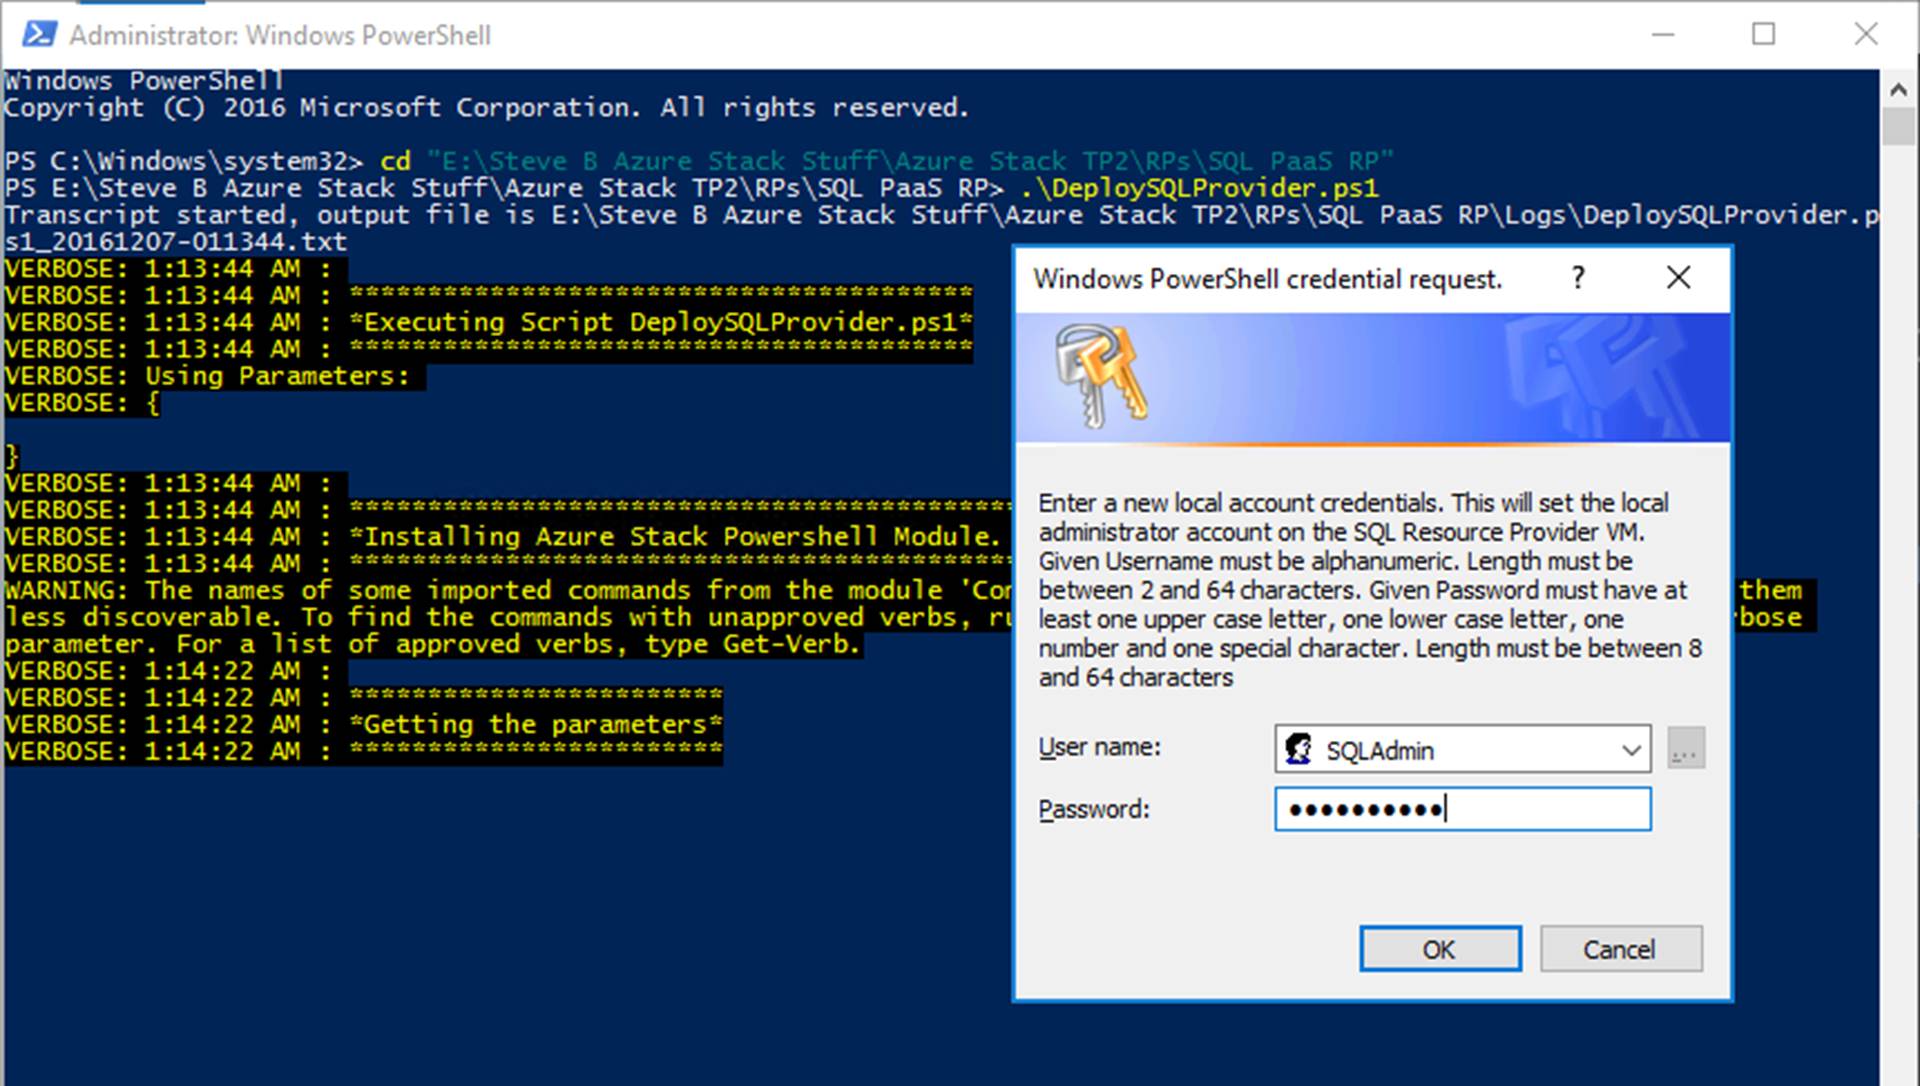
The script will prompt you to input local admin account info. Note that the password you input here will also be used for the SQL SA account.

mastp2-sql-rp-2

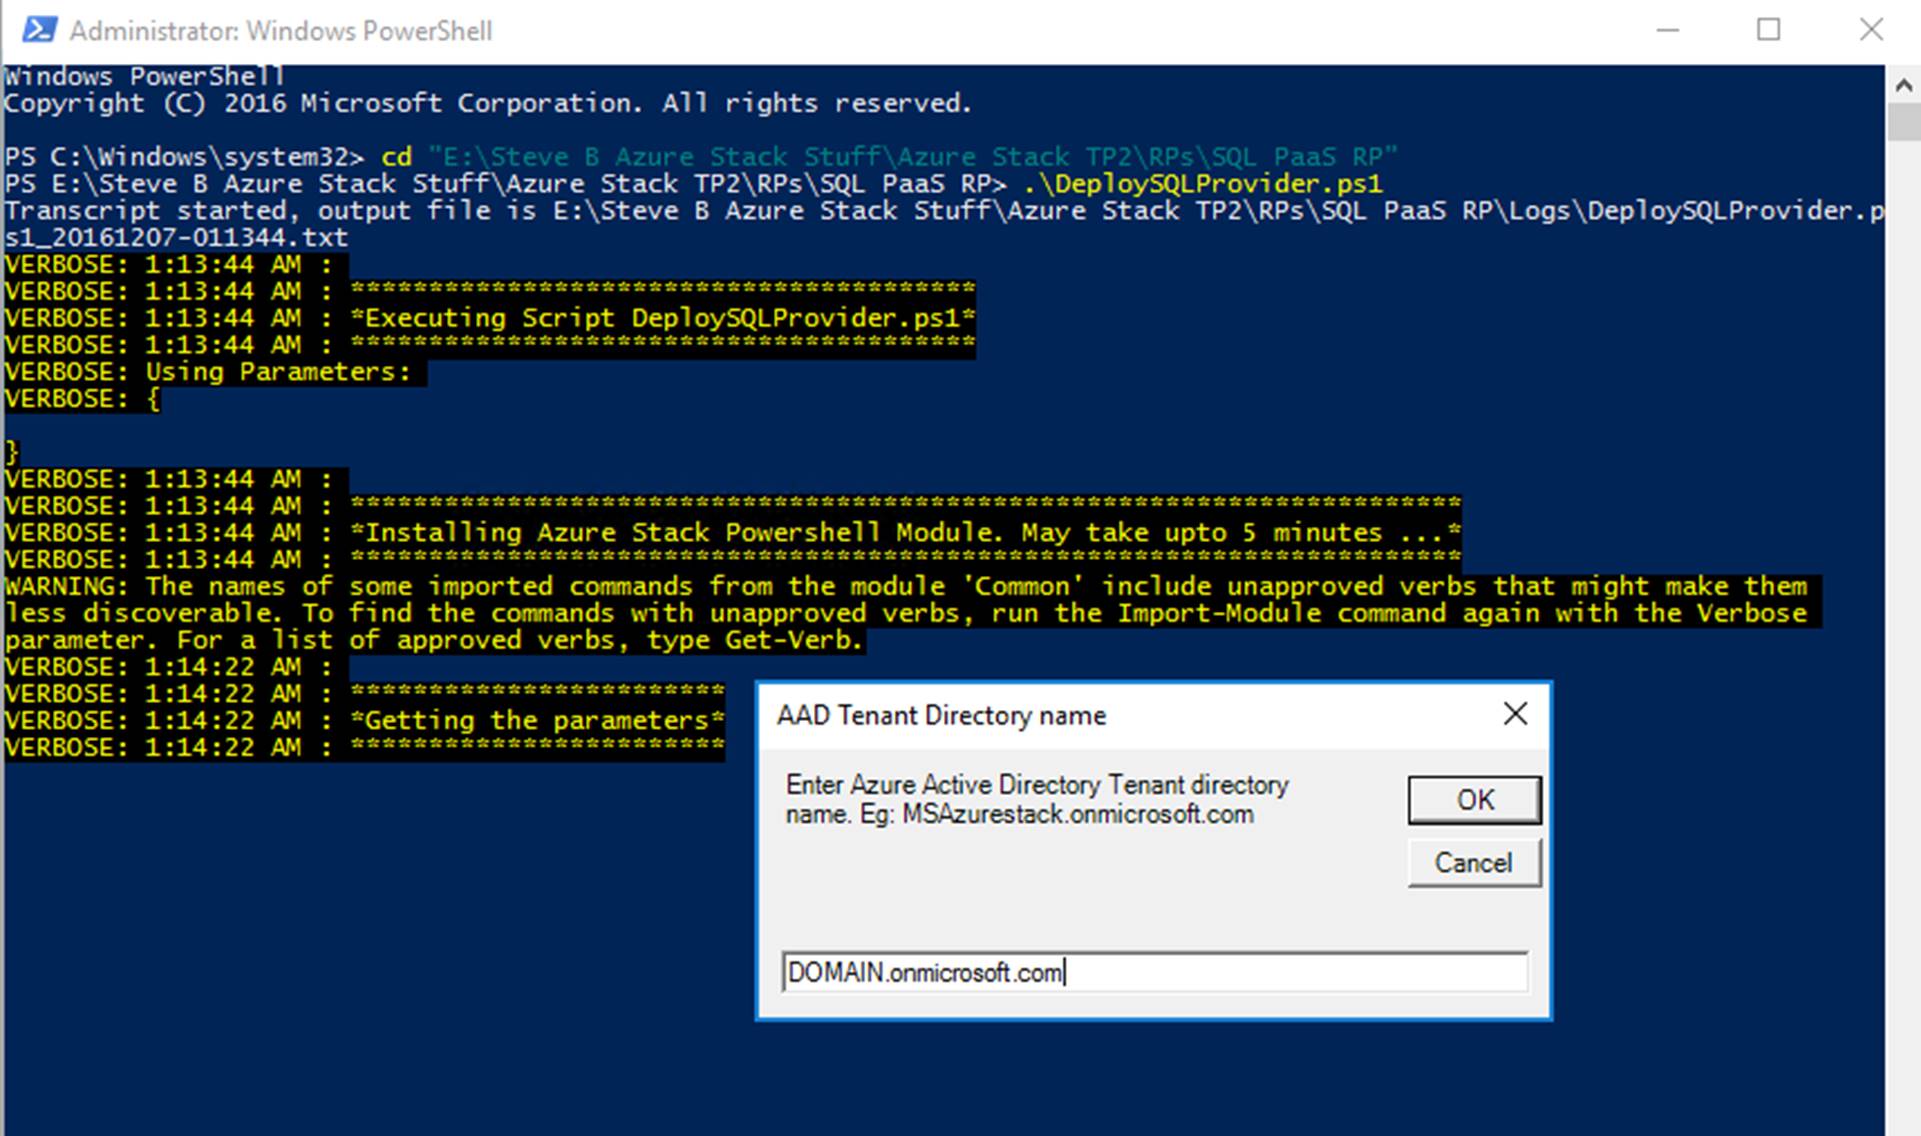
The script will then prompt you for your Azure Active Directory tenant name. This is YOURDOMAIN.onmicrosoft.com.

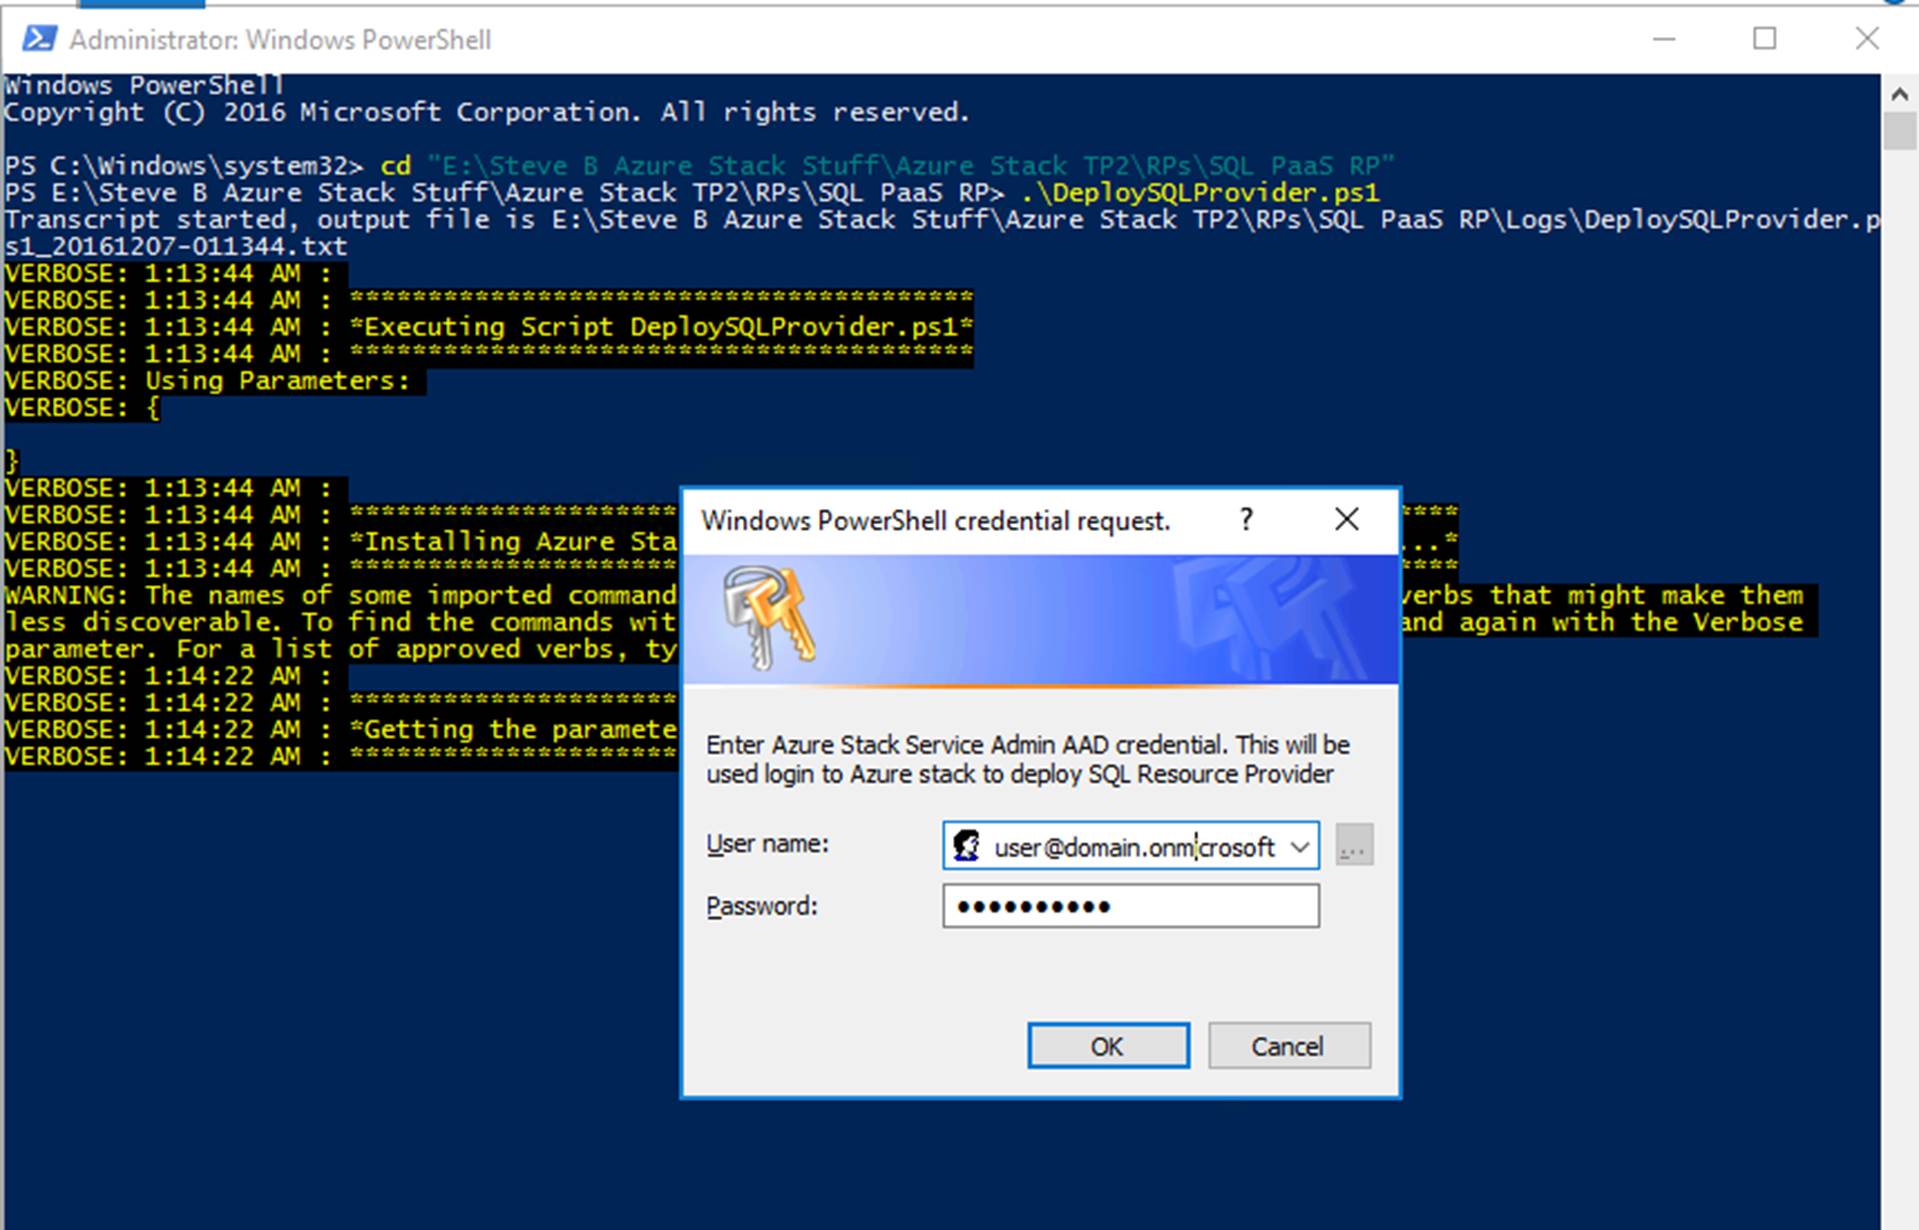
You will then be prompted for an Azure Active Directory account. This should be the account you deployed Azure Stack TP2 with. This will be used to access Azure Stack and create stuff such as the resource provider, resource group and other resources needed by the RP.

mastp2-sql-rp-4

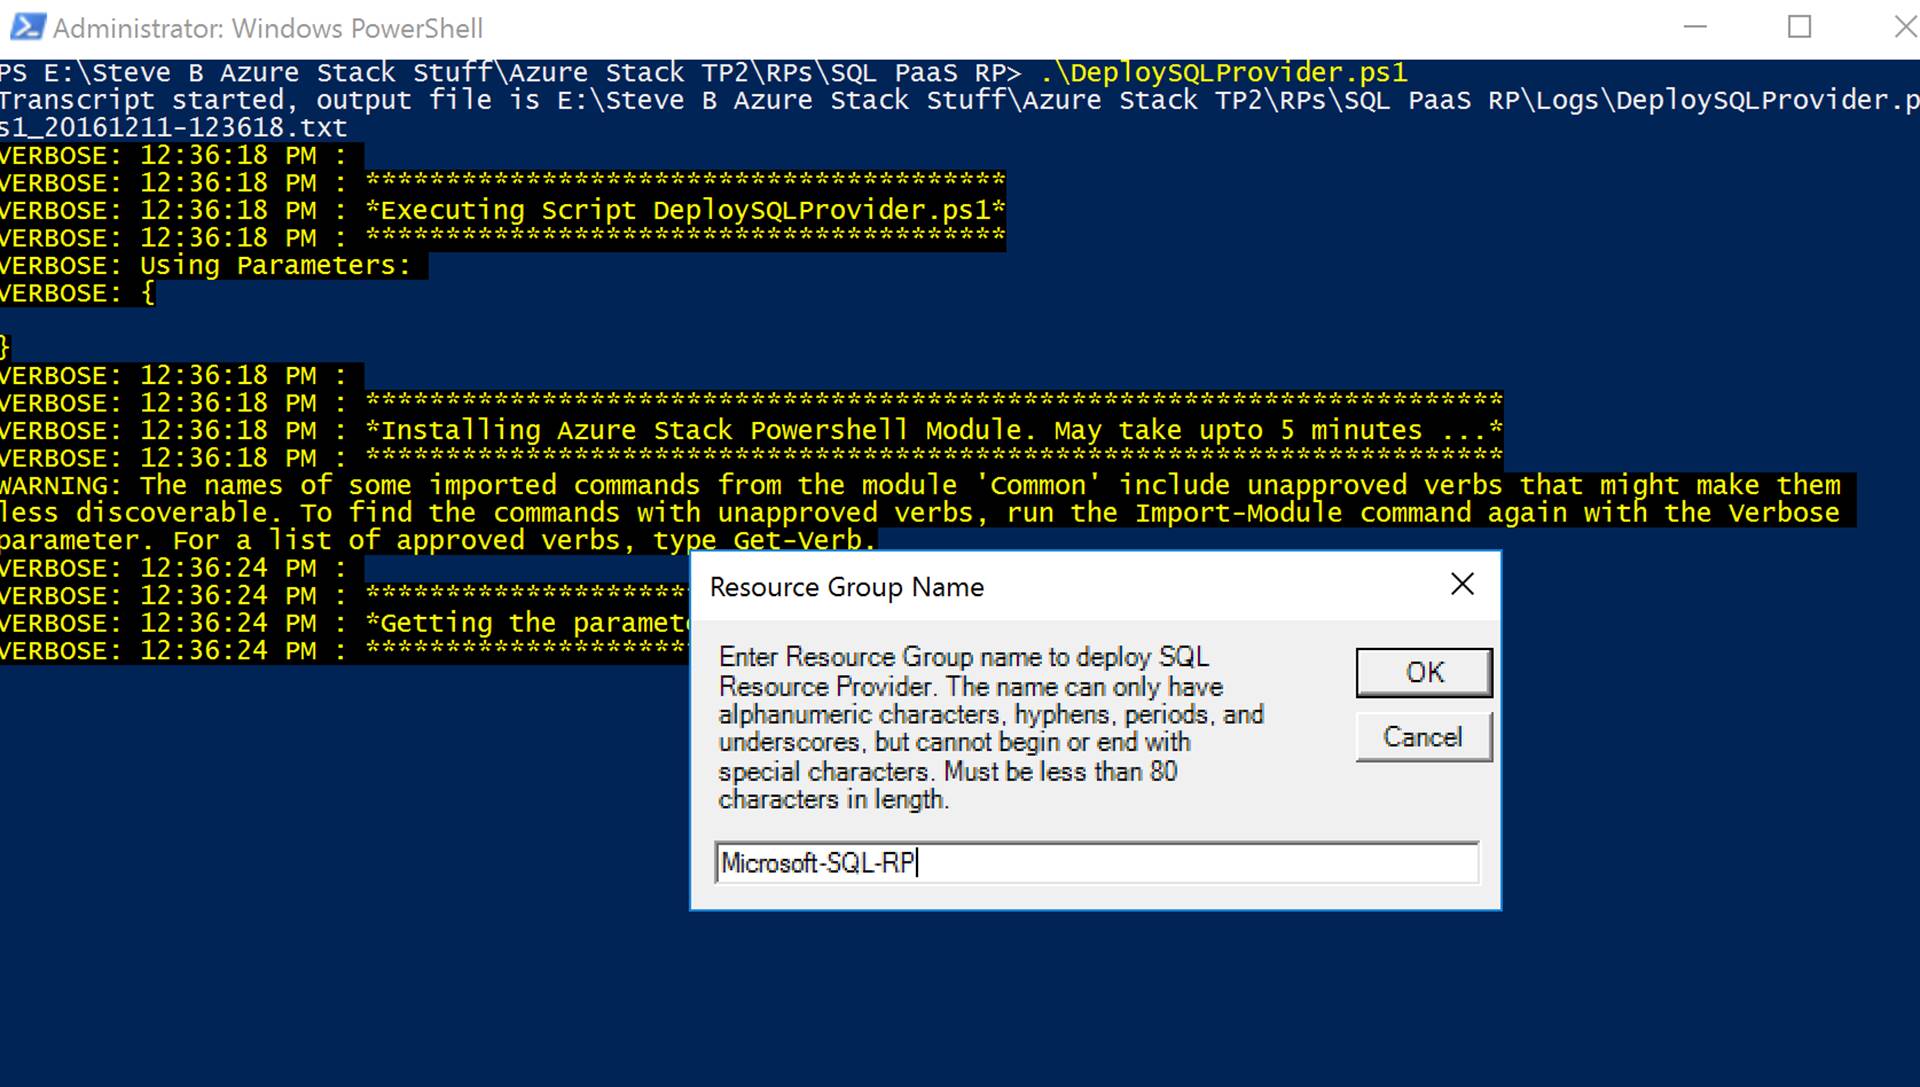
You need to enter a resource group name. You can leave the default if you want.

mastp2-sql-rp-5

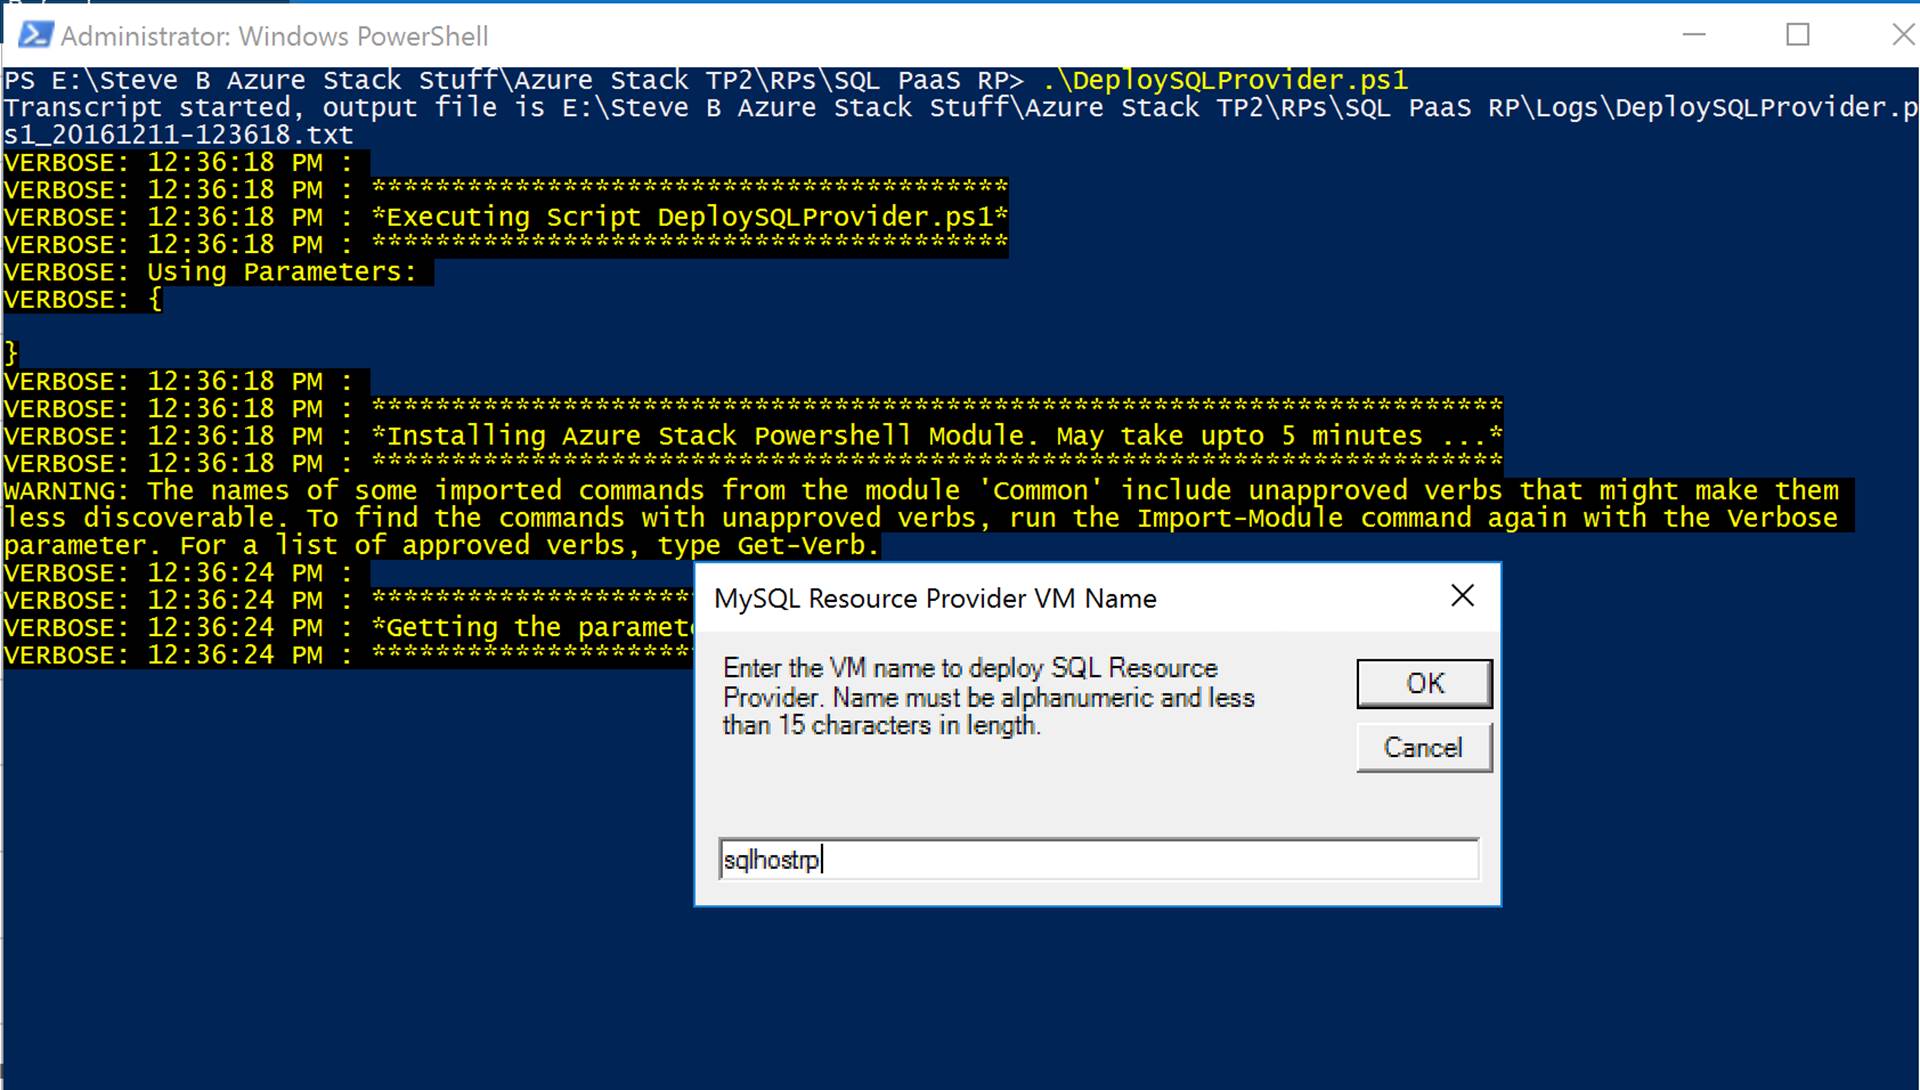
You will then be prompted for the SQL server VM Name. Ignore the title of the pop-up here.

mastp2-sql-rp-6

The script will then run through all of its steps. Here is what the script does as detailed in the official documentation:

  • If necessary, download a compatible version of Azure PowerShell.
  • Create a wildcard certificate to secure communication between the resource provider and Azure Resource Manager.
  • Download an evaluation build of SQL Server SP1 from the internet or from a local file share.
  • Upload the certificate and all other artifacts to a storage account on your Azure Stack.
  • Publish gallery package so that you can deploy SQL database through the gallery.
  • Deploy a VM using the default Windows Server 2012 R2 image that comes with Azure Stack.
  • Register a local DNS record that maps to your resource provider VM.
  • Register your resource provider with the local Azure Resource Manager.
  • Connect the resource provider to the SQL server instance on the RP VM

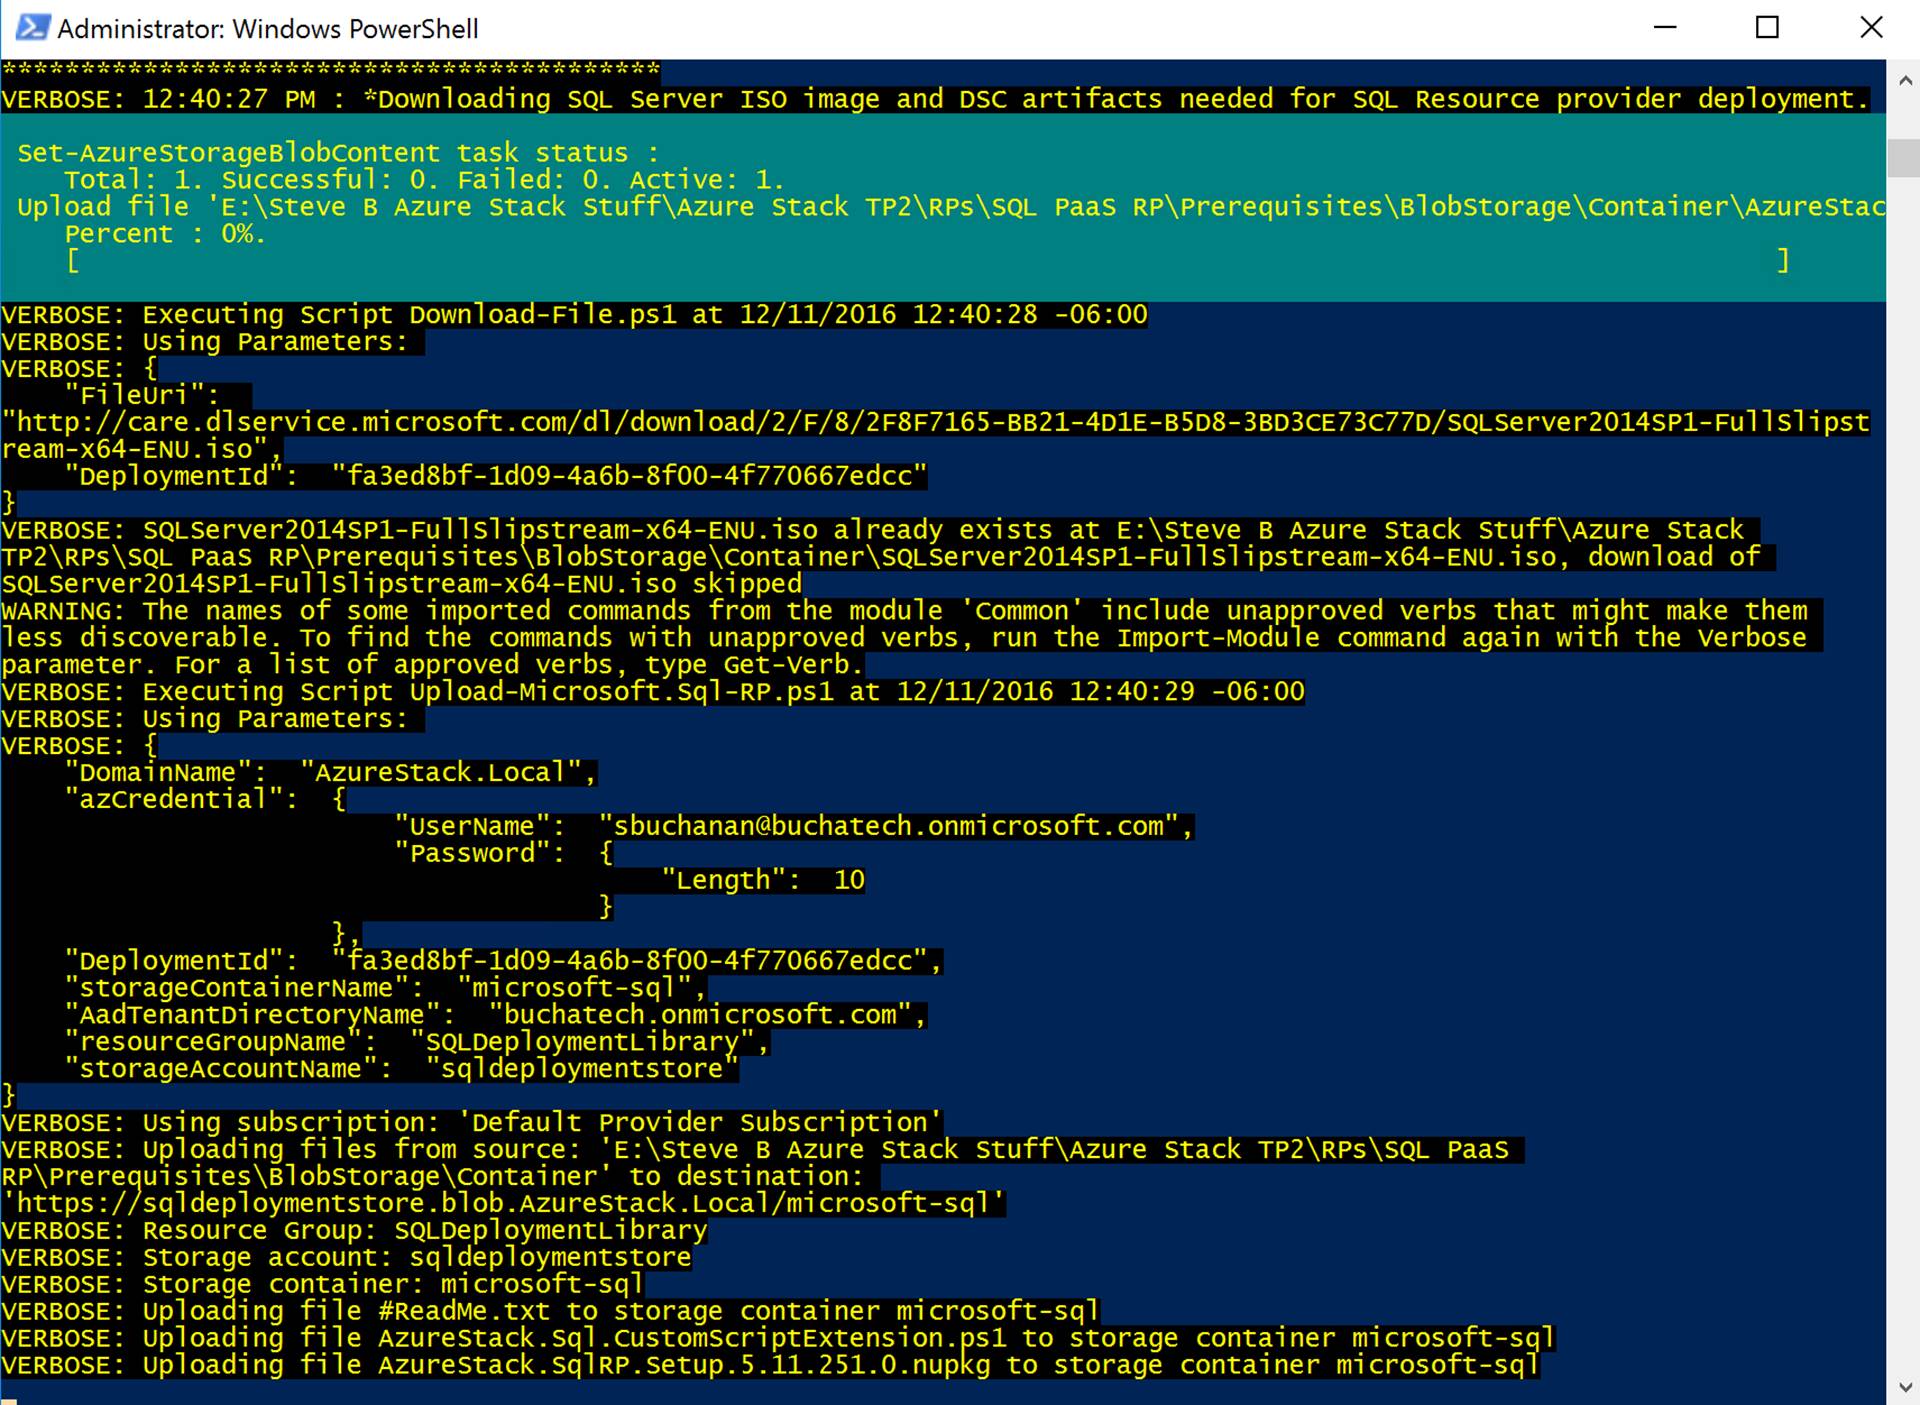
As the script runs you will see it run through each of the steps with detail and status. Be patient. I have had this take anywhere from 30 minutes to 45 minutes. Good time to go take a break.

mastp2-sql-rp-7

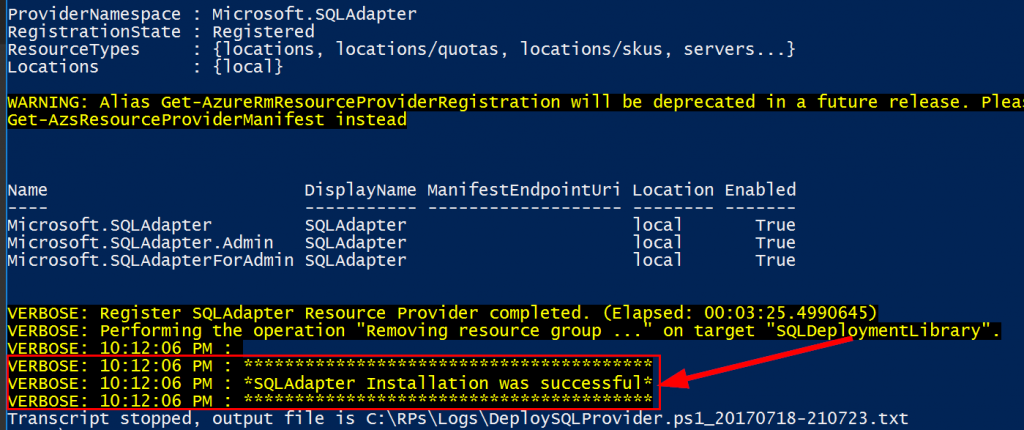
Once the script is done it will show that the installation is successful as shown in the following screenshot.

mastp2-sql-rp-8

NOTE: You could run the deployment script with the required parameters to avoid the prompts. For example:
DeploySQLProvider.ps1 -AadTenantDirectoryName “YOURDOMAIN.onmicrosoft.com” -AzCredential “user@YOURDOMAIN.onmicrosoft.com” -LocalCredential “username”

If for some reason the RP deployment fails you will need to view the logs to troubleshoot. Logging will be found in: LOCATIONOFYOURDOWNLOADEDRP\SQL PaaS RP\Logs in the following format DeploySQLProvider.ps1_20161205-171516.txt as shown in the following screenshot.

mastp2-sql-rp-9

– RP CONFIGURATION –

Read more

Resource Group Clean-up in Azure Stack

If you are like me, you end up creating a ton of resource groups in Azure Stack when testing things out. I needed a way to delete them without having to click one each one via the portal. The best option of course is to leverage PowerShell. I threw together some PowerShell to handle this. I came up with two options #1 can be used to delete a bunch of RG’s that have a common name. For example, I had a bunch of VM00* resource groups. I use the script to go loop through and delete all resource groups with VMO in the name. Option #2 pop’s up a GUI window so I could select the RG’s I wanted to delete. It put them in an array and then looped through to delete them in one shot.

This is great because I can kick this off and go do something else. I will share both below in this blog post along with some screenshots. I won’t have a download for the PowerShell syntax so just copy from this post if you want to use it. Be sure to use AzureStack.Connect.psm1 for connecting to your Azure Stack environment before running any of the following code.

Code:
#1

#Create Variable of RG’s with common name
$Resourcegroups = Get-AzureRmResourceGroup | where {$_.ResourceGroupName -like (‘*VM0*’)}

#Create array of RG’s
$RGLIST = $Resourcegroups.ResourceGroupName

#Loop to remove each resource group in the array
ForEach(
$rg in $RGLIST
)
{
Get-AzureRmResourceGroup -Name $rg -ErrorAction SilentlyContinue | Remove-AzureRmResourceGroup -Force -Verbose
}

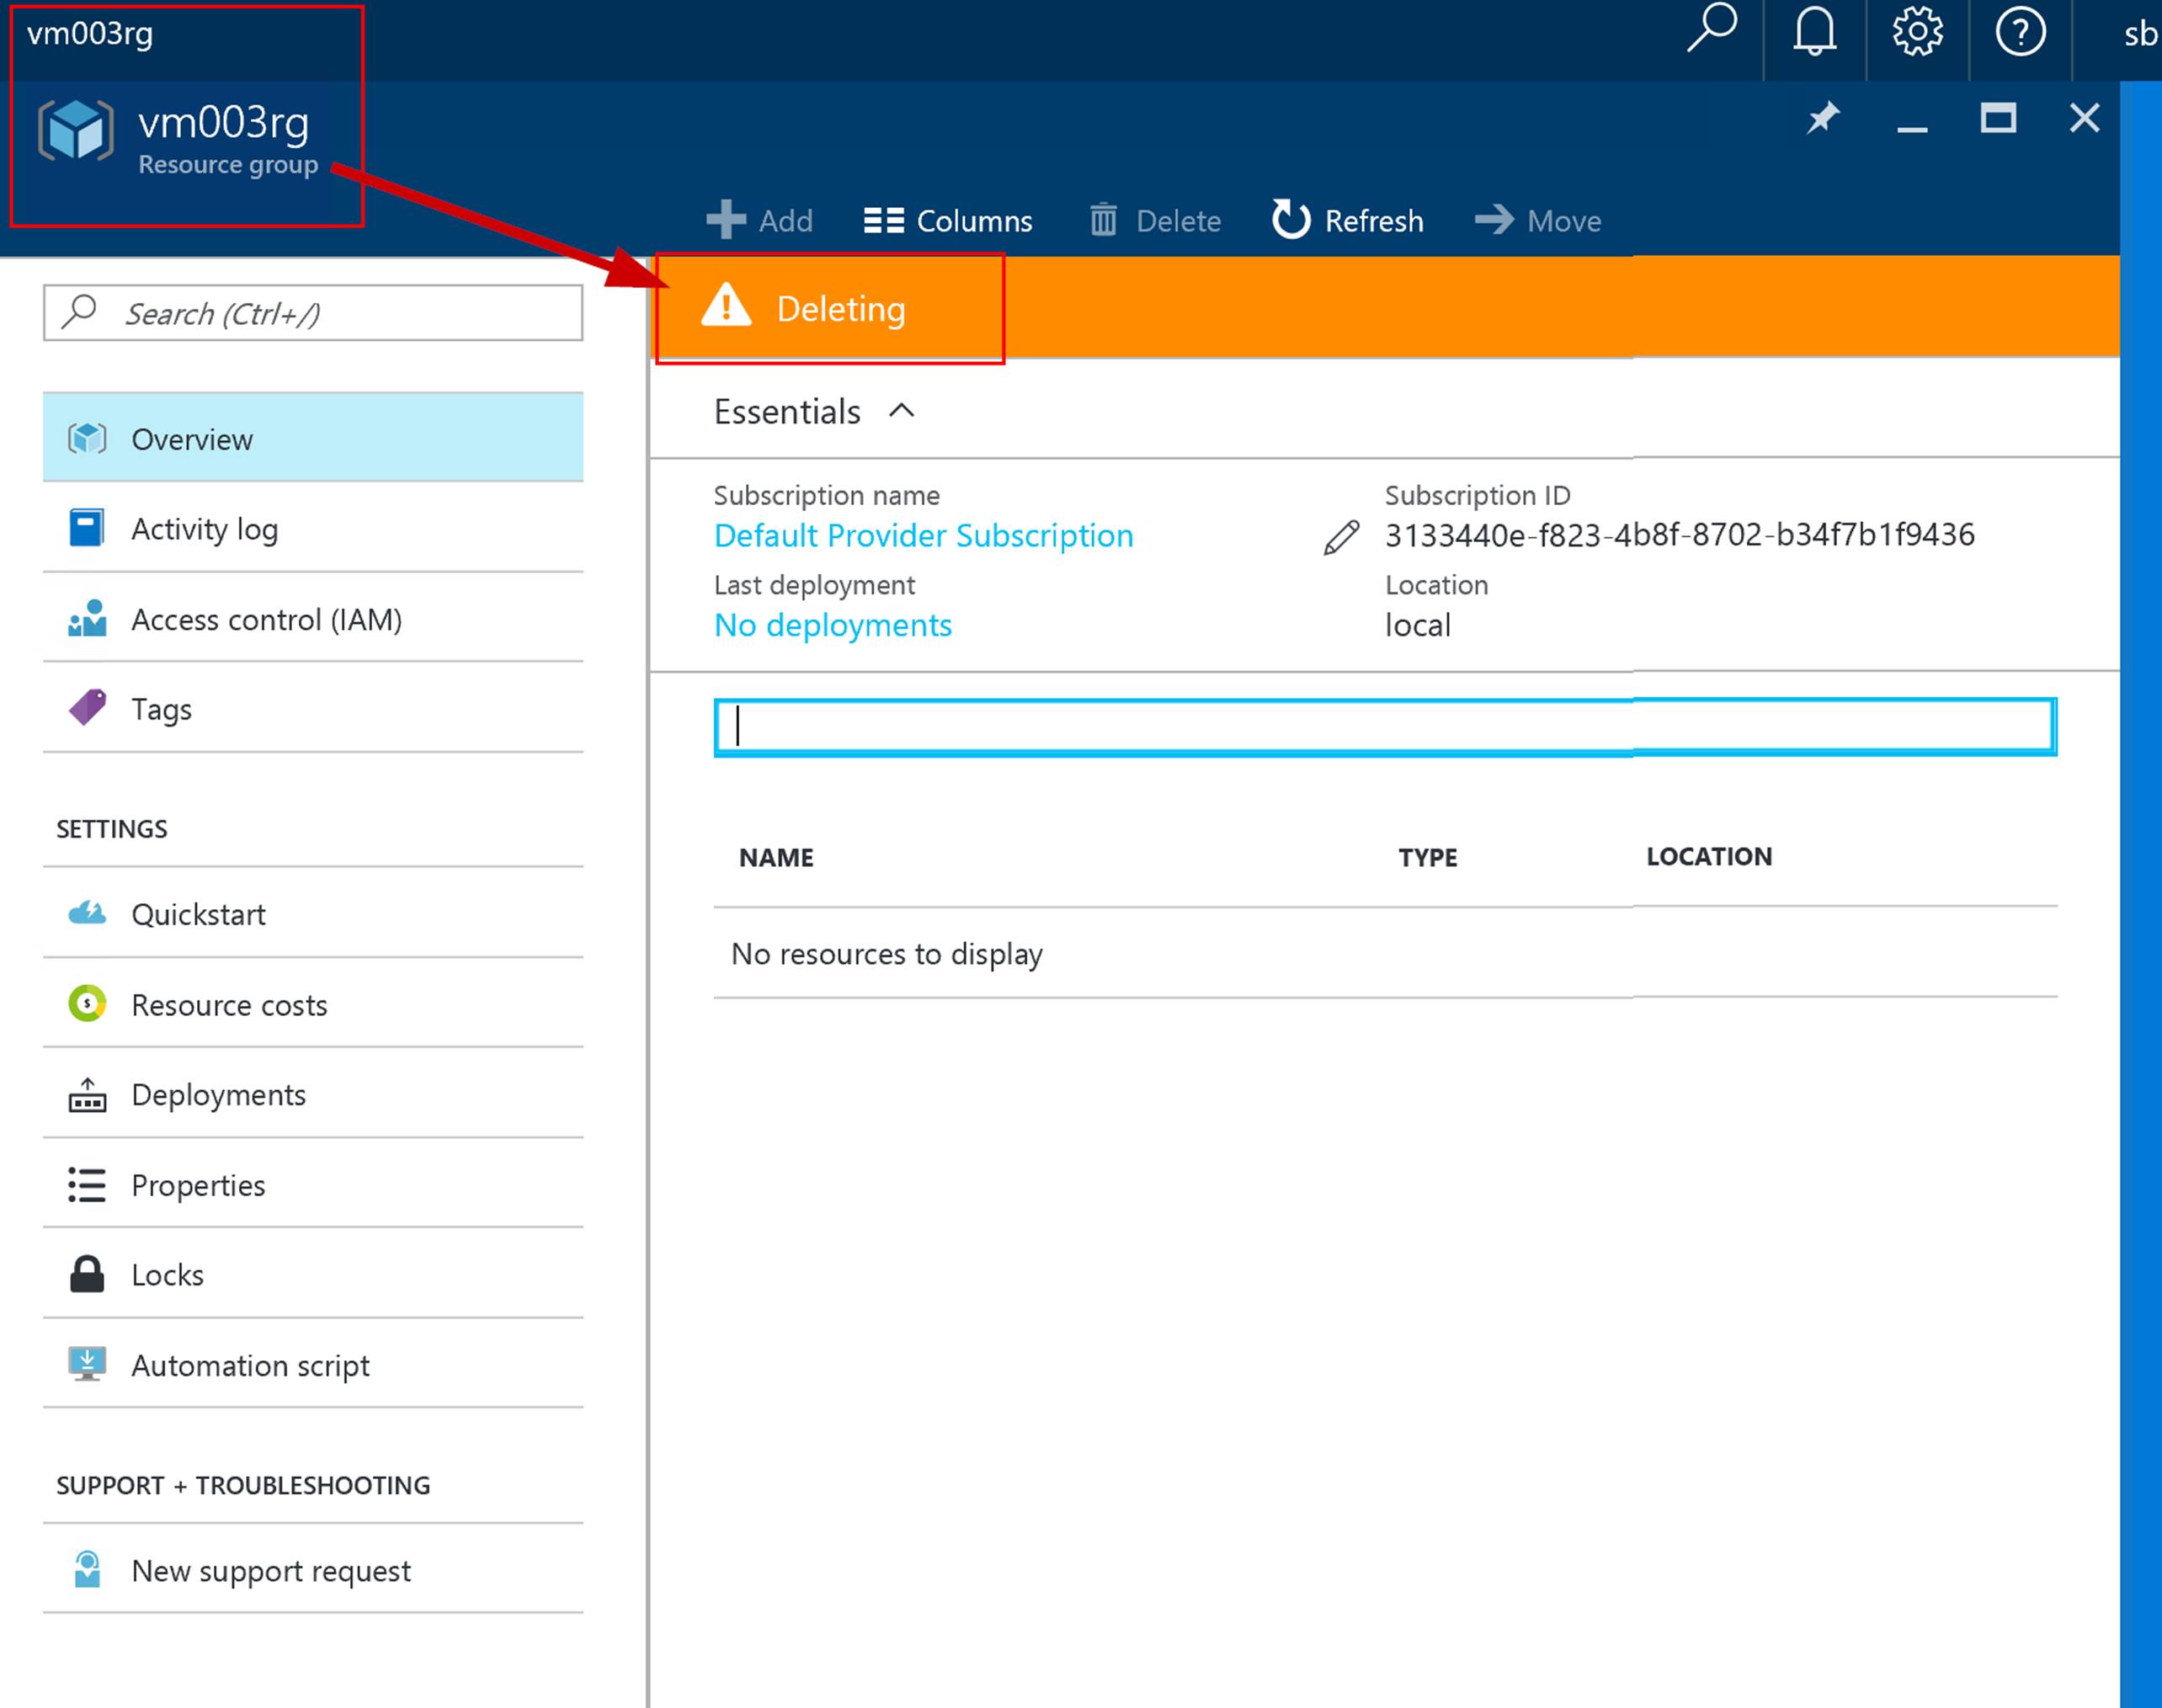
This image shows the array of RG’s that will be looped through. I highlighted vm003rg in the array and in the PowerShell status message.

rgcleanup-1

The following screenshot shows VM003RG being deleted in the Azure Stack portal.

rgcleanup-2

#2

#Create Variable of RG’s from GUI selection
$selectedrgs = (Get-AzureRmResourceGroup | Out-GridView ` -Title “Select ResouceGroups you want to remove.”` -PassThru).ResourceGroupName

#Loop to remove each resource group in the array
ForEach(
$rg in $selectedrgs
)
{
Get-AzureRmResourceGroup -Name $rg -ErrorAction SilentlyContinue | Remove-AzureRmResourceGroup -Force -Verbose
}

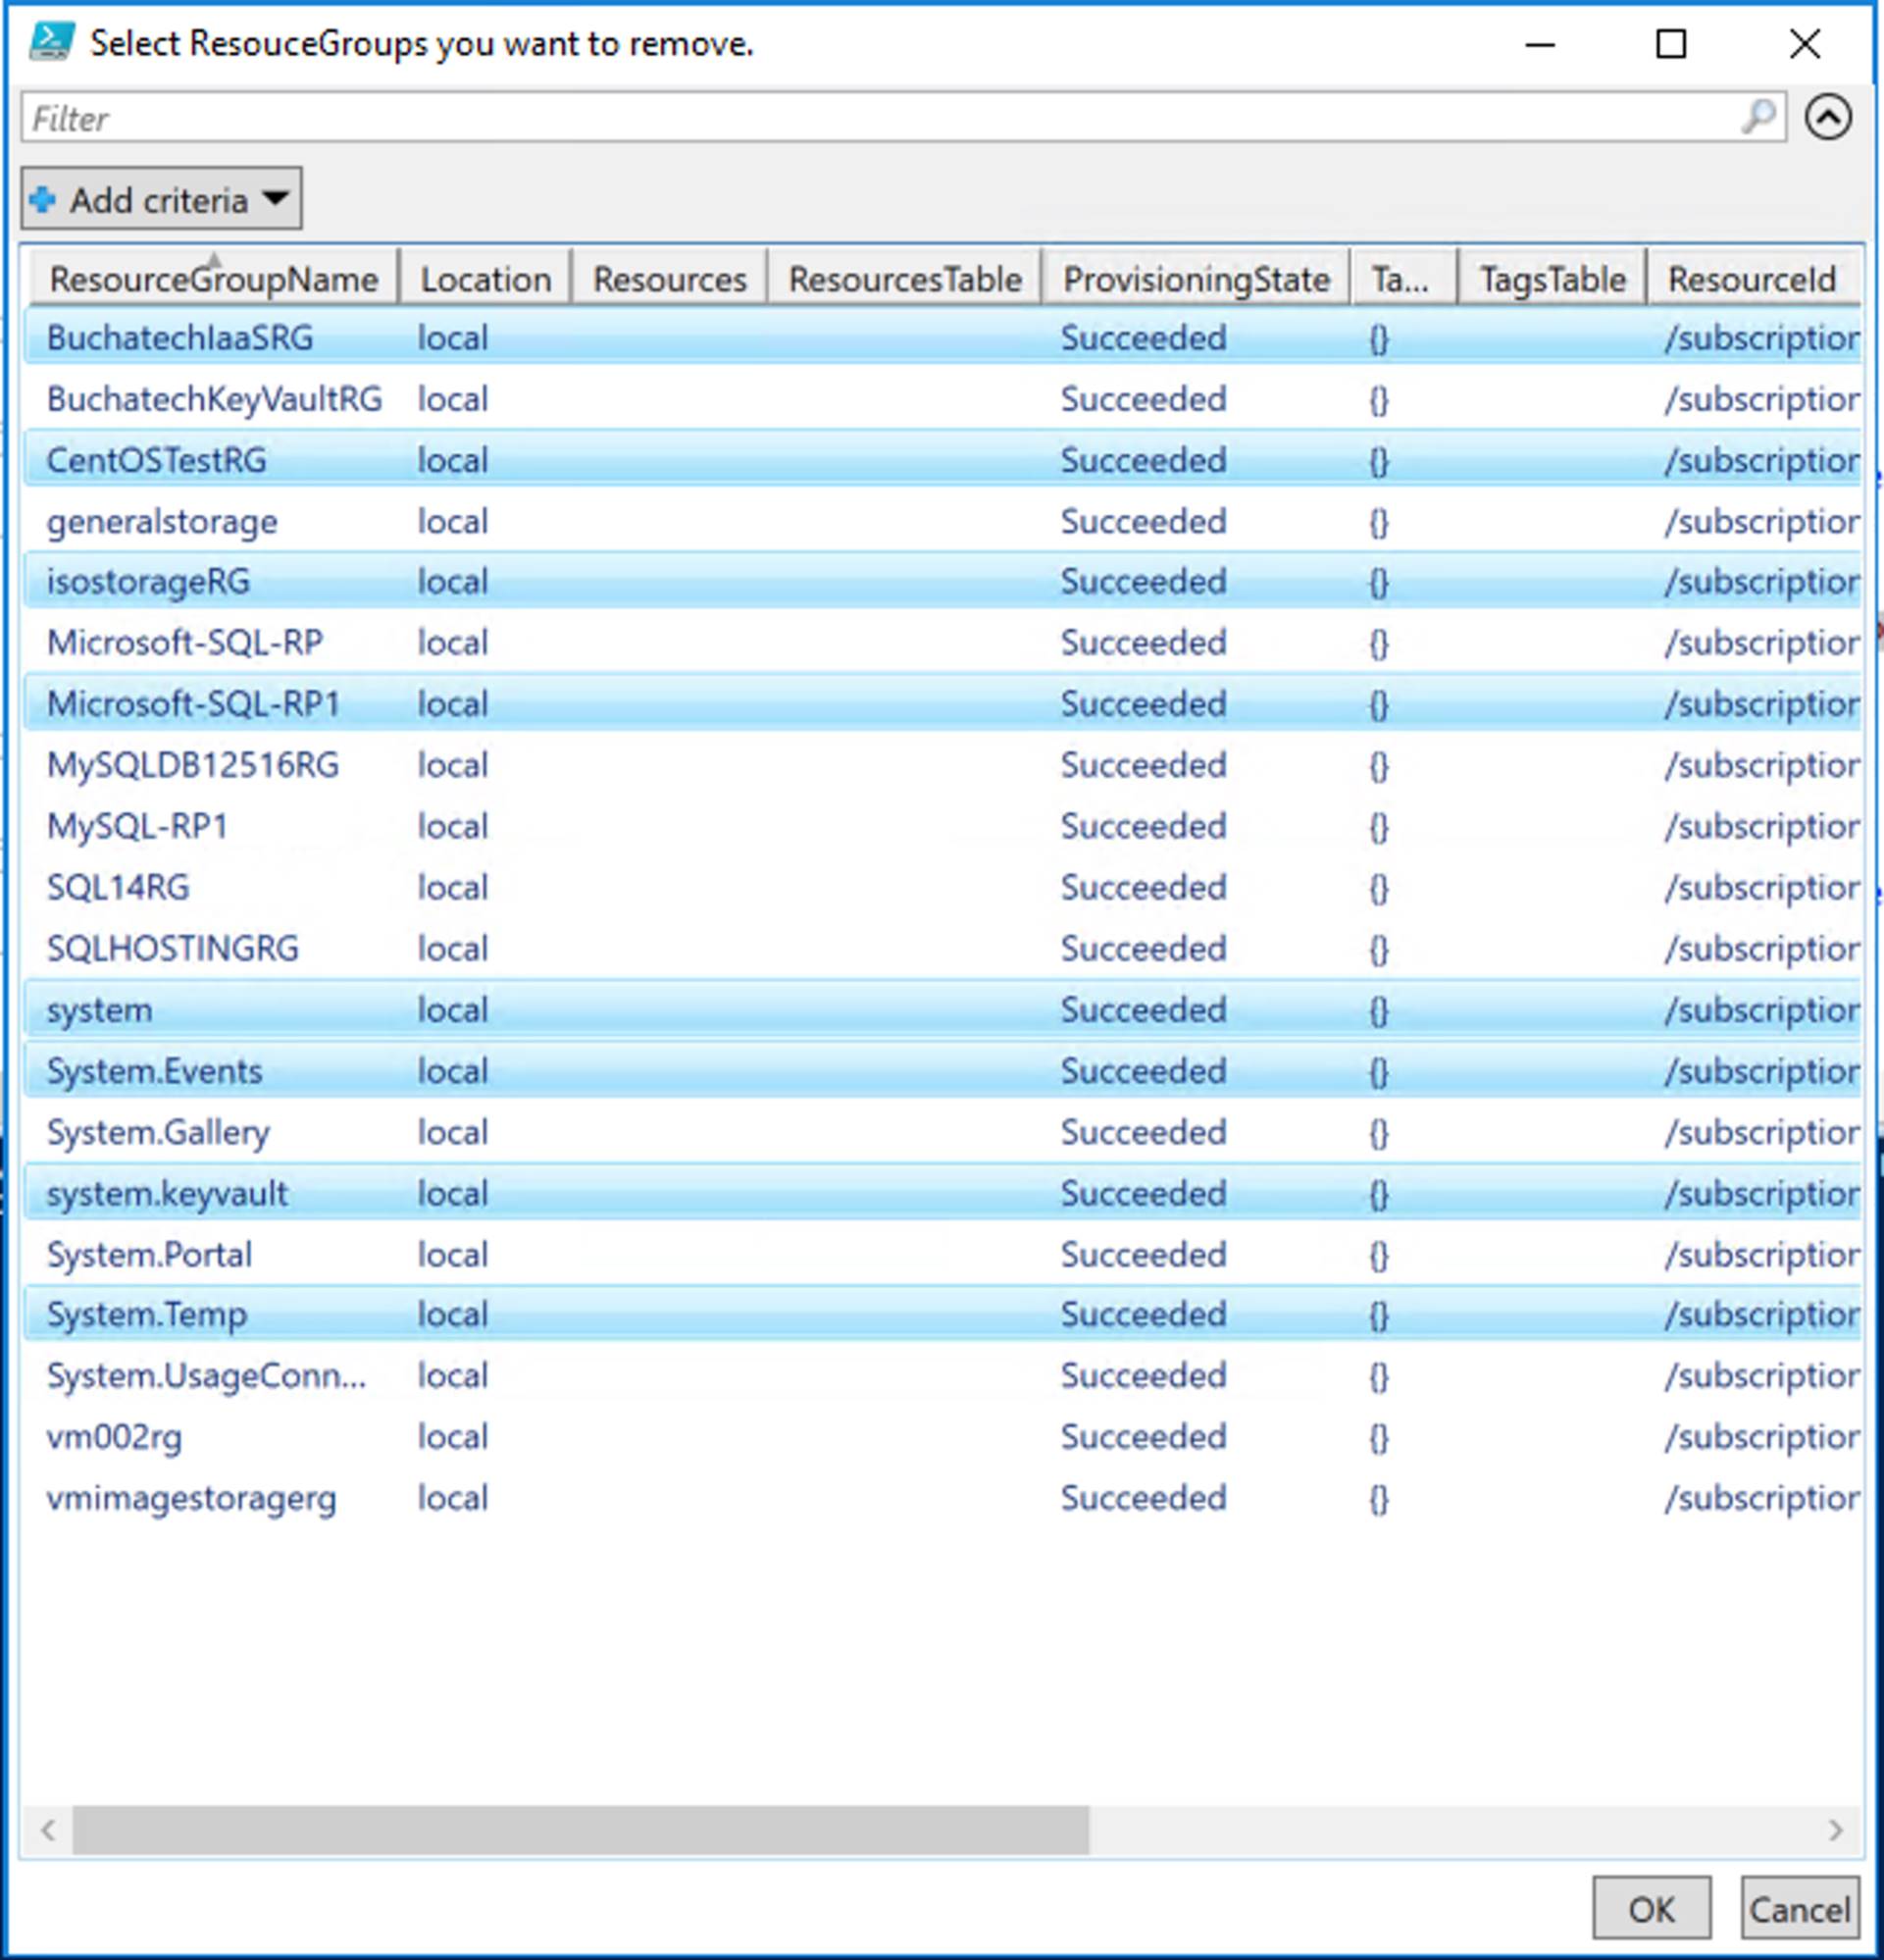
After running the Create Variable of RG’s from GUI selection part of the code a window as shown in the following screenshot will pop up. Select the RG’s you want to remove, click Ok and they will be placed into an array.

rgcleanup-3

Below if the output of the array. Run the Loop to remove each resource group in the array part of the code and each of the RG’s will be removed.

rgcleanup-4

I have also used this when a resource group would not delete from the portal. On some stubborn resource groups I have had to run this a couple of times. This is a short post. I hope this helps someone out!

Read more

Azure Stack Deployment…No KVM…No Problem

When deploying Azure Stack (TP2) you may not have a KVM, a physical monitor, or maybe you just don’t want to use either with the host. Well there is a solution for this. You can utilize a Windows setup answer file for an unattended installation. What this will do is automate the Windows Setup for you. For Azure Stack you basically just need to input the administrator password. 🙂

Microsoft has put together an answer file and a PowerShell script that enables you to inject an answer file into CloudBuilder.vhdx before deploying Azure Stack. What this will do is enter info on the Windows setup screen for you so that you don’t have to have a KVM or physical monitor attached to the host.  You can just wait for the host to reboot and then RDP in. This unattended answer file and script is a part of the AzureStack-Tools. The AzureStack-Tools have some great resources in the repository and I will be blogging about more of them in the future.

There are basically 2 steps to inject this answer file into your Azure Stack VHDX. These are:

Step 1:

Go and download the Deployment tools files manually onto your Azure Stack host from here:

https://github.com/Azure/AzureStack-Tools/tree/master/Deployment

Or run this PowerShell from your Azure Stack host:

# Variables
$Uri = ‘https://raw.githubusercontent.com/Azure/AzureStack-Tools/master/Deployment/
$LocalPath = ‘YOURLOCATION:\AzureStack_TP2_SupportFiles’

# Create folder
New-Item $LocalPath -Type directory

# Download files
‘BootMenuNoKVM.ps1’, ‘PrepareBootFromVHD.ps1’, ‘Unattend.xml’, ‘unattend_NoKVM.xml’ | foreach { Invoke-WebRequest ($uri + $_) -OutFile ($LocalPath + ‘\’ + $_) }

Be sure to set $LocalPath to your location.

Step 2:

NOTE: You need to have the CloudBuilder.vhdx downloaded to your Azure Stack host and it cannot be mounted.

From within PowerShell navigate to the directory you downloaded the deployment tools to and run this

.\PrepareBootFromVHD.ps1 -CloudBuilderDiskPath YOURDRIVE:\CloudBuilder.vhdx -ApplyUnattend

Be sure to point the script to the location containing your CloudBuilder.vhdx before running this.

You will be prompted to enter the password you want to use for the local administrator account.

applyasunattended1

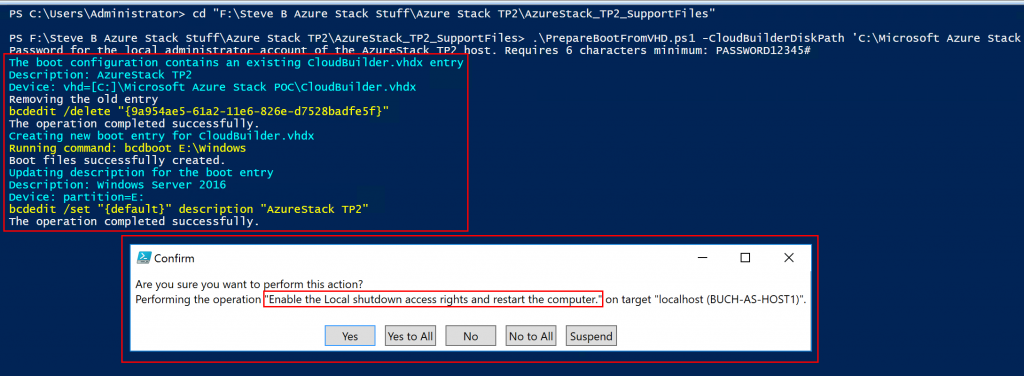
You will see the bcdedit command execution and output as shown in the following screenshot. This saves you the step of modifying the bcdedit. The CloudBuilder.vhdx will also be mounted. You will then be asked to confirm a reboot also as shown in the following screenshot.

applyasunattended2

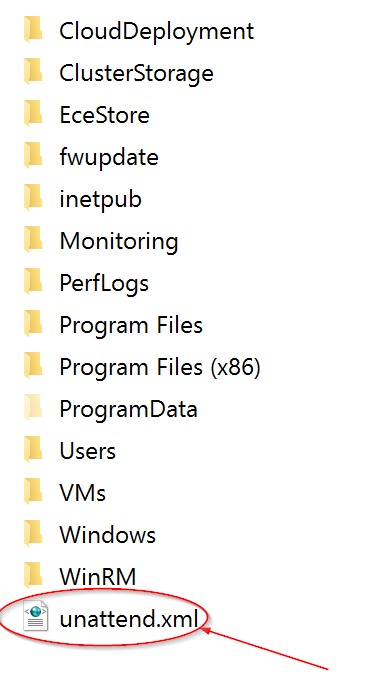
Before you reboot if you are interested you can go see the unattend.xml file that was created. This is the answer file that will be used. This is shown in the following screenshot.

applyasunattended3

The host will be rebooted. When it comes back online you will be able to RDP in. You will then be able to kick off the Azure Stack deployment.

Happy Azure Stacking!!!

Read more

Azure Stack TP2 deployment failure 60.120.123

I recently deployed the new Azure Stack TP2 release. This install is way better. I did run into one small issue during the deployment. Below is what I ran into and the solution.

Failure in Deployment log:

2016-11-18 02:18:36 Error    1> Action: Invocation of step 60.120 failed. Stopping invocation of action plan.

Finding the root of the failure:

When walking back the step index in the summary xml log the error landed on step 60.120.123.

-<Task EndTimeUtc="2016-11-18T08:15:23.1042963Z" Status="Error" StartTimeUtc="2016-11-18T08:10:40.5896841Z" ActionType="Deployment-Phase4-ConfigureWAS" RolePath="Cloud">

-<Action EndTimeUtc=”2016-11-18T08:15:23.1042963Z” Status=”Error” StartTimeUtc=”2016-11-18T08:10:40.5896841Z” Type=”Deployment-Phase4-ConfigureWAS” Scope=”Internal”>

-<Steps>

-<Step EndTimeUtc=”2016-11-18T08:15:23.1042963Z” Status=”Error” StartTimeUtc=”2016-11-18T08:10:40.5896841Z” Name=”(Katal) Configure WAS VMs” Description=”Configures Windows Azure Stack on the guest VMs.Index=”123“>

-<Task EndTimeUtc=”2016-11-18T08:15:23.1042963Z” Status=”Error” StartTimeUtc=”2016-11-18T08:10:40.5896841Z” RolePath=”Cloud\Fabric\WAS” InterfaceType=”Configure”>

-<Exception>

<Message>Function ‘ConfigureWAS’ in module ‘Roles\WAS\WAS.psd1’ raised an exception: Time out has expired and the operation has not been completed. at Stop-WebServices, D:\WAP\Setup\Scripts\Configure-AzureStackMasd.ps1: line 699 at Restart-WebServices, D:\WAP\Setup\Scripts\Configure-AzureStackMasd.ps1: line 712 at Invoke-Main, D:\WAP\Setup\Scripts\Configure-AzureStackMasd.ps1: line 649 at <ScriptBlock>, D:\WAP\Setup\Scripts\Configure-AzureStackMasd.ps1: line 738 at <ScriptBlock>, <No file>: line 21</Message>

<StackTrace> at CloudEngine.Actions.PowerShellHost.Invoke(InterfaceParameters parameters, Object legacyConfigurationObject, CancellationToken token) at CloudEngine.Actions.InterfaceTask.Invoke(Configuration roleConfiguration, Object legacyConfigurationObject, MultiLevelIndexRange indexRange, CancellationToken token, Dictionary`2 runtimeParameter)</StackTrace>

<Raw>CloudEngine.Actions.InterfaceInvocationFailedException: Function ‘ConfigureWAS’ in module ‘Roles\WAS\WAS.psd1’ raised an exception: Time out has expired and the operation has not been completed. at Stop-WebServices, D:\WAP\Setup\Scripts\Configure-AzureStackMasd.ps1: line 699 at Restart-WebServices, D:\WAP\Setup\Scripts\Configure-AzureStackMasd.ps1: line 712 at Invoke-Main, D:\WAP\Setup\Scripts\Configure-AzureStackMasd.ps1: line 649 at <ScriptBlock>, D:\WAP\Setup\Scripts\Configure-AzureStackMasd.ps1: line 738 at <ScriptBlock>, <No file>: line 21 at CloudEngine.Actions.PowerShellHost.Invoke(InterfaceParameters parameters, Object legacyConfigurationObject, CancellationToken token) at CloudEngine.Actions.InterfaceTask.Invoke(Configuration roleConfiguration, Object legacyConfigurationObject, MultiLevelIndexRange indexRange, CancellationToken token, Dictionary`2 runtimeParameter)</Raw>

</Exception>

</Task>

</Step>
Solution:

The first option is to re-run the deployment from the specific failed step. Do this by using the following syntax:

Import-Module C:\CloudDeployment\CloudDeployment.psd1 -Force

Import-Module C:\CloudDeployment\ECEngine\EnterpriseCloudEngine.psd1 -Force

Invoke-EceAction -RolePath Cloud -ActionType Deployment -Start 60.120.123 -Verbose

The second option for this specific issue is to re-run the deployment with network parameters included. Use the following Syntax:

.\InstallAzureStackPOC.ps1 -AdminPassword $adminpass -AADAdminCredential $aadcred -AADDirectoryTenantName X.onmicrosoft.com -NatIPv4Subnet 192.168.5.0/24 -NatIPv4Address 192.168.5.3 -NatIPv4DefaultGateway 192.168.5.1 -EnvironmentDNS 192.168.5.1 -Verbose

Read more

Azure Stack Round Table Video

Microsoft MVP Lee Berg @LeeAlanBerg just finished the Azure Stack Roundtable video from MMS. This video has me and two other Microsoft MVP’s  Damian Flynn @damian_flynn and Mikael Nystrom @mikael_nystrom having a great discussion about many Azure Stack topics. In the video questions such as “does VMM still have a purpose in an Azure Stack?” world, “how is Azure Stack compared to Open Stack?”, and “how can an IT Pro get management to invest in DevOps and Azure Stack?”.

Check out the video here:

https://youtu.be/98fA4In9TSc

ASRoundtablepic

Here are links to Azure Stack sessions from MMS:

http://mms2016.sched.org/type/azure+stack

You can download all the slide decks.

Read more