With Azure Automation there are cases where you will need to have a form that end users can go fill out to kick off an automation runbook. Back with System Center Orchestrator we could use Service Manager’s self-service portal as the front end for our automations. This was a solution that worked well. With Azure Automation we do not have that luxury at least not yet we don’t. There is a community based Azure automation webhook Service Manager (SCSM) connector in the works. One of my colleagues Rob Plank is a part of this project and says it should ready to release very soon. This connector will allow you to use the SCSM portal as the frontend of Azure Automation via webhooks, know when a webhook expires, and see a runbooks job status. Here are some teaser screenshots of the connector.
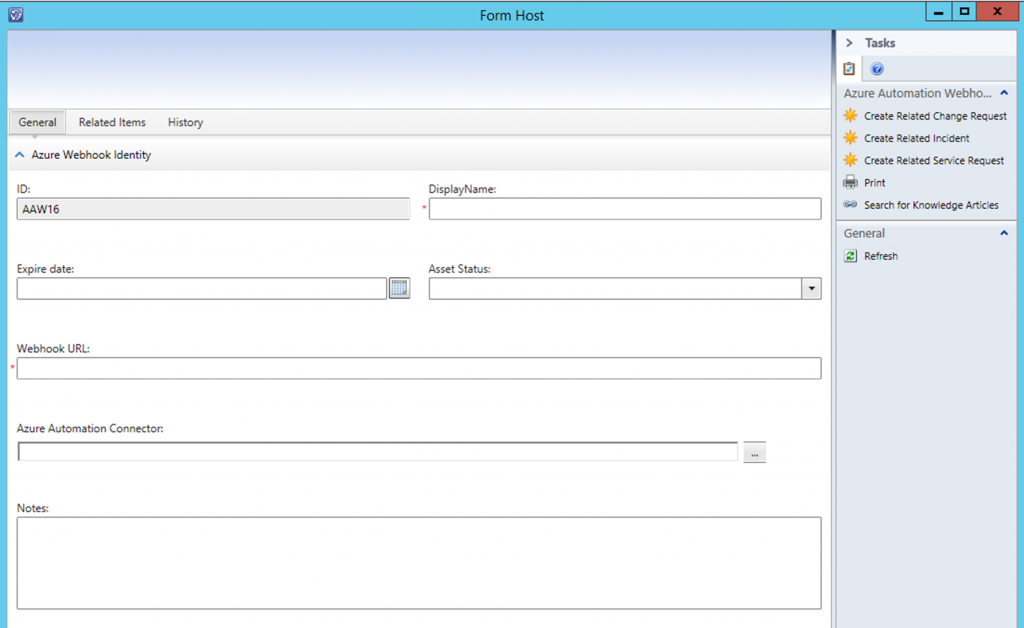
There also are a few posts out there on how to leverage other platforms as the frontend for Azure Automation these are “how to use SharePoint as the frontend of Azure Automation” by Anders Bengtsson and “how to use an ASP website as the frontend to Azure Automation” by a friend of mine and fellow Microsoft MVP Florent Appointaire. Well in this post I am going to show you how to use the popular platform WordPress as the frontend for Azure Automation. The cool thing here is that this is another instance of showcasing the ability to utilize Microsoft and Open Source technologies together. 🙂
Here are the steps at a high level
- Have an Azure Automation account on Azure
- Setup your runbook/s in Azure Automation
- Setup a webhook on your runbook/s in Azure Automation
- Have a WordPress instance
- Install Ninja Forms plugin in the WordPress instance
- Install the Webhooks add on for Ninja Forms
- Setup your runbook frontend form/s
- Configure the runbook frontend form/s to connect to the Azure Automation webhook
Let’s get started!
Step 1: Have an Azure Automation account on Azure
To get started with Azure Automation go here: https://azure.microsoft.com/en-us/documentation/articles/automation-intro. I am not going to cover this within this blog post.
Step 2: Setup your runbook/s in Azure Automation
For this testing this scenario and this post I grabbed a couple of Azure Automation runbooks built by the Microsoft AzureAutomationTeam and made available in the Azure Automation Runbook Gallery. These runbooks start and stop Azure virtual machines.
Runbook #1 Name:
Start-AzureV2VMs
Description:
This runbook connects to Azure and starts all VMs in an Azure subscription or resource group.
Runbook #2 Name:
Stop-AzureV2VMs
Description:
This runbook connects to Azure and stops all VMs in an Azure subscription or resource group.
Both runbooks have two parameters they need. These are:
param (
[Parameter(Mandatory=$false)]
[String] $AzureConnectionAssetName = “AzureRunAsConnection”,
[Parameter(Mandatory=$false)]
[String] $ResourceGroupName
We need to pay attention to these when setting up the webhooks and these often become your fields on your front end form.
Step 3: Setup a webhook on your runbook/s in Azure Automation
Here are the steps to setup a webhook for an Azure Automation Runbook.
First off make sure your runbook/s are in a published authoring status.

Within https://portal.azure.com Navigate to
YOURAZUREAUTOMATIONACCOUNT
Runbooks
YOURRUNBOOK (Start-AzureV2VMs)
Webhooks
From here click on the Add Webhook button.

The Add Webhook blade will fly out. Here you will want to click on Create new webhook to make the next blade flyout.
Here you need to give your webhook a name, set to enabled, set when it will expire and COPY THE URL TO A SAFE PLACE.
NOTE: You will not be able to access the webhook URL after this.
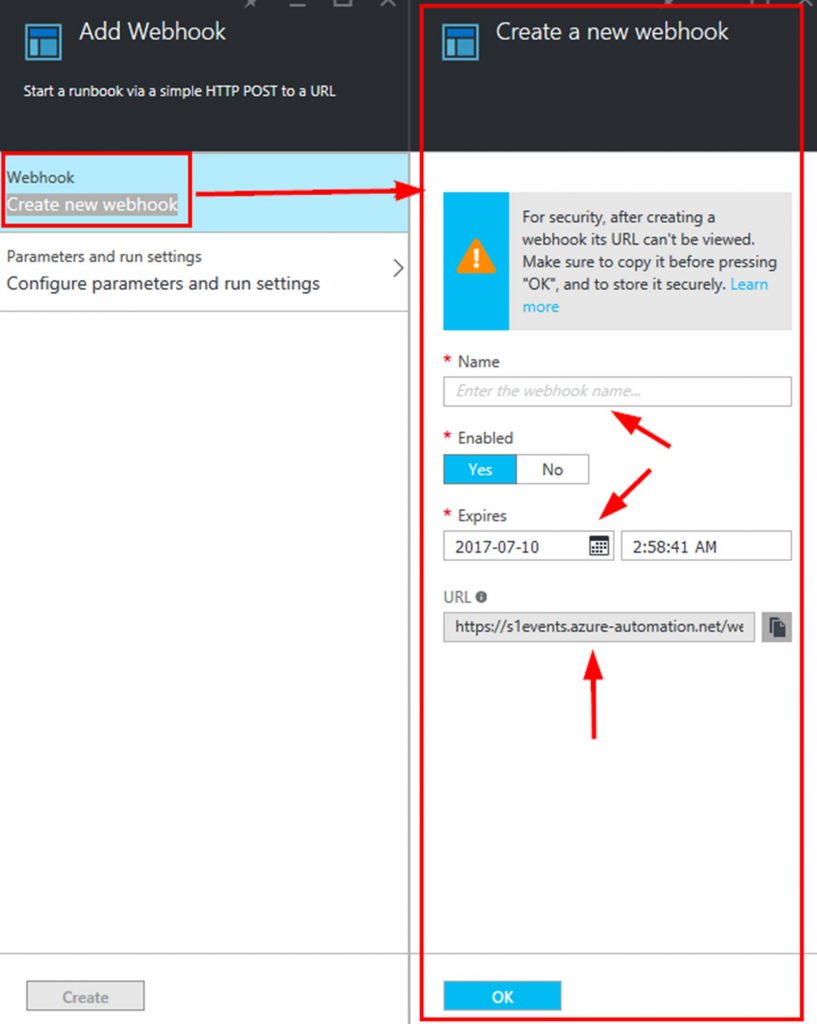
Click OK.
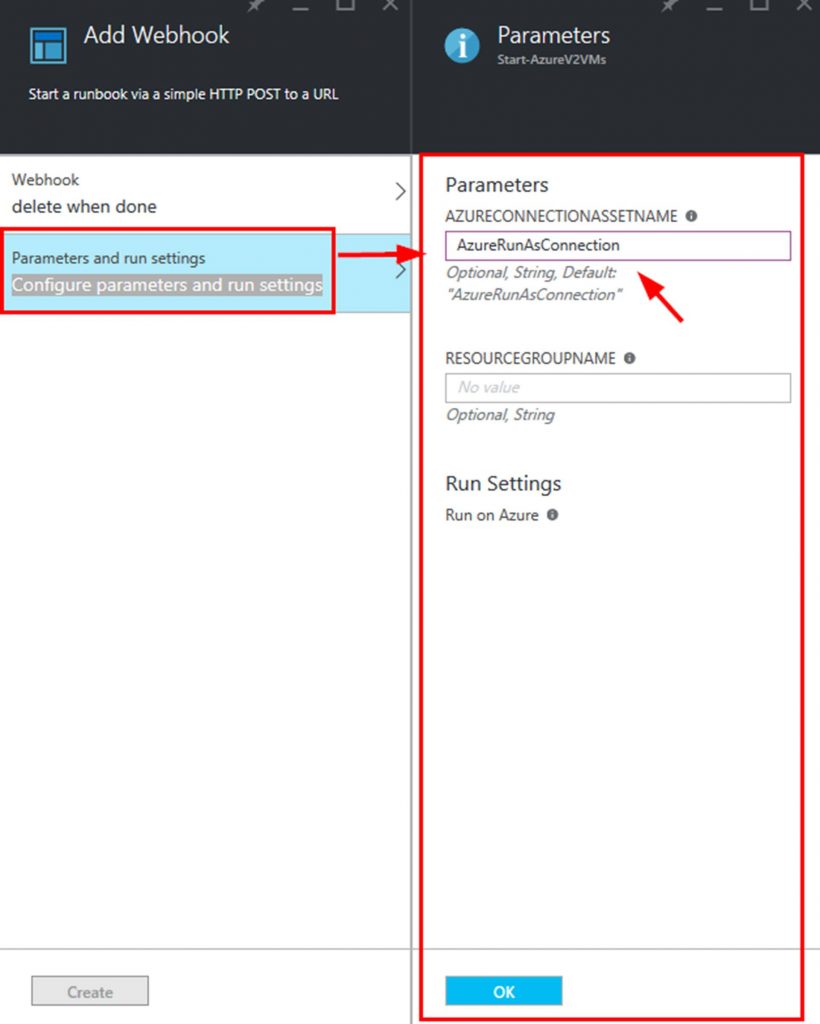
Next you need to click on Configure parameters and run settings. This is where you set the parameters from the runbook.
If your parameters are required you have to set them here. If they are optional you can leave them blank here and pass the data into the runbook from the frontend form via a $WebhookData object.
In my case I put AzureRunAsConnection directly in the webhook. I created a credentials asset in Azure Automation with the account containing the needed permissions to perform the actions from the runbook in my Azure account (Start/Stop VM’s).
I left the resourcegroupname blank as I will pass this in from the front end form. I left the Run Settings to run on Azure as I do not have a Hybrid Worker setup.
NOTE: A Hybrid Worker lets you run automation runbooks on premises in your data center.
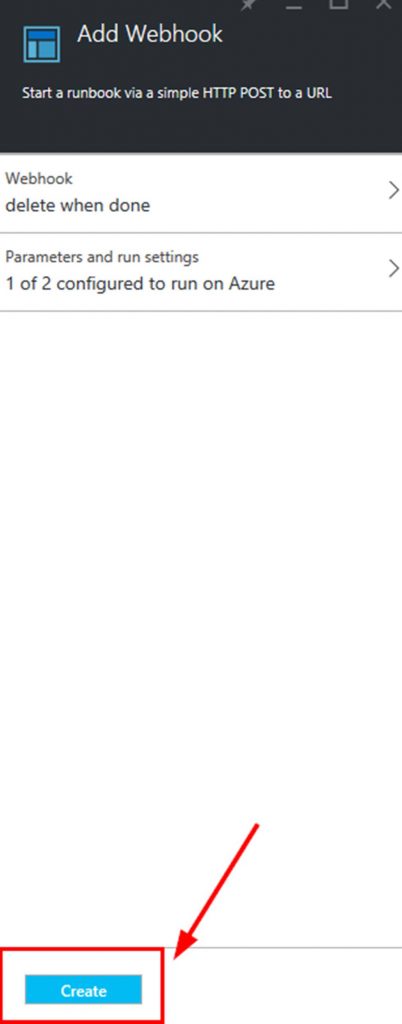
One you have the Webhook and parameters configured click on the Create button to actually create the webhook.
You will now see your new webhook in the webhooks blade.
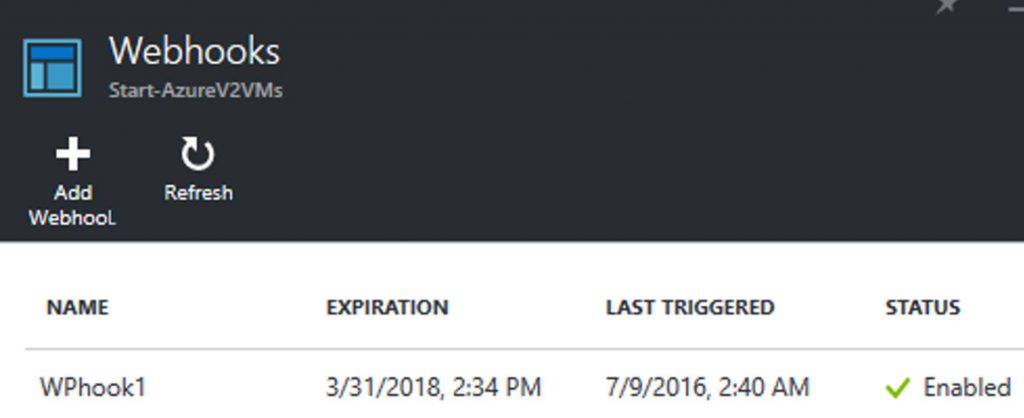
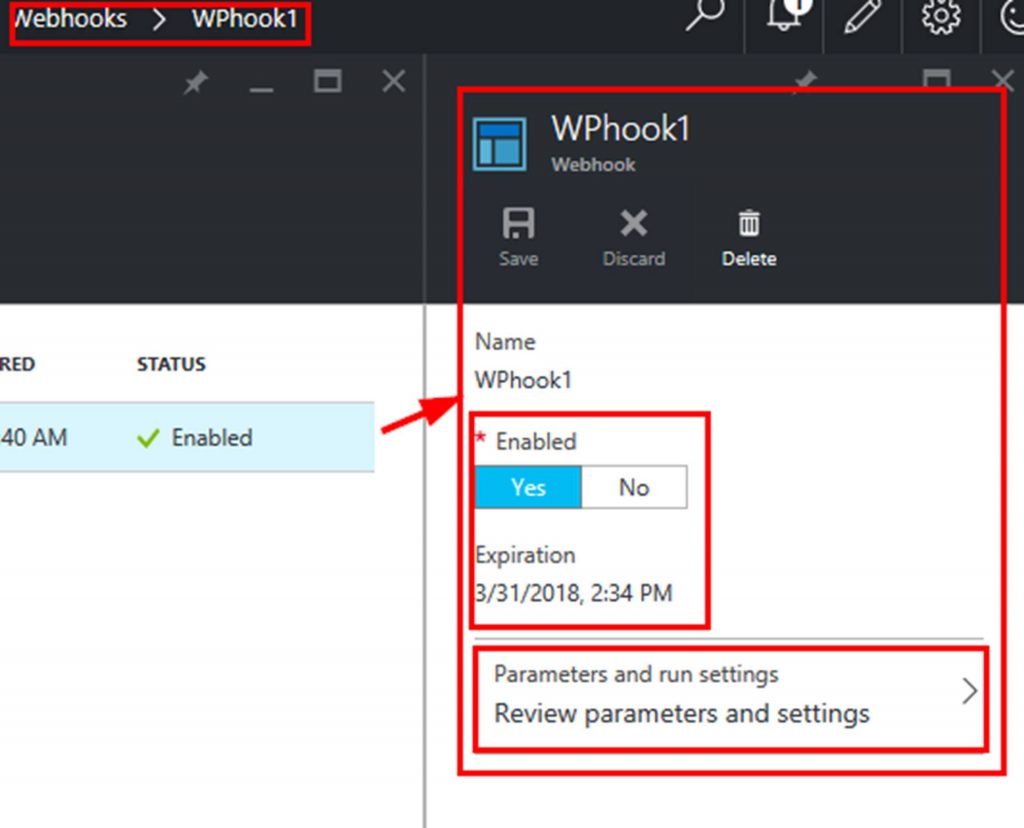
Note that if you click on a webhook you will not see the URL. You can enable or disable the webhook, see when it expires, and access the parameters. This is shown in the following screenshot.
Step 4: Have a WordPress instance
You can host WordPress on WordPress.org on a hosting account, internally or even on Azure. Here is a link to a tutorial on how to run WordPress on Azure. https://azure.microsoft.com/en-us/documentation/articles/app-service-web-create-web-app-from-marketplace. I am not going to cover how to setup a WordPress instance within this blog post.
Step 5: Install Ninja Forms plugin in the WordPress instance
Here are the steps to install Ninja Forms WordPress plugin.
From within the WordPress admin dashboard click on Plugins.
Click on Add New.

Search for Ninja Forms. Click on the Install button to add the plugin. Make sure you activate the plugin.
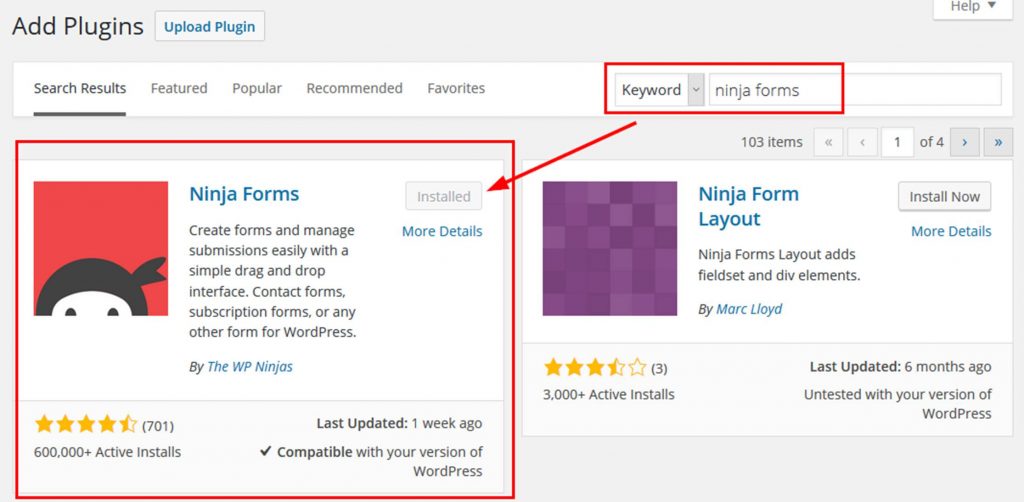
You also could manually download and upload the plugin or load it directly into the plugins directory. I have shown you the steps for the easiest way to install it.
The Ninja Forms plugin page can be found here:
https://wordpress.org/plugins/ninja-forms
Step 6: Install the Webhooks add on for Ninja Forms
The Webhooks for Ninja Forms add on can be found here:
https://ninjaforms.com/webhooks-for-ninja-forms
This add on has to be purchased. It is $39 by itself for 1 WordPress instance.
After you buy it you will get the files for download. Again from within the WordPress admin dashboard click on Plugins.
Click on Add New. This time click on the Upload Plugin button and browse to your downloaded Webhooks for Ninja Forms zip folder.
After it is uploaded be sure to activate it.
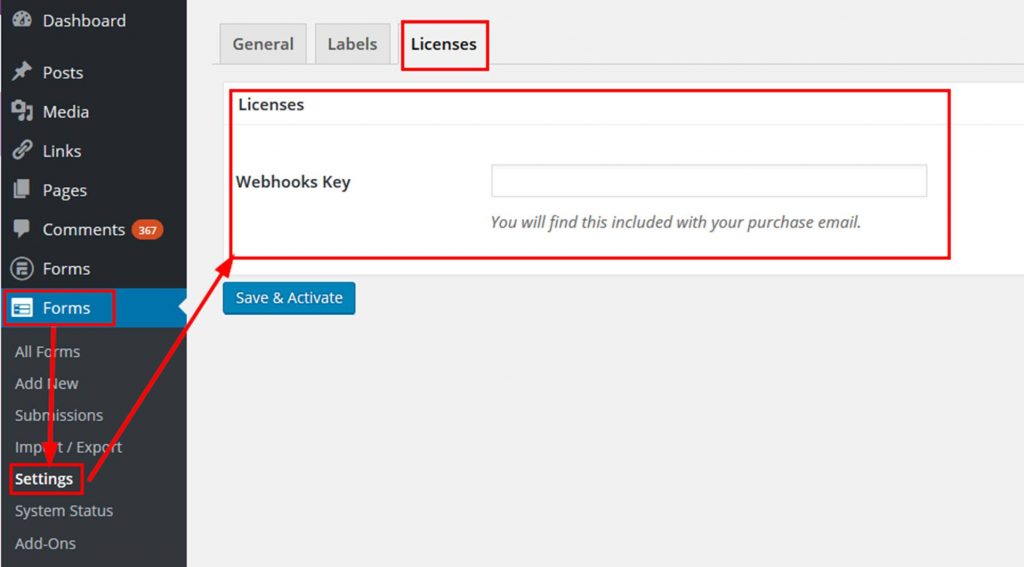
The final step is to install the license for the add on. To do this Click on Forms>Settings>Licenses and input the key that Ninja Forms sent in the Webhooks Key field. Click on Save & Activate.
Step 7: Setup your runbook frontend form/s
Next we need to build the actual form. To do this follow the list of steps.
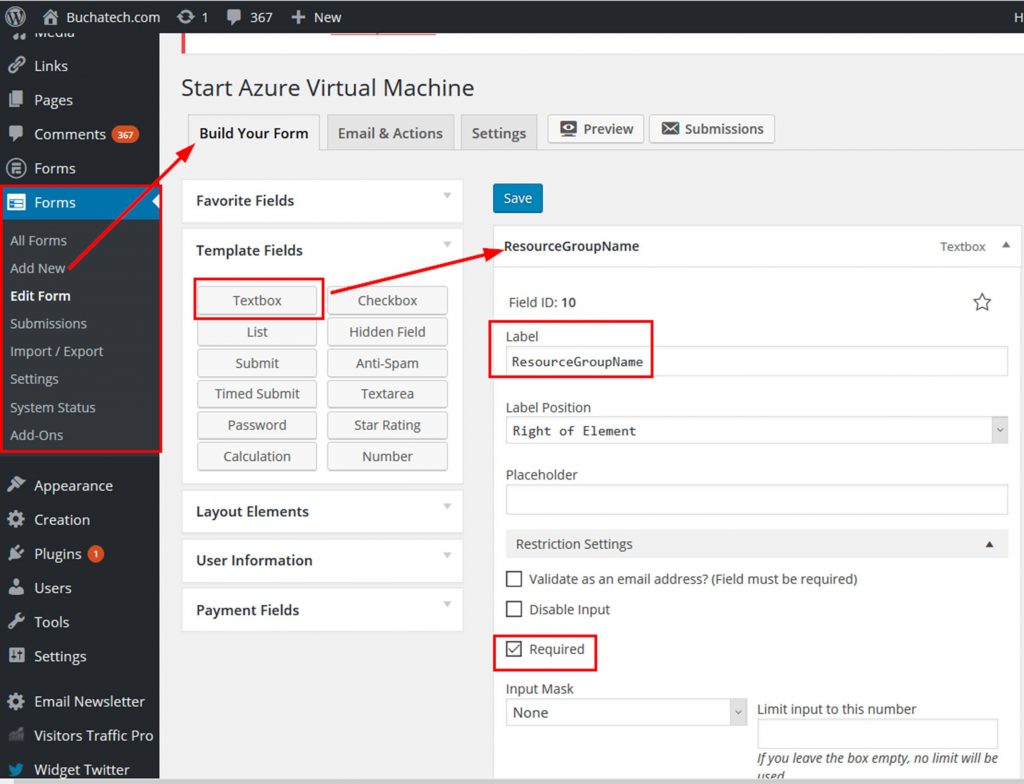
Click on Forms>Add New. Give your form a Title.
Add a Textbox and put in the label of ResourceGroupName.
I like to make it Required.
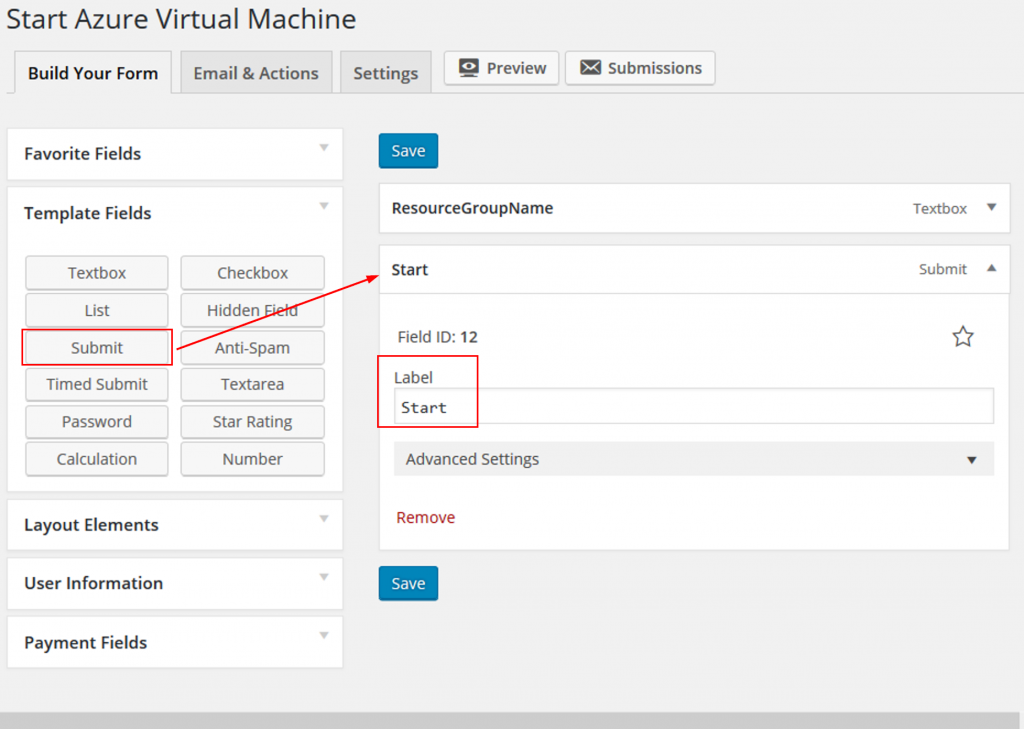
Add a Submit button to your form. I labeled it Start.
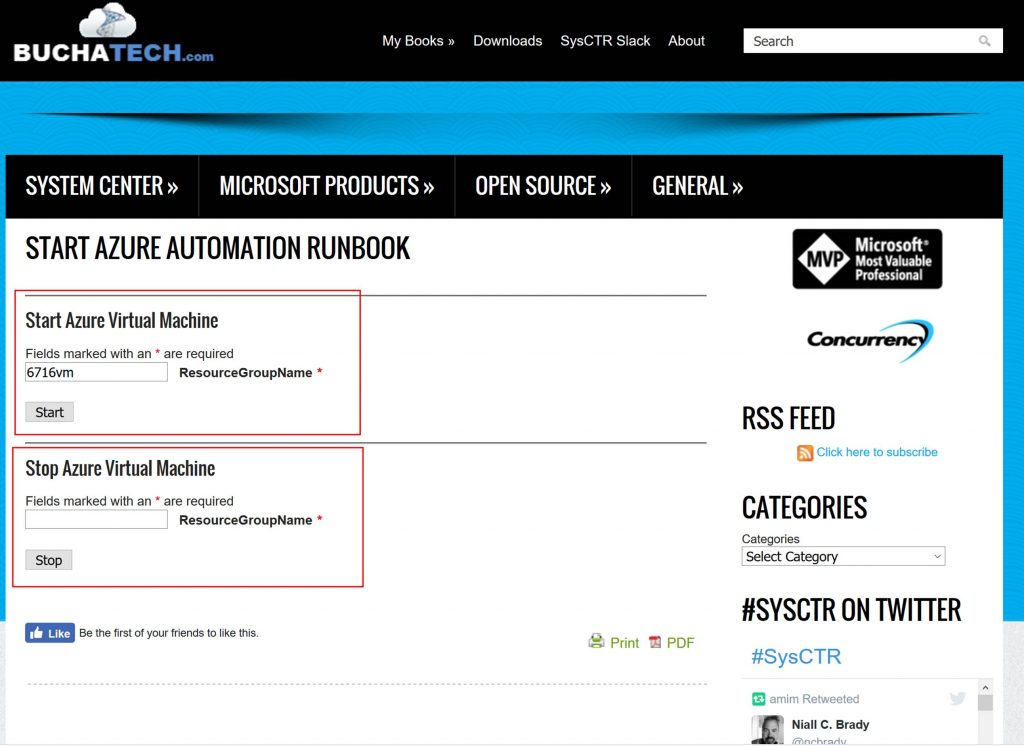
In the following screenshot is what the form looks like. Note that I have both forms loaded on the same page.
Step 8: Configure the runbook frontend form/s to connect to the Azure Automation webhook
Now is the last step. This is the step in which we configure the form to send data to the Auzre Automation webhook upon submission. This is doing it via POST method.
When editing the form click on the Email & Actions tab. Click on the Add New button.
Give this Action a name.
In the Type dropdown select Webhook.
Enter the Azure Automation webhook URL in the Remote Url field.
Select Post for the Remote Method.
For Args select enter the name of and select the field from your form of the parameters you need to send to the Azure Automation runbook.
You can see this all represented in the following screenshot.
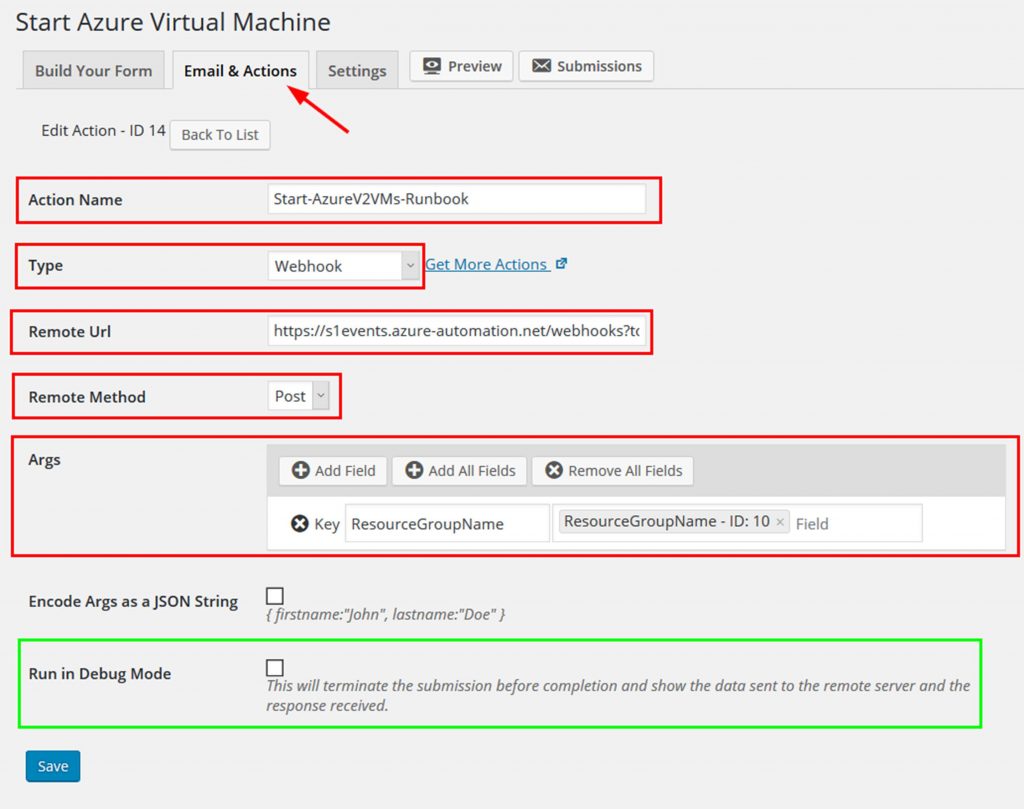
One of the cool things about this solution is we can test the webhook action before actually submitting it to make sure it will work as expected. This testing can be turned on by checking the Run in Debug Mode field. I have highlighted this in the screenshot in green. Checking this box and submitting the form will show debugging information like data sent and response.
Here is an example of what the result in Debug mode will look like:
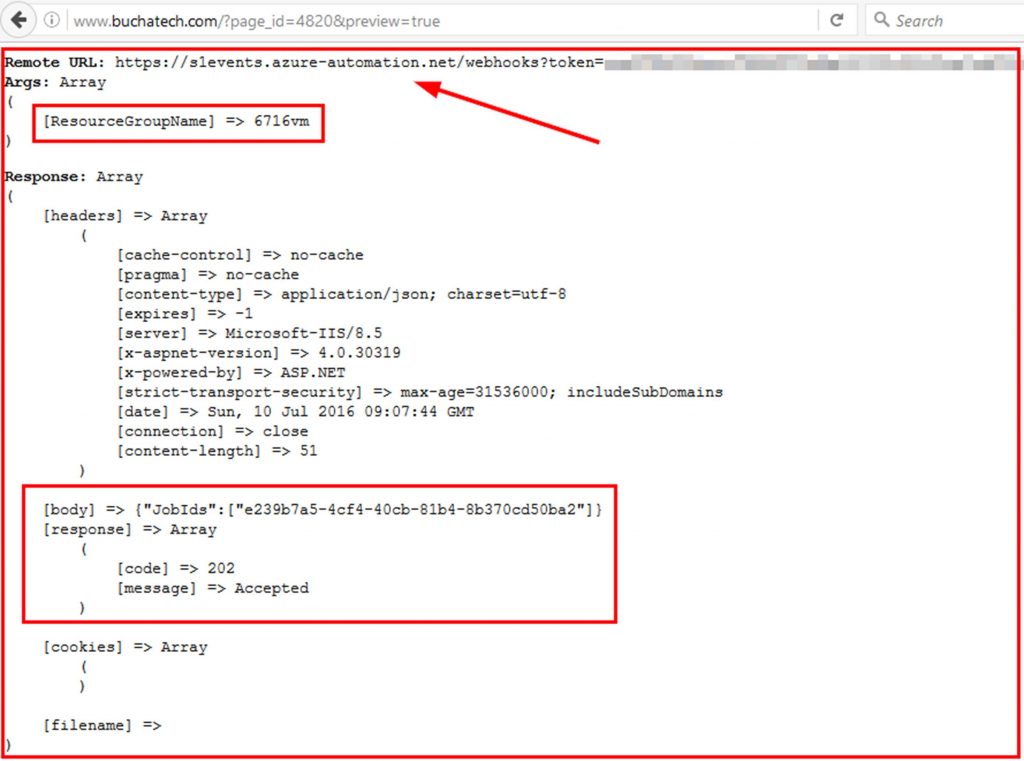
Make sure you uncheck the Run in Debug Mode field when you are ready to actually start your runbook/s.
Now let’s see what this looks like in Azure Automation when we submit the form.
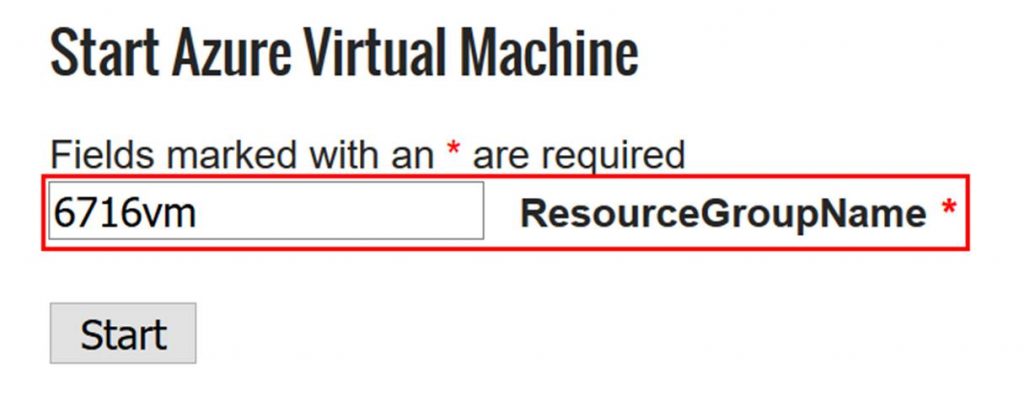
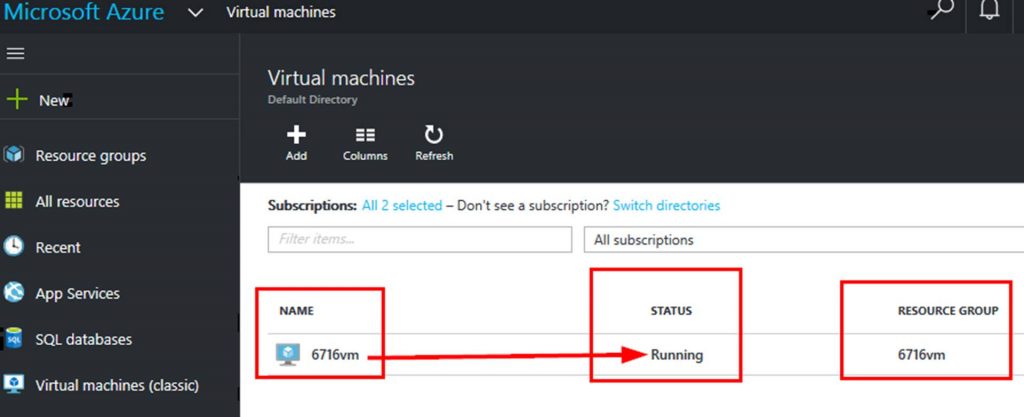
I have a resource group named 6716vm with one VM in it named 6716vm. So I will enter 6716vm on the form. 6716vm will be passed to the runbook as the resourcegroupname.
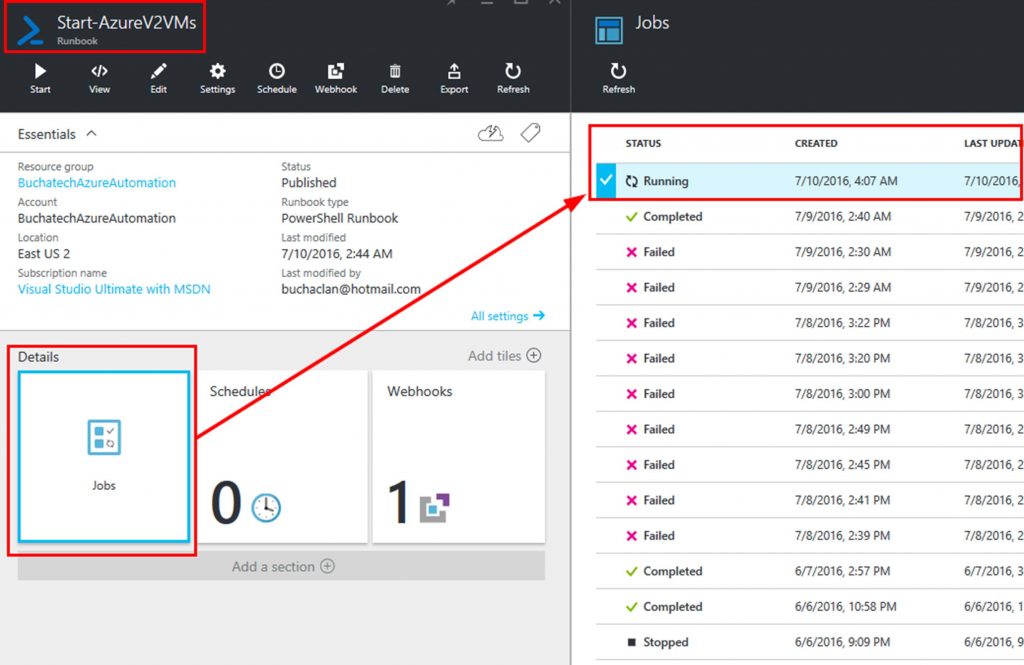
You can see the job running in Azure now.
Within the job if you click on Input you can see it has 2 inputs. One is Webhookdata. This is where the 6716vm is located. The other is the Azureconnectionassetname. Remember we hardcoded this into the webhook itself. We can also see in the following screenshot that the job completed.
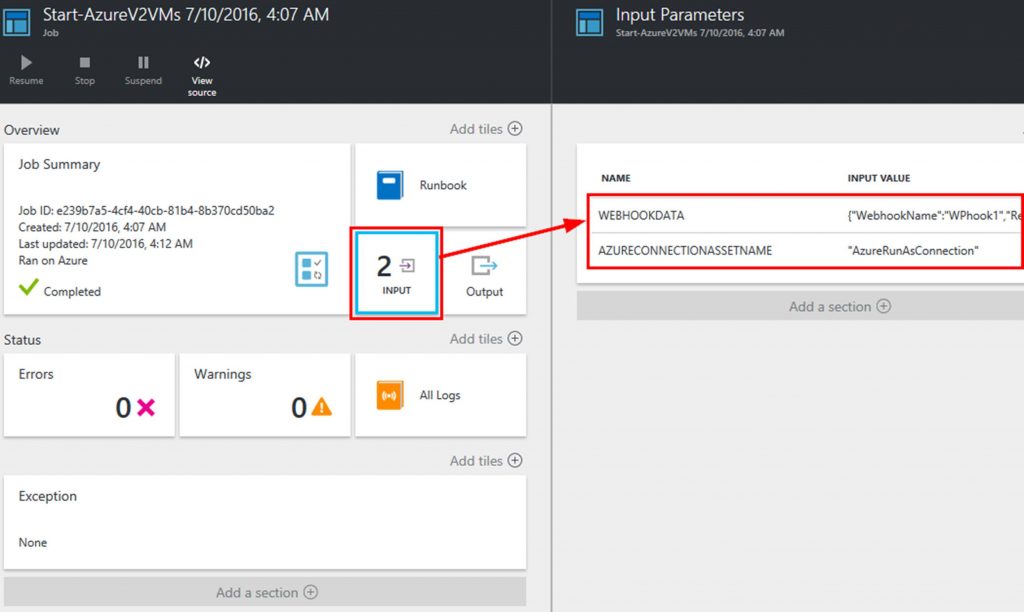
If we look further at the webhookdata we can see several interesting things. We can see exactly where it put the 6716vm parameter for the resourcegroupname and we can see that this request came from my blog at www.buchatech.com.
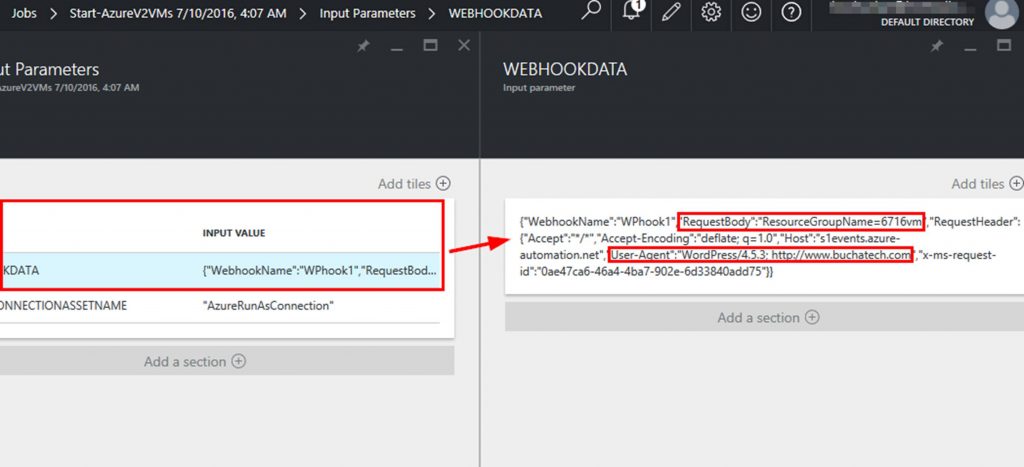
{“WebhookName”:”WPhook1″,”RequestBody”:”ResourceGroupName=6716vm”,”RequestHeader”:{“Accept”:”*/*”,”Accept-Encoding”:”deflate; q=1.0″,”Host”:”s1events.azure-automation.net”,”User-Agent”:”WordPress/4.5.3; https://www.buchatech.com”,”x-ms-request-id”:”0ae47ca6-46a4-4ba7-902e-6d33840add75“}}
Pretty cool right? Check out the VM now running:
Now to shut it down I can go back to my WordPress and use the Stop Azure VM form. The possibilities here are endless. I know some of you may be thinking this is great but what if I want to control who can login to see this form and will it work with Active Directory. The answer is YES. WordPress has several plugins that integrate with Active Directly and even have SSO. A couple of these are Active Directory/LDAP Login for Intranet sites and Active Directory Integration.
You can see that WordPress can make a great frontend for your Azure Automation runbooks. That is the end of the post. Happy automating!
Read more
