I needed a way for users to change their own password. I know this can be done on a domain computer or in OWA. However I needed a centralized location for the end users to do this and this solution needed to work in System Center Service Manager (SCSM) 2012’s Self-Service Portal. SCSM’s Self Service Portal runs on top of SharePoint 2010. So I went on the hunt for a password reset SharePoint web part.
There are a ton of these type of web parts out there but most of them are paid. I did find a free one. It is called ITaCS Change Password web part. (A Big thanks to the developers for making this and making it free!).
This web part enables users to change their local or Active Directory password from within a SharePoint Site Collection. Another cool feature of this web part is that it will show you how long you have before your password will expire. In this post I am going to show how to deploy this on a SharePoint 2010 farm and expose it through SCSM’s Self Service Portal.
Steps to Deploy the ITaCS Change Password Web Part
- Download the web part from:
http://changepassword.codeplex.com
- Extract Web Part from .zip file.
NOTE: This is only for SharePoint 2007. It will work on SharePoint 2010 but you have to install it manually from the SharePoint 2010 Management Shell not the install wizard or it will fail.
This is what you will see if you install from Wizard:

To install from SharePoint 2010 Management Shell
- Launch the SharePoint 2010 Management Shell using administrative privileges.

- We need to add the web part to the solution store in our farm. To do this run the following:
- Navigate to “(PathOFTHEWEBPART)\ITaCS Change Password 2.5\ITaCS Change Password 2.5\Resources\”
- Run Add-SPSolution it will need the Literal path with the name of the WSP. “(PathOFTHEWEBPART) ITaCS Change Password 2.5\ITaCS Change Password 2.5\Resources\ItacsChangePassword.wsp”
- When it finishes you will see this notice it is not Deployed yet:
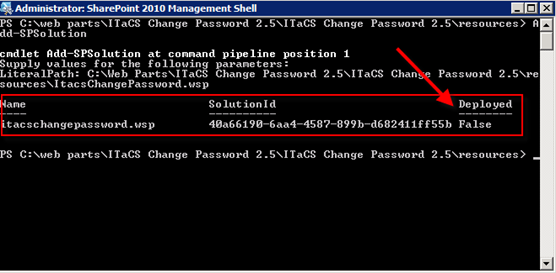
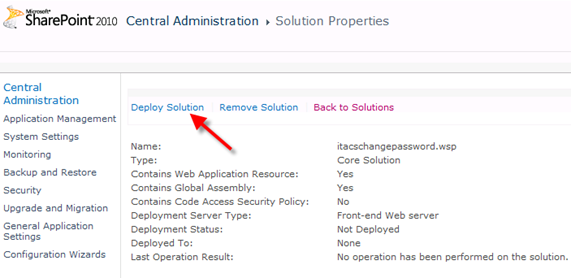
- Go to Central Admin>>System Settings >>Manage farm solutions. You will see the password change web part but it is not deployed.

- Click on it and you will go into the Solution Properties. Click on Deploy Solution.
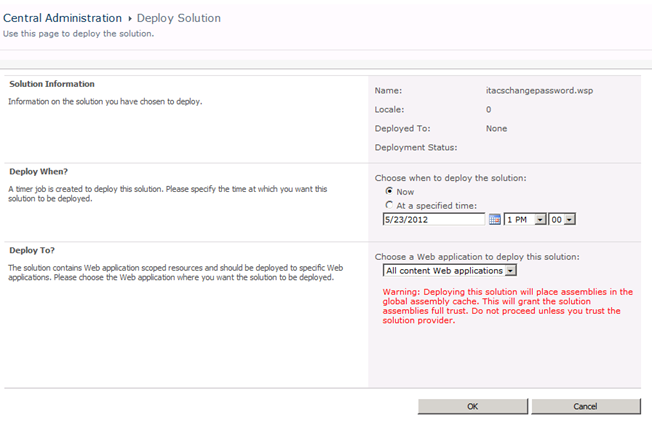
- Make you selections and click OK.
- You will go back to the screen. Notice now itacschangepassword.wsp is now deployed.
Adding the ITaCS Change Password Web Part to SCSM Self Service Portal
You add the web part in two ways either add the web part to the portal front page or add a link to the portal that directs to the page you create with the web part on it.
Adding the web part to SCSM’s Self Service Portal:
- You need to activate the web part on your SCSM’s Self Service Portal.
- Go to the SCSM’s Self Service Portal then go to Site Actions >> Site Settings >> Site Collection Administration>>Go to Top Level Site Settings >> Site Collection Features and click “Activate” for the ITaCS Change Password Web Part.
![]()
- Now go back to the home page on the SCSM’s Self Service Portal and add the web part.
- Edit the SCSM Self Service Portal page and click on Insert then click on the Web Part icon.
- Select ITaCS Change Password Web Part from the Categories list and click the Add button.
![clip_image002[4] clip_image002[4]](https://www.buchatech.com/wp-content/uploads/2012/05/clip_image00241.png)
Now you need to configure the web part using the tool pane before it can be used.
- Click tool pane.
![clip_image003[4] clip_image003[4]](https://www.buchatech.com/wp-content/uploads/2012/05/clip_image00341.png)
- Configure the highlighted fields in the tool pane in the following screenshots.
![clip_image004[4] clip_image004[4]](https://www.buchatech.com/wp-content/uploads/2012/05/clip_image00441.png)
![clip_image005[4] clip_image005[4]](https://www.buchatech.com/wp-content/uploads/2012/05/clip_image00541.png)
Some information about the fields in the web parts tool pane:
Scope
This is for either AD or the local computer.
FQDN
This is the domain name and is required for AD password resets.
Show Password Expiration
This web part is able to notify the user about the expiration of his current password if the web part is in Active Directory mode. The account can be any Active Directory user account and does not require administrative permissions.
More information can be found about these fields in the ITaCS Change Password Web Part manual. You get the manual when you download the web part.
Final result of the web part.
![clip_image006[4] clip_image006[4]](https://www.buchatech.com/wp-content/uploads/2012/05/clip_image0064.png)
Now if you don’t want the change password web part on the front page of SCSM’s Self Service Portal you can create a new page and then simply create a link to it. I am not going to cover how to add a page in SharePoint as I will assume you know how to do this if you are reading this post. Here is how you would add the link.
Adding Link to Web Part page
- Go to your SCSM Self Service Portal
- Site Actions >> Site Settings >>Quick Launch
- Click New Navigation Link
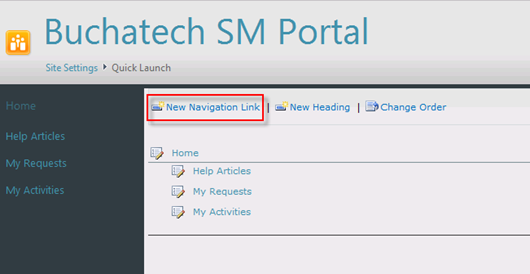
- Enter the URL and the description for the new link.

This is what it will look like.
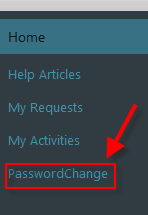
Now your end users can reset their password on the same portal they go to for support and service offerings. Remember you can follow the same process if you want to place this web part on other sites on your SharePoint farm as well.

