~ How to Configure System Center Essentials 2010 ~
We already covered How to install System Center Essentials 2010 (SCE2010) in part 1:
https://www.buchatech.com/2010/09/install-and-configure-system-center-essentials-2010-part-1.
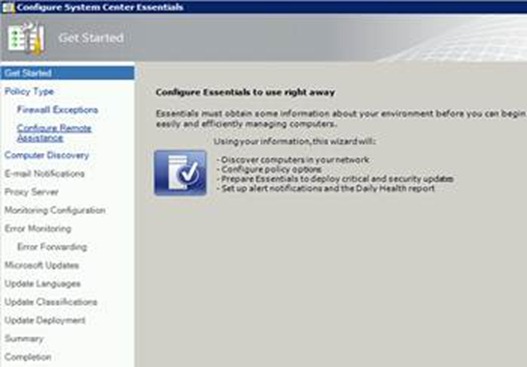
It has been a while as I had to find the time to draft this post. In part 2 we will cover basic configuration of SCE2010. As you already know SCE2010 is a combination of several System Center products so there are a fair amount of settings that need to be configured. When you first open up SCE2010 a wizard opens that you use to configure it. Here is the list of what is in the initial configuration:
- Group Policy Settings (Use Local or Domain Group Policy)
- Computer Discovery (A scheduled job that adds new computers to SCE2010.)
- Email Notifications (What email server and account is used to send out notifications.)
- Proxy Server
- Monitoring Configuration
- Error Monitoring and Forwarding
and
- Microsoft Updates (Update Languages, Update Classifications, and Update Deployment)
Here is a screenshot of the initial configuration wizard.

In this post we will basically go through the options in the wizard and some other basic settings you may want to configure.
Group Policy Settings
This gives you two options for Group Policy. You have domain or local. Domain is the recommended option as this will automatically make changes to computers that you add to SCE2010 such as directing computers to use SCE2010 for Windows updates. If you do not have a domain account that has privileges to create objects in the domain group policy then you will have to go with the local option. This will work just fine but changes are made to the local group policy of ever computer that is managed by SCE 2010 rather then pushed down through domain group policy.
When the SCE 2010 agent is installing on a computer a SCE_ConfigureAgentCertPolicy rule in the System Center Essentials Management Pack runs and configures the machines local group policy settings.)
Select “Yes” and put in your domain account credentials. Click test to make sure the account has enough privileges to create GPO objects.

Selecting the domain level group policy makes the following changes to your active directory:
- An Active Directory security group is created.
- The Essentials management server is added to the Active Directory security group.
- Two Group Policy objects (GPOs) are created.
- One GPO is targeted at all computers in the domain and contains both the Secure Sockets Layer (SSL) and Windows Server Update Services (WSUS) certificates and Windows Firewall exception settings.
- The other GPO is specifically targeted at Essentials-managed computers. This GPO is applied to the Active Directory security group created by Essentials 2010 and contains settings related to the Windows Update agent, Agentless Exception Monitoring (AEM), and Remote Assistance.
- A domain-level object, System Center Essentials Managed Computers (Active Directory security group), is created.
- A domain-level object, System Center Essentials Managed Computers Group Policy, is created and added to the Access Control List (ACL) of the System Center Essentials Managed Computers group.
- A domain-level object, System Center Essentials All Computers Policy, is created. This object’s Group Policy applies to computers in the domain.
Now you need to set whether SCE 2010’s policy will configure Firewall settings or not on computers so that SCE 2010 agent can be installed and communicate through them. It is recommended to choose yes and let SCE 2010 open up the ports. This will open ports TCP 135, TCP 445, UDP 137, and UDP 138 on the firewalls of your domain computers. Select Yes and click Next.

Next you can choose for the SCE2010 group policy to enable Remote Assistance on your domain computers or not. Select the option you want and click Next.

Computer Discovery
SCE 2010 can be configured to scan Active Directory for new computers and automatically install the agent on these computers for management. This is what the Computer Discovery is. You can say not to this and manually add all the computers you want to manage. If you chose to have SCE 2010 run Computer Discovery you can set it to scan the entire Active Directory or specific Organizational Units like in the screen shot. You can also set the time of day that this scan will run. Make your selection and click Next.

Email Notifications
Email Notifications is where you configured an email to send to an email to send from so that you can receive the Daily Health Report for your network. The Daily Health Report is an overall report about all the managed computers/devices in SCE2010. This is a pretty standard configuration. If you have Exchange in your environment be sure to allow relay from your SCE 2010 server and then chose the anonymous option. If you need authentication then you can chose the Windows integrated option. You cannot set this up to email using an external SMTP server. You can send ta test email to verify it is working. Click Next to continue.

Proxy Server
If Proxy settings are required to get out to the internet go ahead and configure them here. If Proxy settings are not required select No and click Synchronize. This will actually synchronize out to the Microsoft Updates website. It is basically checking to make sure you can get out to the internet.

NOTE: This is not configured the Update Services.
Monitoring Configuration
Monitoring Configuration is about the types of computers and services you will monitor in your environment. SCE 2010 knows what types of Microsoft workloads you are running in your environment and will recommend that you monitor these. Monitoring is done through Management Packs (we do not cover management packs in the blog post). As you can see in the screenshot SCE 2010 detected the workloads I am running such as DPM and Hyper-V and it is prepared to monitor the health of them. You to not monitor these and to have SCE 2010 not update more management packs in the future. It is recommended to let SCE 2010 use the detected management packs. Make your selections and click Next to continue.

Error Monitoring and Forwarding
Here you can chose to collect application errors or not to. If you chose to collect them you will need to place to store them. Set the path and then click Next.

On the next screen you can chose to also send error reports to Microsoft or not. Make your selection and click Next.
Microsoft Updates
This is the section where you configure the Update Services in SCE 2010.
On the first screen you can configure SCE 2010 to automatically download updates or you can configure SCE 2010 to manually download updates. You can also go through and configure what applications you want to download updates for depending on the Microsoft workloads you have in your environment. Make your selection and click Next.

Update Languages:
This screen is self-explanatory. You can choose what languages the updates should be. Make your selection and click Next to continue.

Update Classifications:
Defining classifications gives you more control of the level of updates you download. You may want to only download the critical updates while downloading service packs manually. Make your selections here and click Next to continue.

Update Deployment:
Here you can configure if and when updates are deployed to managed computers. You can also specify different settings for servers and client computers. Configure your settings and click Next.

Completing the Install
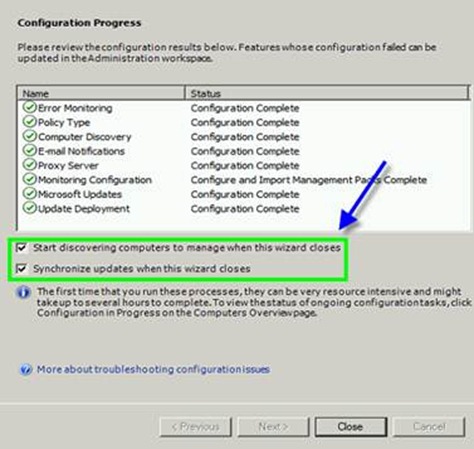
The SCE 2010 configuration wizard gives you a summary of all your selections. Review this and then click Configure. It will go through its process seen in the screenshot.

Once it completes SCE 2010 gives you the option to scan for computers to manage right away and the option to check for Windows updates right away. Make your selections to perform these actions or not for each option and click Close.

That is all for now in regards to the basic SCE 2010 setup. There are more settings that you could configure in SCE 2010 later that are beyond this post. What we covered in this post should be enough to get your System Center Essentials 2010 up and running.


1 thought on “Install and Configure System Center Essentials 2010 Part 2”